
Vegan Sushi
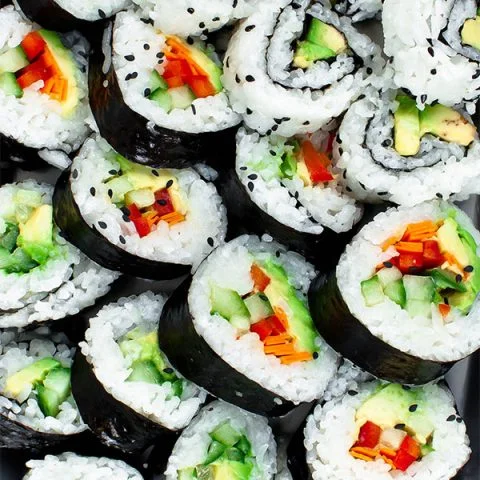
Vegan sushi rolls pair seasoned short-grain rice with strips of fresh or cooked vegetables, wrapped in nori. They’re a flexible choice for a light meal or a hands-on dinner where everyone can pick their own fillings.
Ingredients
- 300 g (2 rice cups)uncooked short-grain glutinous rice
- 120 ml (½ cup)rice vinegar
- 50 g (¼ cup)sugar
- 1 teaspoonsalt
- 1 tablespoongrapeseed oil (optional)
- As neededyour favourite vegetables, cut into thin strips (such as avocado, cucumber, carrot, bell pepper, baked sweet potato wedges and lettuce)
- As needednori sheets
- As neededroasted black sesame seeds
- To tastewasabi
- To tastesoy sauce
Instructions
- 1
Cook the rice
Cook the rice in a rice cooker according to its instructions.
- 2
Mix the seasoning
Put the remaining ingredients in a saucepan.
- 3
Dissolve the sugar
Warm the mixture over a medium-low heat, stirring until the sugar has dissolved.
- 4
Season the rice
When the rice has finished cooking, pour in the seasoning mixture. Gently fold it through with a rice paddle until the grains are separated and evenly coated.
- 5
Rest the rice
Cover the rice and leave it to sit for 15 minutes so it can absorb any excess liquid.
- 6
Set out the nori
Place a nori sheet shiny-side down on a bamboo mat.
- 7
Spread on rice
Spread an even layer of sushi rice over the nori, leaving the edges uncovered.
- 8
Add the vegetables
Arrange a few strips of your chosen vegetables in a row about 2.5 cm (1 inch) from the edge nearest you.
- 9
Roll the sushi
Bring the near edge of the nori over the filling. Squeeze gently as you roll to make a firm, tight roll.
- 10
Seal the nori
If needed, dampen the far edge of the nori so it sticks and holds the roll together.
- 11
Cut into pieces
Cut each sushi roll into 8 evenly sized pieces.
- 12
Finish and serve
Sprinkle with sesame seeds and serve with wasabi and soy sauce.
What is vegan sushi?
Sushi is a Japanese dish built around vinegared rice, often paired with seafood or vegetables and wrapped in nori. This plant-based version uses vegetables for its fillings and keeps the familiar combination of seasoned rice and seaweed.
The recipe works because the rice is seasoned while warm, then rested before rolling. That gives the grains time to take up the vinegar mixture and makes them easier to spread.
Nutrition and macros by portion
The nutrition label shows one serving as written: 340 calories, 6g protein, 75g carbs, 2g fat.
| Portion | Adjustment | kcal | Protein | Carbs | Fat |
|---|---|---|---|---|---|
| Lighter | More vegetables, less rice | 238 kcal | 4g | 53g | 1g |
| This serving | As written | 340 kcal | 6g | 75g | 2g |
| Hungry | Serve extra sushi rolls | 510 kcal | 9g | 113g | 3g |
Most of the carbohydrates come from the rice and the sugar in the seasoning; the rice also contributes some protein. The optional oil and avocado add fat, while the vegetables contribute varying amounts depending on your choices. Balance the plate with a generous selection of vegetables and use soy sauce sparingly if you want to limit added sodium.
Choose fillings that roll well
Fresh vegetables: Cut them into thin, even strips so they sit neatly in the centre and don’t make the roll bulky. Cucumber, carrot, pepper and avocado offer a mix of crisp and soft textures.
Cooked vegetables: Baked sweet potato wedges make a softer, sweeter filling. Let cooked ingredients cool before adding them so they don’t warm or soften the nori.
Season the rice gently
Rice seasoning: Heat the vinegar, sugar, salt and optional oil just until the sugar dissolves; it does not need to boil. The oil is included to help the rice grains separate.
Rice paddle: Fold the seasoning through with a gentle lifting motion rather than mashing the rice. The grains should remain intact and evenly coated.
Spread an even layer
Rice layer: Cover the nori evenly while keeping its edges clear, as directed. A consistent layer helps the roll hold together without putting too much rice around the filling.
Filling line: Keep the vegetables in a narrow row near the edge closest to you. Overfilling makes it harder to roll tightly and can push ingredients out at the ends.
Roll and seal firmly
Tight roll: Use the bamboo mat to guide the nori over the filling, squeezing gently as you move forward. Aim for a snug roll without crushing the vegetables.
Seam: If the final edge won’t stick, dampen it lightly with water. Avoid soaking the nori, which can make it fragile.
Cut clean pieces
Sharp knife: A sharp blade helps cut through the nori without compressing the roll. Wipe the blade between cuts if rice begins to cling.
Serving: The recipe cuts each roll into 8 pieces and serves them with wasabi and soy sauce. Add the condiments at the table so everyone can adjust them to taste.
Plan the timing
Rice cooker: The rice cooks according to the cooker’s instructions, so its cooking time may vary. The stated 20 minutes is the recipe’s total time, but allow for your cooker’s cycle and the specified 15-minute covered rest if needed.
Assembly: Prepare and arrange the vegetables while the rice cooks, then roll once the rice has rested. This keeps the final assembly straightforward.
Recipe notes & tips
- Prepare the vegetables in thin, even strips before you start rolling.
- Let the rice rest covered for the full 15 minutes so it can absorb extra seasoning.
- Keep a small bowl of water nearby for dampening the nori edge if needed.
- Use the bamboo mat to guide the roll and apply steady, gentle pressure.
- Cut with a sharp knife and wipe it between slices if rice sticks.
- Serve the wasabi and soy sauce on the side so they can be added to taste.
Variations
- Avocado and cucumber: Pair creamy avocado with crisp cucumber for a fresh, soft-and-crunchy filling.
- Sweet potato: Use cooled baked sweet potato wedges for a tender, sweet centre.
- Colourful vegetables: Combine carrot and bell pepper strips for a crisp, varied filling.
- Lettuce wrap: Add lettuce with other vegetables for extra leafy crunch.
- Sesame finish: Sprinkle roasted black sesame seeds over the cut pieces just before serving.
Common mistakes to avoid
- Overfilling the nori: Too many vegetables make the roll difficult to close; use just a few strips in a narrow row.
- Mashing the rice: Pressing hard breaks the grains; fold in the seasoning gently with a rice paddle.
- Skipping the rice rest: Cutting the rest short can leave excess liquid; keep the rice covered for 15 minutes.
- Loose rolling: A slack roll can fall apart when sliced; squeeze gently as you roll to tighten it.
- Soaking the nori: Too much water weakens the sheet; dampen only the far edge if it needs help sealing.
- Using a blunt knife: A dull blade can flatten the roll; use a sharp knife and wipe it as needed.
How to store
Store leftover sushi in an airtight container in the fridge and eat within 1 day; the rice and vegetables are best soon after making. Serve it chilled or let it stand briefly at room temperature, as reheating can make the nori soft and the vegetables limp.
Frequently asked questions
Can I make the rice without a rice cooker?
The method specifies a rice cooker, so follow the cooking instructions for your cooker. If using a saucepan, cook the rice according to the packet directions for your particular rice.
Do I have to use the grapeseed oil?
No, it is optional. The recipe includes it to help the rice grains separate.
Which vegetables work best?
Use thin strips of vegetables that are easy to arrange in a narrow line, such as cucumber, carrot, bell pepper or avocado. Baked sweet potato and lettuce are also suggested options.
Why is my sushi roll coming apart?
It may need a firmer roll or a better-sealed edge. Squeeze gently as you roll, then dampen the far edge of the nori lightly if it does not stick.
How many pieces does each roll make?
Cut each roll into 8 evenly sized pieces, as directed in the recipe.
Can I make sushi ahead?
You can prepare the vegetables in advance, but assembled sushi is best eaten soon after rolling. Refrigerate leftovers in an airtight container and use within 1 day.
Cook it from the original
This recipe comes from keytomylime.com. Their page has the author’s own photos, notes and tips — the best place to cook it from.
Open the recipe on keytomylime.com