
Maple Glazed Pumpkin Wedges
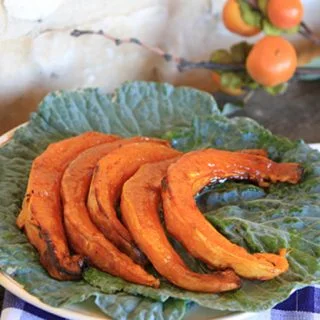
Pumpkin wedges are roasted until tender and lightly browned, then glazed with pure maple syrup. This simple side dish brings out the squash’s sweetness and works well served warm or at room temperature.
Ingredients
- 1 pumpkin or winter squashCooking pumpkin or winter squash of choice, peeled, seeds removed and cut into wedges
- 30 ml (2 tablespoons)Olive oil
- 80 ml (⅓ cup)Pure maple syrup
Instructions
- 1
Preheat the oven
Heat the oven to 190°C (375°F).
- 2
Oil the wedges
Toss the squash wedges with the olive oil, then arrange them side by side on a foil-lined baking sheet.
- 3
Brush with maple
Brush the tops with a little maple syrup. Bake for about 20–25 minutes, depending on the squash variety, until fork-tender and beginning to brown.
- 4
Serve the wedges
Serve warm or at room temperature.
What are maple-glazed pumpkin wedges?
They are pieces of pumpkin or winter squash roasted with olive oil and finished with maple syrup. Roasting encourages the squash’s natural sugars to brown and develop a deeper sweetness.
Pumpkin and squash are used in many Italian home-cooking traditions, though this straightforward maple glaze is a simple modern pairing rather than a claim to a particular regional classic. The short ingredient list lets the roasted squash remain the focus.
Nutrition and macros by portion
The nutrition label shows one serving as written: 160 calories, 1g protein, 25g carbs, 7g fat.
| Portion | Adjustment | kcal | Protein | Carbs | Fat |
|---|---|---|---|---|---|
| Lighter | Use less olive oil | 112 kcal | 1g | 18g | 5g |
| This serving | As written | 160 kcal | 1g | 25g | 7g |
| Hungry | Serve a larger portion | 240 kcal | 2g | 38g | 11g |
The squash supplies most of the carbohydrates, while olive oil and maple syrup contribute much of the fat and additional carbohydrate respectively. Protein is low, so balance the plate with a protein-rich main and a green vegetable or salad.
Choosing the squash
Cooking squash: choose a firm pumpkin or winter squash that holds its shape when cut into wedges. Different varieties can take different amounts of time to become tender, so use the fork test rather than relying only on the clock.
Even wedges: cut the pieces to a similar thickness so they cook at roughly the same rate. Remove the seeds and peel the squash before roasting, as directed.
Getting the roasting right
Oil first: toss the wedges so they are lightly coated, then lay them side by side on the lined baking sheet. Keeping them in a single layer gives the exposed surfaces a chance to brown.
Maple glaze: brush a little syrup over the tops before baking. The syrup can darken as it cooks, so check the wedges as they approach the end of the 20–25 minute cooking time.
How to tell when they are done
Tenderness: a fork should pass into the thickest part of a wedge without much resistance. If it still feels firm, continue baking and check again shortly.
Colour: look for some browning at the edges or on the exposed surfaces. The exact timing depends on the squash variety and the thickness of the wedges.
When and how to serve
Serving temperature: the wedges can be served straight from the oven or allowed to cool to room temperature. Both options suit the sweet, roasted flavour.
Pairings: serve them alongside a savoury main and a green vegetable or salad. Their sweetness also makes them a useful contrast with salty or herby dishes.
Making the most of the glaze
Brush lightly: use a little syrup on the tops rather than pouring it over the tray. This follows the method and helps keep the wedges’ surfaces visible for browning.
Watch the finish: maple syrup can brown quickly near the end of roasting. Check the tray as the squash becomes tender and take it out once the wedges are beginning to brown.
Recipe notes & tips
- Choose a firm cooking pumpkin or winter squash rather than a watery carving pumpkin.
- Cut wedges to a similar thickness to help them finish cooking together.
- Arrange the wedges side by side without overlapping them.
- Check tenderness with a fork, as cooking time varies with the squash variety.
- Keep an eye on the syrup as the wedges approach the end of their baking time.
Variations
- Add herbs: scatter a little chopped rosemary or sage over the wedges before serving.
- Use another squash: swap the pumpkin for a firm winter squash and check it for tenderness as it bakes.
- Add black pepper: season the finished wedges with freshly ground pepper for a savoury edge.
- Finish with seeds: sprinkle toasted pumpkin seeds over the wedges just before serving.
- Make it tangier: serve with a small squeeze of lemon to balance the glaze.
Common mistakes to avoid
- Crowding the tray: overlapping wedges can brown less evenly; arrange them side by side.
- Uneven cutting: wedges of very different thicknesses finish at different times; cut them as evenly as practical.
- Relying only on the timer: squash varieties cook at different speeds; check the thickest wedge with a fork.
- Adding too much syrup: a heavy coating can darken quickly; brush on just a little before baking.
- Waiting for deep browning: the glaze may darken before the squash is ready; judge doneness by tenderness as well as colour.
How to store
Cool leftovers and refrigerate them in a covered container for up to 3 days. Reheat in the oven until warmed through, or serve at room temperature.
Frequently asked questions
Can I use a different type of squash?
Yes. The recipe allows for a cooking pumpkin or winter squash of choice; the time may vary by variety, so check for fork tenderness.
Do I need to peel the pumpkin?
Yes, the recipe calls for the pumpkin or squash to be peeled and its seeds removed before cutting it into wedges.
How long should the wedges bake?
Bake them for about 20–25 minutes at 190°C (375°F). The exact time depends on the squash variety and wedge thickness.
How can I tell if the wedges are ready?
They should be fork-tender and beginning to brown. Check the thickest piece, and bake a little longer if it is still firm.
Can I serve these at room temperature?
Yes. The recipe says to serve the wedges warm or at room temperature.
Cook it from the original
This recipe comes from italianfoodforever.com. Their page has the author’s own photos, notes and tips — the best place to cook it from.
Open the recipe on italianfoodforever.com