
Spicy Tuna Crispy Rice Bites (Nobu Copycat)
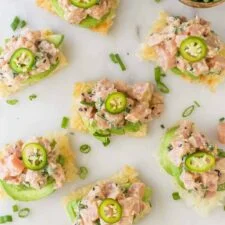
These spicy tuna crispy rice bites pair golden, pan-fried sushi rice with a creamy, chilli-spiked ahi tuna topping. They make an impressive party appetiser, with cool avocado and a fresh garnish balancing the crisp rice.
Ingredients
- 190 g (1 cup)sushi rice
- 355 ml (1½ cups)water
- 15 ml (1 tablespoon)rice wine vinegar
- 1 teaspoonsugar
- 90 ml (¼ cup + 2 tablespoons)vegetable oil, such as rapeseed or avocado oil
- to tastesalt
- 283 g (10 oz)raw sushi-grade ahi tuna, finely diced
- 2 tablespoonsKewpie Japanese mayonnaise
- 1 tablespoonsriracha
- 1 teaspoongarlic
- ½ teaspoonminced ginger
- 1 teaspoontamari
- 1 teaspoonsesame oil
- 1 teaspoonrice wine vinegar
- 1 teaspoonwhite sesame seeds
- ½ teaspoonblack sesame seeds
- 30 g (¼ cup)green onion, green parts diced
- 1avocado, thinly sliced
- 1 (optional)serrano pepper, thinly sliced
Instructions
- 1
Mix the seasoning
Stir the rice wine vinegar and sugar together in a small bowl, then set aside.
- 2
Cook the rice
Put the sushi rice and water in a small saucepan and bring to the boil over medium-high heat, until bubbles appear in the centre. Cover, lower the heat and cook for 12–13 minutes, or until the water has evaporated.
- 3
Season the rice
Pour the vinegar and sugar mixture over the cooked rice, then stir and fluff it with a spatula.
- 4
Press and chill
Line the base of a 20 × 20 cm (8 × 8 inch) tin, or two loaf tins, with baking parchment. Spread the rice evenly in the tin, cover it with another sheet of parchment and press it down firmly. For best results, place a second 20 × 20 cm (8 × 8 inch) tin on top to help compact the rice. Refrigerate overnight, or freeze for 1 hour and then refrigerate for 1 hour.
- 5
Cut the rice
Turn the chilled rice out onto a chopping board and cut it into rectangles; the recipe makes 15.
- 6
Fry until crisp
Heat a large non-stick frying pan over medium-high heat and add 60 ml (¼ cup) of the oil. Once hot, gently add the rice rectangles; the oil should sizzle. Fry for 4 minutes on one side, then turn and fry for 3–4 minutes on the other. Transfer to a plate lined with kitchen paper, season with salt and repeat with the remaining rice, adding the rest of the oil if needed.
- 7
Dice the tuna
Using a very sharp knife, cut the tuna into small 6 mm (¼ inch) cubes.
- 8
Mix the topping
Put the tuna in a medium bowl with the Kewpie mayonnaise, sriracha, garlic, ginger, tamari, sesame oil, rice wine vinegar, white and black sesame seeds and green onion.
- 9
Coat the tuna
Stir with a spoon until the tuna is evenly coated. Garnish with extra sesame seeds or green onion, if desired, and serve immediately.
- 10
Assemble the bites
Top each crispy rice rectangle with a few slices of avocado and some spicy tuna. Finish each with a slice of serrano pepper, if using, and serve immediately.
What are spicy tuna crispy rice bites?
Crispy rice bites are a restaurant-style appetiser made by frying chilled sushi rice until its outside is golden and crunchy. This version takes inspiration from the well-known Japanese-restaurant pairing of spicy tuna and crisp rice, with avocado and sesame adding extra richness and flavour.
Rice vinegar seasons the rice, while chilling firms it enough to cut and fry. The contrast between the crisp base and cool, tender tuna is what makes each bite work.
Nutrition and macros by portion
The nutrition label shows one serving as written: 147 calories, 5g protein, 10g carbs, 8g fat.
| Portion | Adjustment | kcal | Protein | Carbs | Fat |
|---|---|---|---|---|---|
| Lighter | Use less frying oil | 103 kcal | 4g | 7g | 6g |
| This serving | As written | 147 kcal | 5g | 10g | 8g |
| Hungry | Serve a larger portion | 221 kcal | 8g | 15g | 12g |
Most of the carbohydrates come from the sushi rice, while the frying oil, mayonnaise and avocado contribute much of the fat. Tuna supplies most of the protein. For a more balanced plate, serve a few bites with a generous portion of fresh vegetables or salad.
Getting the rice ready
Rice choice: Sushi rice is short-grained and sticky, so it holds together when pressed and cut. Rinse it before cooking if that is your usual rice-preparation routine, but the method here simply adds it to the pan with water.
Pressing: Spread the rice evenly and compact it firmly between sheets of baking parchment. Chilling it thoroughly helps the rectangles keep their shape when you move them to the pan.
Frying the rice
Hot oil: Wait until the oil is hot before adding the rice; a sizzle helps signal that the pan is ready. Lower each piece in gently to reduce splashing.
Batch size: Leave room around the rectangles so they can brown rather than crowding the pan. Fry each side for the stated time, then lift the pieces onto kitchen paper to drain.
Choosing and handling the tuna
Tuna: Use tuna sold as suitable for raw consumption, and keep it chilled until you are ready to prepare the topping. A very sharp knife makes it easier to cut neat, small cubes.
Mixing: Stir the tuna with the mayonnaise, sriracha, seasonings and green onion just until coated. The recipe serves the topping immediately, so prepare it close to assembly time.
Texture and doneness cues
Rice: The outside should be crisp and golden after frying, while the compact centre remains tender. If a piece is still soft on the surface, give it a little more time in the pan.
Tuna: Small, evenly sized cubes are easy to coat and sit neatly on the rice. Add the avocado and tuna just before serving to preserve the contrast of textures.
Serving the bites
Finish: Add a few avocado slices and a spoonful of tuna to each rice rectangle, then top with serrano if using. Extra sesame seeds or green onion can be used as a final garnish.
Pairing: Serve these as a starter or party snack, alongside a simple salad or other light appetisers. Assemble them at the last minute so the rice stays crisp.
Recipe notes & tips
- Chill the pressed rice for the full recommended time so it is easier to cut and handle.
- Keep the rice pieces in a single layer in the pan and fry in batches if needed.
- Use a sharp knife to dice the tuna evenly.
- Drain the fried rice on kitchen paper before adding the toppings.
- Prepare the tuna topping and assemble the bites just before serving.
Variations
- Adjust the heat: Use less sriracha for a milder tuna topping.
- Skip the chilli: Leave out the serrano pepper for a gentler finish.
- Add citrus: Serve with a little lime alongside for a fresh, tangy note.
- Change the garnish: Finish with extra green onion or sesame seeds.
- Make smaller bites: Cut the chilled rice into smaller rectangles and adjust the topping to suit.
Common mistakes to avoid
- Rice not compacted: Press it firmly between parchment sheets so the rectangles hold together.
- Rice not chilled enough: Give it the full chilling time before cutting and frying.
- Oil not hot: Wait for the oil to heat before adding rice, so the pieces begin crisping straight away.
- Pan overcrowded: Fry in batches to give each rectangle room to brown.
- Topping added too early: Assemble just before serving to keep the rice crisp.
How to store
For the best texture, serve the bites straight after assembly. Keep any leftover cooked rice and tuna topping covered and refrigerated separately, and use the raw tuna promptly; do not leave assembled bites at room temperature. Reheat plain rice pieces in a frying pan until hot and crisp, then add freshly prepared toppings.
Frequently asked questions
Can I make the rice ahead?
Yes. Press and chill the rice overnight, then cut and fry it when you are ready to serve.
Can I freeze the rice to chill it faster?
Yes. The method gives the option of freezing it for 1 hour, followed by 1 hour in the refrigerator.
How do I know when the rice is crisp?
The outside should be golden and crunchy after frying for 4 minutes on the first side and 3–4 minutes on the second. Let it drain on kitchen paper before topping.
Can I prepare the bites completely in advance?
It is better to keep the chilled rice and tuna topping separate, then fry and assemble close to serving. The assembled bites are best served immediately.
Is the serrano pepper essential?
No, it is optional. Leave it off or serve it separately if you would like people to choose their own level of heat.
Cook it from the original
This recipe comes from joyfulhealthyeats.com. Their page has the author’s own photos, notes and tips — the best place to cook it from.
Open the recipe on joyfulhealthyeats.com