
Hand Roll Sushi (Temaki Sushi)
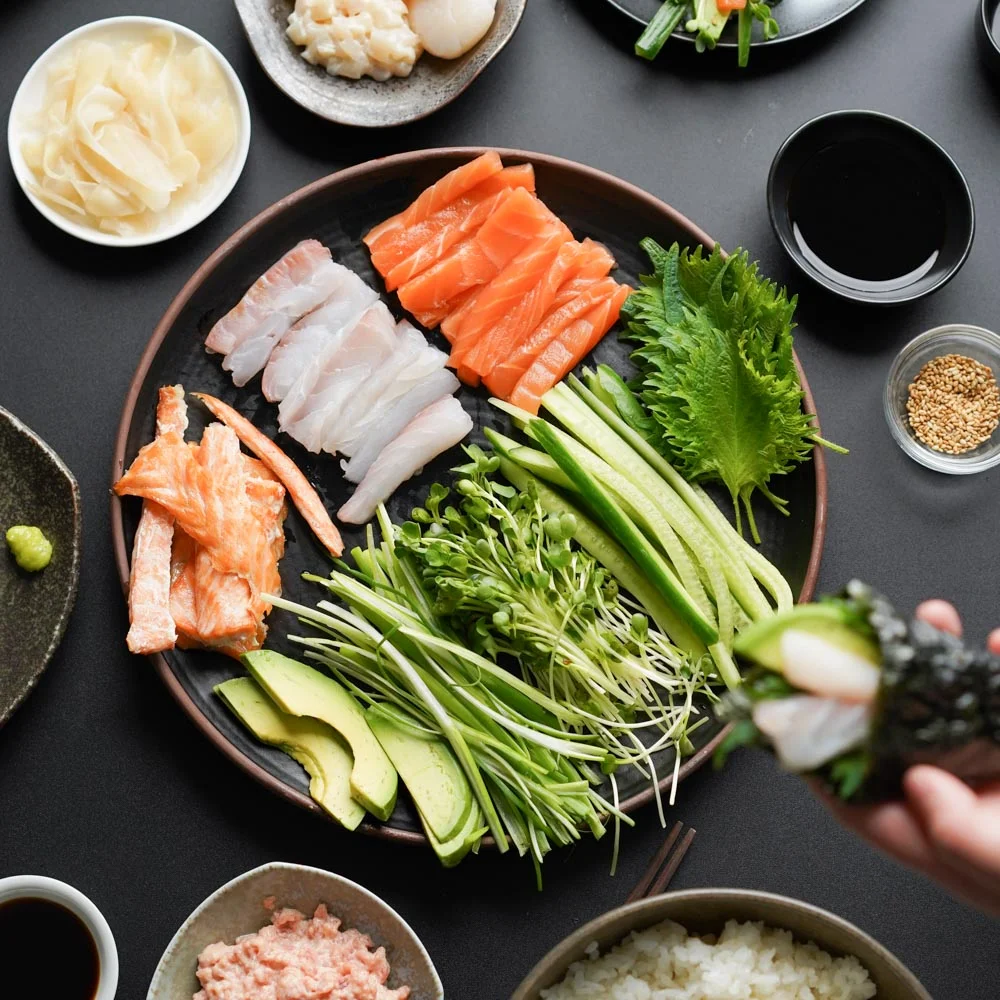
Temaki sushi is a hand-rolled cone of seasoned sushi rice, sushi-grade seafood and fresh vegetables wrapped in crisp nori. It makes a lively DIY dinner: prepare the fillings, then let everyone build and roll their own just before eating.
Ingredients
- 370 g (2 cups)sushi rice, cooked and seasoned
- 1 packnori sheets (gold or silver grade preferred)
- 57 g (2 oz)sushi-grade salmon, cut into strips
- 57 g (2 oz)sushi-grade yellowtail, cut into strips
- 43 g (1.5 oz)sushi-grade tuna, minced
- 3.75 ml (¼ tbsp)sriracha
- 15 ml (1 tbsp)Kewpie Japanese mayonnaise
- 57 g (2 oz)sushi-grade scallops
- to tasteroe
- to tasteradish sprouts
- to tastePersian or Japanese cucumbers
- to tasteshiso leaves
- to tasteavocado, sliced
- to tastetoasted sesame seeds
- to tasteKewpie Japanese mayonnaise
- to tastesriracha
- to tastesoy sauce
- to tastewasabi
- to tastegari (pickled ginger)
Instructions
- 1
Prepare the rice
Prepare the sushi rice and have it cooked and seasoned before assembling the rolls.
- 2
Prepare the seafood
Cut the salmon and yellowtail into strips. Mix the minced tuna with the measured sriracha and Kewpie. Halve the scallops or cut them into bite-sized pieces; if you like, mix them with Kewpie and sriracha for a spicy scallop filling.
- 3
Cut the vegetables
Wash the vegetables and cut them into thin strips.
- 4
Halve the nori
Cut one nori sheet in half horizontally.
- 5
Add the rice
Put some sushi rice on the left-hand side of the nori.
- 6
Arrange the vegetables
Add some vegetables in a diagonal line, running from the top-left corner towards the bottom-centre corner.
- 7
Add the seafood
Lay the fish over the vegetables or other fillings.
- 8
Fold the corner
Bring the bottom-left corner of the nori over the fish.
- 9
Roll and seal
Fold the right side of the nori over the left, then keep rolling it around to the front. Use a grain of rice to seal the open fold.
- 10
Serve straight away
Serve each roll as soon as it is made, before preparing more, so the nori stays crisp.
What is temaki sushi?
Temaki means hand-rolled sushi: a piece of nori is filled with seasoned rice and toppings, then rolled into a cone. It is a Japanese style of sushi designed to be picked up and eaten by hand.
This version combines salmon, yellowtail, tuna and scallops with crisp vegetables and optional spicy fillings. Making the rolls one at a time helps preserve the nori’s crunch.
Nutrition and macros by portion
The nutrition label shows one serving as written: 434 calories, 18g protein, 78g carbs, 5g fat.
| Portion | Adjustment | kcal | Protein | Carbs | Fat |
|---|---|---|---|---|---|
| Lighter | Use less rice and mayonnaise | 304 kcal | 12g | 54g | 3g |
| This serving | As written | 434 kcal | 18g | 78g | 5g |
| Hungry | Add another hand roll | 651 kcal | 26g | 116g | 7g |
Most of the carbohydrates come from the seasoned sushi rice, while the seafood contributes much of the protein. The mayonnaise and avocado provide most of the fat, depending on how much is used. Add a vegetable side and choose your sauces at the table to balance the plate to your preference.
Choose and prepare the fillings
Seafood: use sushi-grade fish and scallops, and keep them chilled until you are ready to assemble. Cut the salmon and yellowtail into strips, and mince the tuna for its spicy mixture.
Vegetables: thin strips are easier to arrange in the diagonal line and fold into the cone. The recipe also offers roe, sprouts, shiso, avocado and sesame as additional toppings.
Keep the nori crisp
Nori softens when it sits against moist rice and fillings, so assemble each temaki shortly before serving. Set out the ingredients first and roll only what will be eaten straight away.
Cut the sheet horizontally as directed, and keep the uncut sheets dry until needed. Gold or silver grade nori is preferred in this recipe.
Build a roll that holds together
Rice: place it on the left-hand side of the half-sheet, leaving room to fold the nori around the fillings. A thin, even layer makes the roll easier to close.
Filling: arrange the vegetables diagonally from the top-left towards the bottom-centre, then lay the seafood on top. Fold the bottom-left corner over the filling and bring the right side around to form the cone.
Seal: press a grain of rice onto the open fold as a simple seal. Handle the nori gently so it does not tear.
Serve as you roll
The method is quick once the rice, seafood and vegetables are prepared, but the 50-minute total time allows for the preparation as well as assembly. Have serving dishes and condiments ready before cutting the nori.
Serve the temaki immediately, with soy sauce, wasabi and gari available at the table. Kewpie, sriracha and toasted sesame seeds can also be offered for finishing.
Make it a DIY meal
Temaki works well as a build-your-own meal because guests can choose from the prepared seafood, vegetables and condiments. Keep each filling in its own dish so different combinations are easy to make.
For a balanced plate, add a simple vegetable side and serve the rolls alongside it. Keep the nori separate until each person is ready to roll.
Recipe notes & tips
- Prepare the rice and fillings before cutting the nori so assembly can happen quickly.
- Keep the fish and scallops chilled until you are ready to use them.
- Cut the vegetables into thin, similar-sized strips for easier rolling.
- Start with a modest amount of rice and filling so the nori can wrap around them.
- Use a grain of rice to seal the fold without adding another ingredient.
- Roll each temaki just before eating to enjoy the nori while it is crisp.
Variations
- Spicy scallops: mix the bite-sized scallops with Kewpie and sriracha as suggested in the method.
- Extra heat: offer more sriracha at the table for anyone who wants a spicier roll.
- More avocado: add sliced avocado alongside the seafood for a softer, creamy filling.
- Roe topping: add roe to the filling for a briny accent.
- Vegetable-led: use more cucumber, sprouts and shiso with a smaller amount of seafood.
Common mistakes to avoid
- Overfilling the nori: too much filling makes the cone hard to close; use a smaller amount and add more in the next roll.
- Thick vegetable pieces: bulky strips interrupt the fold; cut the vegetables thinly.
- Soft nori: rolls made too far ahead lose their crispness; assemble them just before serving.
- Loose filling: arrange the ingredients along the diagonal before folding so they stay inside the cone.
- Skipping the seal: the fold may open as you handle the roll; press a grain of rice onto it.
How to store
Temaki is best eaten immediately, as the nori quickly softens after it touches the rice and fillings. Keep any unused seafood chilled and follow its packaging guidance; do not leave assembled rolls at room temperature. Avoid storing assembled rolls for later.
Frequently asked questions
Can I prepare the fillings ahead?
You can wash and cut the vegetables ahead, and prepare the rice before assembly. Keep the seafood chilled and cut or mix it close to serving time.
Why is the nori no longer crisp?
Nori absorbs moisture from the rice and fillings. Make each roll just before eating and serve it straight away.
Do I have to use every seafood filling?
No. Choose from the listed fillings and arrange the ones you want in each roll. Keep the nori and folding method the same.
How do I make the spicy tuna?
Mix the minced tuna with the measured sriracha and Kewpie Japanese mayonnaise.
How can I make spicy scallops?
Cut the scallops into bite-sized pieces and mix them with Kewpie and sriracha to taste, as an optional filling.
What should I serve with temaki?
Put soy sauce, wasabi and gari on the table, along with any extra mayonnaise or sriracha. A simple vegetable side can round out the meal.
Cook it from the original
This recipe comes from hungryhuy.com. Their page has the author’s own photos, notes and tips — the best place to cook it from.
Open the recipe on hungryhuy.com