
Fruit and Yogurt Pops
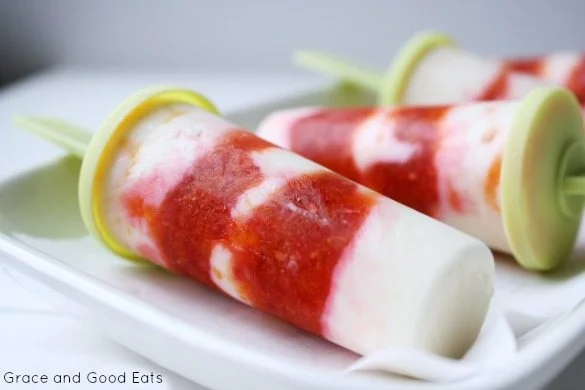
These fruit and yoghurt pops combine creamy vanilla Greek yoghurt with puréed fruit for a refreshing frozen treat. They take only a few minutes to assemble, then need at least three hours in the freezer to set.
Ingredients
- 300 g (1 1/4 cups)vanilla Greek yoghurt
- 10 ml (2 tsp)honey
- 150 g (1 cup)whole fruit
Instructions
- 1
Purée the fruit
Purée the fruit in a food processor.
- 2
Sweeten the yoghurt
Mix the honey into the yoghurt.
- 3
Layer the mixture
Alternate layers of fruit and yoghurt in a popsicle or ice cream pop mould.
- 4
Freeze the pops
Place the mould in the freezer for at least 3 hours.
- 5
Release the pops
Run the mould under warm water to make the pops easier to remove.
What are fruit and yoghurt pops?
These are frozen treats made by layering fruit and sweetened yoghurt in individual moulds. They draw on the familiar American tradition of fruit ice pops, with yoghurt adding a creamy contrast to the fruit.
This version keeps the ingredient list short and uses Greek yoghurt for a thick, smooth layer. Alternating it with puréed fruit gives each pop a simple striped look and a mix of flavours.
Nutrition and macros by portion
The nutrition label shows one serving as written: 52 calories, 3g protein, 9g carbs, 0g fat.
| Portion | Adjustment | kcal | Protein | Carbs | Fat |
|---|---|---|---|---|---|
| Lighter | Use less honey | 36 kcal | 2g | 6g | 0g |
| This serving | As written | 52 kcal | 3g | 9g | 0g |
| Hungry | Serve two pops | 78 kcal | 5g | 14g | 0g |
The fruit contributes most of the carbohydrates, while the Greek yoghurt provides most of the protein and some of the fat. Pair a pop with a handful of nuts or another protein-rich snack if you want a more filling plate.
Choosing the fruit
Ripe fruit: use fruit that is flavourful and soft enough to purée smoothly. The recipe leaves the choice open, so you can use a favourite or combine several types.
Getting smooth layers
Fruit purée: blend it until there are no large pieces, so it is easier to spoon into the moulds. If you prefer some texture, leave a few small pieces rather than blending completely smooth.
Yoghurt mixture: stir the honey through the yoghurt before assembling. This distributes the sweetness evenly without adding another step at the mould.
Layering in the mould
Alternating layers: spoon fruit and yoghurt into the moulds in turn, rather than mixing them together. Keep the layers modest so they are easier to place neatly and the fruit and yoghurt remain distinct.
Freezing and checking
Setting time: freeze the filled mould for at least 3 hours. The pops should be firm enough to release from their moulds; larger or unusually shaped moulds may need longer.
Serving the pops
Easy release: briefly run warm water over the outside of the mould when serving. Ease the pops out gently rather than pulling hard on the sticks.
What to serve alongside
These pops work well on their own as a cool snack or simple dessert. For a more substantial snack, serve one with a small handful of nuts or a piece of toast.
Recipe notes & tips
- Use ripe fruit for a naturally sweet, pronounced flavour.
- Make sure the fruit is puréed smoothly enough to spoon into the mould.
- Stir the honey thoroughly into the yoghurt before layering.
- Alternate the mixtures carefully to keep the layers distinct.
- Freeze for at least 3 hours, and allow extra time if the pops are not firm.
- Use warm water briefly to loosen the mould rather than forcing the pops out.
Variations
- Mixed berries: purée a combination of berries for a tangy fruit layer.
- Mango: use ripe mango for a smooth, tropical-tasting layer.
- Peach: purée ripe peach for a mellow fruit flavour.
- Plain yoghurt: swap in plain Greek yoghurt and adjust the honey to taste.
- Marbled pops: gently swirl the fruit and yoghurt together instead of making separate layers.
Common mistakes to avoid
- Using underripe fruit: it can taste bland; choose ripe fruit with a clear flavour.
- Leaving large fruit pieces: they can make layering awkward; purée until the mixture is easy to spoon.
- Skipping the honey in the yoghurt: the layers may taste unevenly sweet; mix it in before filling the mould.
- Filling the mould carelessly: the layers can blend; add them in turn with a spoon.
- Freezing for too little time: the pops may not release cleanly; give them at least 3 hours.
- Pulling the pops out dry: this can strain the sticks; run warm water over the mould first.
How to store
Keep the pops in their moulds or transfer them to an airtight freezer-safe container once fully frozen. They are best enjoyed within about 1 month for good flavour and texture. Serve directly from the freezer; avoid repeated thawing and refreezing.
Frequently asked questions
How long do these pops take to freeze?
Freeze them for at least 3 hours. They may need longer if your moulds are large or your freezer is not very cold.
Can I use plain yoghurt instead of vanilla?
Yes. Plain Greek yoghurt works; mix in honey to taste before assembling.
Do I have to use a food processor?
A food processor is the method given for puréeing the fruit. A blender can also purée it if that is what you have.
How do I get the pops out of the mould?
Run the mould under warm water briefly, then ease the pops out gently.
Can I mix the fruit and yoghurt together?
Yes. The recipe layers them, but gently swirling them together makes a marbled pop instead.
How should I store leftover pops?
Keep them frozen in their moulds or in an airtight freezer-safe container. For the best texture, avoid letting them thaw and refreeze.
Cook it from the original
This recipe comes from graceandgoodeats.com. Their page has the author’s own photos, notes and tips — the best place to cook it from.
Open the recipe on graceandgoodeats.com