
Italian Bread
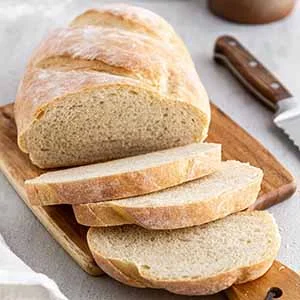
This homemade Italian-style loaf has a soft, chewy crumb and a golden crust. Make it for sandwiches, toast or breakfast bakes, using a stand mixer or kneading by hand.
Ingredients
- 7 g (2¼ teaspoons; 1 packet)active dried yeast
- 4 g (1 teaspoon)granulated sugar
- 240 ml (1 cup)warm water
- 300 g (2½ cups)bread flour or plain flour
- 30 ml (2 tablespoons)olive oil
- 5 g (1 teaspoon)salt
Instructions
- 1
Mix the yeast
In a large bowl or the bowl of a stand mixer, combine the yeast, sugar and warm water at about 43°C (110°F).
- 2
Wait for foam
Leave the mixture to stand for 5 to 10 minutes, until the yeast looks foamy.
- 3
Make the dough
Add 240 g (2 cups) of the flour, the olive oil and salt. Stir with a wooden spoon, or use a dough hook on low speed, until a shaggy dough forms. Turn it onto a lightly floured surface and knead by hand for 10 minutes, adding just enough of the remaining flour to make a soft, smooth, elastic dough. Alternatively, knead with the dough hook at medium speed for 5 minutes, adding just enough of the remaining flour to reach the same texture.
- 4
Let it rise
Shape the dough into a ball and place it in an oiled bowl, turning it to coat. Cover the bowl with cling film and leave the dough to rise for 1 hour, until doubled in size.
- 5
Shape the loaf
Heat the oven to 200°C (400°F). Line a baking sheet with baking parchment or a silicone mat, or lightly grease it with oil or cooking spray. On a lightly floured surface, punch down the dough and carefully shape it into a batard or torpedo about 30 cm (12 inches) long. Transfer it to the prepared sheet, cover with a tea towel and leave to rise for another 20 to 30 minutes, until puffy.
- 6
Slash and bake
Use a bread lame, razor blade or serrated knife to make a few slits about 6 mm (¼ inch) deep across the loaf. Bake for 20 to 25 minutes, until golden brown. Cool completely on a wire rack before slicing.
What is Italian bread?
Italian bread is a broad family of loaves, with shapes and textures that vary from region to region. This home-style version is shaped as a long batard and has a soft interior beneath a chewy crust.
Yeast gives the dough its lift, while a simple rise and a second proof help it develop its airy texture. The loaf is straightforward to make and useful for sandwiches, toast or serving alongside a meal.
Nutrition and macros by portion
The nutrition label shows one serving as written: 118 calories, 3g protein, 19g carbs, 3g fat.
| Portion | Adjustment | kcal | Protein | Carbs | Fat |
|---|---|---|---|---|---|
| Lighter | Thinner slices | 83 kcal | 2g | 13g | 2g |
| This serving | As written | 118 kcal | 3g | 19g | 3g |
| Hungry | Larger portion | 177 kcal | 5g | 29g | 5g |
The flour supplies most of the carbohydrates and some of the protein, while the olive oil provides most of the fat. Serve a slice with a protein-rich topping and vegetables or salad for a more balanced plate.
Choosing the flour
Bread flour: its higher protein content helps the dough form a springy structure. Plain flour is also an option, as specified in the ingredients, though the loaf may have a slightly different texture.
Remaining flour: the method adds most of the flour at first and reserves some for kneading. Add only enough of that remainder to make the dough soft, smooth and elastic.
Getting the yeast started
Water temperature: aim for about 43°C (110°F), as in the method. Water that is too hot can affect the yeast, so check it before mixing if you are unsure.
Foam: after 5 to 10 minutes, the mixture should look foamy. If it does not, check that the yeast is active before continuing.
Kneading and rising
Kneading: work the dough by hand for 10 minutes, or use a stand mixer on medium speed for 5 minutes. In either case, the aim is a smooth, elastic dough rather than a stiff one.
First rise: keep the dough covered in an oiled bowl for 1 hour, until it has doubled. The recipe gives a visual cue as well as a time, so look for the change in size.
Shaping and scoring
Shape: after punching down the risen dough, form it into a torpedo about 30 cm long. Handle it carefully when moving it to the prepared baking sheet.
Score: make a few shallow slits about 6 mm deep just before baking. Use a sharp blade or serrated knife and cut carefully across the surface.
Knowing when it is ready
Second proof: the shaped loaf needs another 20 to 30 minutes, until it looks puffy. The time can vary, so use that appearance as your guide.
Bake: cook it at 200°C for 20 to 25 minutes, until the crust is golden brown. Leave it to cool completely on a rack before slicing so the interior can set.
Serving the loaf
Slice the cooled bread for sandwiches or toast, or use it in breakfast bakes. It also works well alongside soup or a salad.
For a simple serving, toast a slice and add a topping of your choice. Let the loaf cool fully before cutting to help keep the slices neat.
Recipe notes & tips
- Weigh the flour for a more consistent dough.
- Add the reserved flour gradually during kneading rather than tipping it all in at once.
- Use either the hand-kneading or stand-mixer method, not both.
- Wait for the dough to look doubled before shaping it.
- Cool the loaf completely on a rack before slicing.
Variations
- Herb-scented: add dried herbs to the flour for a savoury note.
- Garlic oil: brush the baked crust lightly with garlic-infused oil.
- Seeded crust: scatter seeds over the loaf before its second rise.
- Wholemeal blend: replace part of the bread flour with wholemeal flour, adding it gradually as the dough comes together.
- Olive loaf: fold chopped olives into the dough during mixing.
Common mistakes to avoid
- Water too hot: use warm water around 43°C (110°F), rather than very hot water.
- Too much flour: add the reserved flour little by little so the dough stays soft.
- Rushing the first rise: wait until the dough has doubled before shaping.
- Skipping the second rise: give the shaped loaf 20 to 30 minutes to become puffy.
- Cutting too soon: cool the loaf completely on a rack before slicing.
How to store
Once completely cool, store the loaf in a bread bag or wrapped at room temperature and use within 2 to 3 days. Refresh slices by toasting them; freeze any bread you will not use promptly.
Frequently asked questions
Can I use plain flour instead of bread flour?
Yes. The recipe allows either bread flour or plain flour. The dough may have a somewhat different texture, so knead until it is smooth and elastic.
Can I knead the dough without a stand mixer?
Yes. Knead it by hand on a lightly floured surface for 10 minutes, adding just enough of the reserved flour to reach the described texture.
How can I tell whether the dough has risen enough?
For the first rise, the recipe says to wait until it has doubled in size. After shaping, leave it for 20 to 30 minutes, until it looks puffy.
Why does the recipe score the loaf?
The shallow cuts are made just before baking as part of preparing the loaf for the oven. Use a bread lame, razor blade or serrated knife and cut about 6 mm deep.
Can I slice the bread while it is warm?
The recipe recommends cooling it completely on a rack first. This helps the interior set before you cut it.
Cook it from the original
This recipe comes from girlversusdough.com. Their page has the author’s own photos, notes and tips — the best place to cook it from.
Open the recipe on girlversusdough.com