
Homemade Fig Newtons
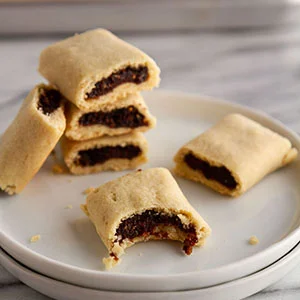
Homemade Fig Newtons taste just like the store-bought version, but BETTER. A no-cook fig filling is surrounded by a sweet, cake-like exterior that's part dessert, part snack and 100% delicious.
Ingredients
- 2 1/2 cups dried Mission figs (stems trimmed)
- 1/3 cup unsweetened applesauce
- 2 tablespoons fresh-squeezed orange juice
- 1/2 cup unsalted butter (softened)
- 1/2 cup granulated sugar
- 1/2 cup light brown sugar (packed )
- 2 large eggs
- 1/2 teaspoon vanilla extract
- 2 1/2 cups all-purpose flour
- 1/4 teaspoon salt
Instructions
- 1
--- Make the fig filling: ---
- 2
Cut the figs in half. Add to a food processor along with applesauce and orange juice. Pulse until the mixture is roughly chopped, then scrape down the sides of the bowl. Continue to pulse, adding 1 teaspoon water as needed, until the mixture is a smooth, thick, but spreadable paste.
- 3
Spoon the filling into a large piping bag fitted with a 1/2 inch plain tip. Set aside.
- 4
--- Make the pastry dough & assemble: ---
- 5
In the bowl of a stand mixer fitted with the paddle attachment or in a large bowl using an electric hand mixer, cream butter and both sugars on medium speed for 2 to 3 minutes or until the mixture is smooth, light and fluffy. Beat in eggs and vanilla extract until just incorporated, then beat in flour and salt until well-combined.
- 6
Shape dough into a large, flat disk about 1-inch thick; cover tightly with plastic wrap. Refrigerate for at least 1 hour to chill and set.
- 7
Preheat your oven to 350°F. Line a large rimmed baking sheet with parchment paper; set aside.
- 8
Divide chilled disk of dough in half; cover one half and keep refrigerated until needed. On a well-floured surface, roll remaining half to a 14x9-inch rectangle; use a bench scraper or pizza cutter to trim ends as needed to form a perfect rectangle shape.
- 9
Using bench scraper or pizza cutter, cut dough into three, 14x3-inch strips. Pipe fig filling down the center of each strip, about 1-inch wide and 1/4-inch tall. Using wet fingers, roll the strip of dough lengthwise over the filling; pinch the seam to seal, then roll over so the seam is facing down. Gently press the filled dough down to flatten slightly. Repeat with remaining strips of dough.
- 10
Transfer strips to the prepared baking sheet, spaced about 3 inches apart. Bake for 15 to 17 minutes or until the dough is baked through and just very lightly golden. While the dough is still warm, use a bench scraper or knife to cut the strips into squares, each about 1 1/2 inches long.
- 11
Option 1 -- To get really soft, cakey squares, immediately transfer the warm cookies to an airtight container, with paper towel between each layer. Let the cookies sit in the container for at least 6 hours to absorb the steam, which helps them retain their cake-like texture.
- 12
Option 2 -- Allow the cookies to cool completely on a cooling rack, then store in an airtight container. They will be a little drier, but still delicious!
- 13
Repeat Steps 6-9 with second half of dough.
- 14
Store leftover cookies covered in an airtight container at room temperature for up to 1 week. TIP: These cookies taste best eaten the day after they're made and beyond.
Cook it from the original
This recipe comes from girlversusdough.com. Their page has the author’s own photos, notes and tips — the best place to cook it from.
Open the recipe on girlversusdough.com