
No-Churn Ice Cream Recipe
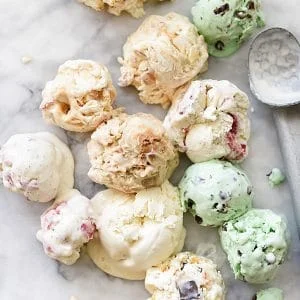
This American-style no-churn ice cream turns cream, sweetened condensed milk and vanilla into a smooth frozen dessert without an ice-cream maker. It is easy to customise with your favourite mix-ins and needs only a few hours in the freezer.
Ingredients
- 473 ml (2 cups)double cream (heavy whipping cream)
- 397 g (14 ounces)sweetened condensed milk
- 1 teaspoonvanilla extract
Instructions
- 1
Whip the cream
In a large bowl, whip the cream with a hand mixer or stand mixer until it forms stiff peaks. Stop as soon as the peaks hold their shape when you lift out the beaters; avoid whipping it past this point.
- 2
Make the base
In a separate large bowl, whisk the vanilla into the sweetened condensed milk. Fold in the whipped cream gently with a spatula, incorporating it gradually to keep the mixture light and airy.
- 3
Add mix-ins
For individual flavours, divide the mixture between smaller bowls and gently fold a different mix-in into each. For one flavour, stir the additions directly into the full mixture.
- 4
Freeze until firm
Transfer the mixture to an insulated tub or paper containers. Freeze for 4–6 hours, until firm.
What is no-churn ice cream?
No-churn ice cream is a homemade frozen dessert made without an ice-cream machine. This American-style version relies on whipped cream for airiness and sweetened condensed milk for sweetness and a creamy base.
The method works because folding the whipped cream into the condensed milk mixture keeps some air in the base as it freezes. Vanilla gives it a simple flavour that suits a range of additions.
Nutrition and macros by portion
The nutrition label shows one serving as written: 293 calories, 4g protein, 23g carbs, 21g fat.
| Portion | Adjustment | kcal | Protein | Carbs | Fat |
|---|---|---|---|---|---|
| Lighter | Serve a smaller scoop | 205 kcal | 3g | 16g | 15g |
| This serving | As written | 293 kcal | 4g | 23g | 21g |
| Hungry | Serve a larger scoop | 440 kcal | 6g | 35g | 32g |
The sweetened condensed milk supplies most of the carbohydrates, while the cream contributes most of the fat; both ingredients also provide some protein. Serve a scoop with fruit for a fresh contrast, or alongside a smaller portion of another dessert.
Why these ingredients work
Cream: Whipping it to stiff peaks gives the base its volume. Use cold cream and stop once the peaks hold their shape.
Condensed milk: Its thick, sweet texture forms the other part of the base. Whisk the vanilla into it first so the flavour is evenly distributed.
Vanilla: A small amount adds a familiar rounded flavour without overpowering the cream.
The folding stage
Gentle folds: Add the cream gradually and turn the mixture over with a spatula rather than beating it. This helps preserve the air created during whipping.
Mix-ins: Fold additions in carefully so they are distributed without flattening the base. If making separate flavours, divide the base before adding them.
Check the texture
Whipped cream: The peaks should stand upright when the beaters are lifted, but the cream should still look smooth. If it turns grainy or begins to separate, it has been over-whipped.
Frozen base: The ice cream is ready when it is firm after 4–6 hours. The exact time can vary with the container and freezer, so check its consistency before serving.
Choose a container
Shallow tubs: A broad, shallow container makes it easier to scoop the mixture in and can be convenient for serving. An insulated tub or paper containers are both options in the recipe.
Covering: Keep the container covered while the ice cream freezes and stores, to protect its surface from picking up freezer smells.
Flavour and serving ideas
Simple pairings: Serve a scoop with fresh berries, sliced peaches or a warm fruit crumble. A biscuit or wafer adds a crisp contrast to the creamy texture.
Mix-in choices: Chopped chocolate, crushed biscuits or toasted nuts can be folded through the base. Keep pieces small enough to scoop easily.
Recipe notes & tips
- Chill the cream before whipping so it is easier to bring to stiff peaks.
- Use a large bowl to give the cream room to expand as you whip it.
- Scrape the bowl as you fold so the condensed milk mixture is incorporated evenly.
- Add mix-ins only after the cream and condensed milk have been combined.
- Label separate containers if you are making more than one flavour.
Variations
- Chocolate: Fold finely chopped chocolate through the finished base.
- Biscuit: Add crushed biscuits for a crunchy, sweet variation.
- Berry: Swirl in a little berry purée for fruit flavour.
- Coffee: Stir a small amount of cooled, strong coffee into the condensed milk with the vanilla.
- Nutty: Fold in chopped toasted nuts for crunch.
Common mistakes to avoid
- Under-whipping the cream: The base may lack volume; whip until the peaks hold their shape.
- Over-whipping the cream: It can turn grainy; stop as soon as stiff peaks form.
- Beating instead of folding: Vigorous mixing deflates the cream; use a spatula and gentle turns.
- Adding mix-ins too early: They can be unevenly distributed; fold them in after combining the base.
- Freezing for too little time: The mixture may still be soft; allow 4–6 hours until firm.
How to store
Keep the ice cream covered in the freezer and use a clean, airtight container if transferring it. Freeze for at least 4–6 hours to set; allow it to soften briefly at room temperature before scooping if it is very firm.
Frequently asked questions
Do I need an ice-cream maker?
No. This recipe is designed to freeze in a tub or paper containers without churning.
How long does it take to freeze?
The method calls for 4–6 hours, or until firm. Freezing time can vary depending on the container and freezer.
How do I know when the cream is whipped enough?
Lift the beaters out: the peaks should stand upright. Stop before the cream becomes grainy.
Can I make more than one flavour?
Yes. Divide the base between smaller bowls and fold different mix-ins into each portion.
When should I add mix-ins?
Fold them in once the whipped cream has been combined with the condensed milk mixture. This helps keep the base light.
Cook it from the original
This recipe comes from foodiecrush.com. Their page has the author’s own photos, notes and tips — the best place to cook it from.
Open the recipe on foodiecrush.com