
Moroccan Preserved Lemons
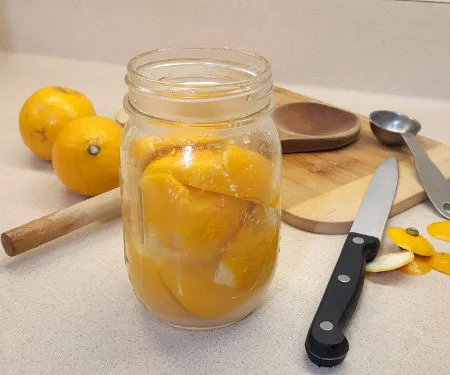
Moroccan preserved lemons are salt-cured lemons that soften and develop a savoury, tangy flavour over several weeks. Make a jar for adding a distinctive citrus note to stews, sauces and other dishes.
Ingredients
- 4–5lemons (preferably Meyer lemons)
- 60 ml (¼ cup)sea salt
Instructions
- 1
Wash the lemons
Wash the lemons thoroughly.
- 2
Trim the ends
Carefully slice off the very tips of each lemon, just enough to expose the white pith.
- 3
Cut the lemons
Stand a lemon on one cut end. From the other end, make two deep cuts across it to form an X, stopping about 2.5 cm (1 inch) from the bottom so the lemon stays in one piece.
- 4
Add the salt
Pack sea salt into the cuts. Put the salt-filled lemons into a clean glass pint jar with a tightly fitting lid.
- 5
Press and rest
Press the lemons firmly with the bottom of a wooden spoon or another kitchen utensil to compact them and release their juices. Cover the jar and leave it on the worktop overnight.
- 6
Press again
The next day, press the lemons down again to help release more juice as they start to soften.
- 7
Cover with juice
Repeat this pressing process for 2–3 days, until the lemons are completely covered with liquid. If they are still not covered after 2–3 days, add enough freshly squeezed lemon juice to cover them.
- 8
Leave to ferment
Leave the lemons on the worktop for 3–4 weeks, until they are very soft and ready to use.
- 9
Refrigerate the jar
Once ready to use, store the preserved lemons in the refrigerator for 8–12 months.
- 10
Rinse before use
Take the lemons out of their liquid and rinse off the salt. Use them as directed in your dish.
What are Moroccan preserved lemons?
Preserved lemons are citrus fruit cured in salt until the peel softens and takes on a rounded, tangy, savoury character. They are associated with North African cooking, particularly Moroccan food, and are also used in modern dishes well beyond the region.
This version relies on lemons, salt and time rather than added spices. Cutting the fruit almost into quarters helps salt reach the inside while keeping each lemon intact.
Nutrition and macros by portion
The nutrition label shows one serving as written: 110 calories, 3g protein, 38g carbs, 1g fat.
| Portion | Adjustment | kcal | Protein | Carbs | Fat |
|---|---|---|---|---|---|
| Lighter | Use less preserved lemon | 77 kcal | 2g | 27g | 1g |
| This serving | As written | 110 kcal | 3g | 38g | 1g |
| Hungry | Larger portion of the dish | 165 kcal | 5g | 57g | 2g |
Most of the carbohydrates come from the lemons, while the sea salt contributes nearly all the sodium; this preserve provides little fat or protein. Use a modest amount alongside a meal with a protein-rich main and vegetables, and adjust added salt to taste.
Choosing and preparing the lemons
Meyer lemons: These are suggested for their milder flavour, but ordinary lemons can also be used. Choose fruit that is clean and firm, and wash it thoroughly before cutting.
The cuts: Trim only the tips, then make an X from the opposite end without cutting through the base. That intact bottom holds the lemon together when you pack in the salt.
Packing the jar
Salt in the cuts: Work the sea salt into the slits so it is distributed inside the fruit, not just around the outside. A clean glass pint jar gives the lemons a snug place to soften.
Firm pressure: Press with a wooden spoon to compact the lemons and encourage their juices to flow. The next-day press, followed by repeats over 2–3 days, helps the fruit settle into the liquid.
Getting the lemons covered
Juice level: The lemons need to be completely covered with liquid before the longer fermentation period. Check the jar after the repeated pressing; if the fruit is still exposed, add freshly squeezed lemon juice until covered.
Keep the lid on between presses and use a clean utensil. The method calls for a tightly fitting lid, with the jar left on the worktop during the initial pressing and fermentation.
Texture and timing
The lemons are ready when they are very soft, after 3–4 weeks on the worktop. The recipe gives softness as the doneness cue, rather than a fixed change in colour.
The initial pressing takes 2–3 days, followed by the longer ferment. If the lemons are still firm at the end of that period, allow more time until they reach the stated soft texture.
Using preserved lemons
Rinse the lemon before using it to remove surface salt, then follow the directions for the dish you are making. The peel is especially useful when you want an intense citrus flavour in sauces, stews or dressings.
Because the lemons are salty, taste the dish before adding more salt. Their concentrated flavour means a little can have a noticeable effect.
What to serve them with
Use small amounts to bring brightness to a hearty meal, such as a stew served with couscous or bread. They also work as a sharp, salty counterpoint to roasted vegetables or grilled fish.
Add them to a dish gradually and taste as you go. Their saltiness can vary depending on how thoroughly they are rinsed.
Recipe notes & tips
- Wash the lemons well before cutting, since the peel is kept in the finished preserve.
- Leave the base of each lemon intact so it stays in one piece while you pack in the salt.
- Press the fruit again each day during the first 2–3 days to help its juices rise.
- Check that the lemons are fully covered before beginning the 3–4-week ferment.
- Rinse the portion you use, then taste your dish before seasoning it further.
- Label the jar with the date so you can keep track of the fermentation time.
Variations
- Use regular lemons: Substitute them for Meyer lemons if those are easier to find.
- Add spices: Tuck a cinnamon stick or a few peppercorns into the jar for a spiced version.
- Add herbs: Include a sprig of rosemary for an aromatic variation.
- Use lemon juice: Top up with freshly squeezed lemon juice if the fruit is not covered after 2–3 days.
- Make a smaller batch: Scale down both ingredients while keeping the lemons covered in the jar.
Common mistakes to avoid
- Cutting through the base: The lemon can fall apart; stop the cuts about 2.5 cm (1 inch) from the bottom.
- Leaving salt on the outside: Pack it into the X-shaped cuts so it reaches the inside of the fruit.
- Skipping the daily pressing: Press again over the first 2–3 days to encourage more juice to flow.
- Leaving lemons exposed: Add enough freshly squeezed lemon juice to cover them if pressing does not release enough liquid.
- Using them too soon: Wait until the lemons are very soft, usually after 3–4 weeks.
- Forgetting to rinse: Rinse the fruit before using it so excess surface salt does not overwhelm the dish.
How to store
Once the lemons are ready, keep them in their jar in the refrigerator for 8–12 months. Take out only what you need, rinse it before use, and keep the remaining lemons covered with liquid.
Frequently asked questions
Can I use ordinary lemons instead of Meyer lemons?
Yes. Meyer lemons are preferred, but the recipe can be made with regular lemons.
How long do the lemons need to ferment?
Leave them on the worktop for 3–4 weeks, until they are very soft. Before that, press them over 2–3 days until they are covered with liquid.
What if the lemons are not covered with juice?
After the 2–3 days of pressing, add enough freshly squeezed lemon juice to cover them completely.
Do I rinse preserved lemons before using them?
Yes. Remove a lemon from the liquid and rinse off the salt before using it in your dish.
How long do preserved lemons keep?
Once ready, they can be stored in the refrigerator for 8–12 months.
Can I use them before they are very soft?
The recipe recommends waiting until they are very soft, after 3–4 weeks. That is the stated cue that they are ready to use.
Cook it from the original
This recipe comes from curiouscuisiniere.com. Their page has the author’s own photos, notes and tips — the best place to cook it from.
Open the recipe on curiouscuisiniere.com