
Homemade Thai Green Curry Paste
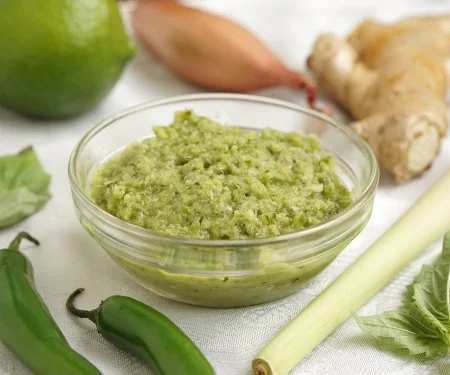
This homemade Thai green curry paste combines fresh green chillies, herbs, aromatics and lime into a spicy, fragrant paste. Make it in about 10 minutes to add fresh flavour to a Thai-style curry.
Ingredients
- 3Serrano chillies, seeds and veins removed
- 3garlic cloves, peeled and chopped
- 30 mlfresh basil, chopped (Thai basil, if available)
- 1shallot, sliced (roughly 80 ml)
- 1 stalk (about 30 ml sliced)lemongrass
- 2.5 cmginger, peeled and sliced
- 1lime, zested
- 5 mlfresh lime juice
- 3.75 mlsalt
- 2.5 mlbrown sugar
- 5 ml, plus more as neededvegetable oil
Instructions
- 1
Chop the aromatics
Put the chillies, garlic, basil, shallot, lemongrass and ginger in a food processor. Pulse until finely chopped.
- 2
Add lime and seasoning
Add the lime zest, 5 ml lime juice, salt and sugar. Pulse until the ingredients begin to form a paste.
- 3
Adjust the texture
Add the oil 5 ml at a time, only as needed, pulsing until the mixture reaches a thick-paste consistency.
- 4
Use or store
Use the fresh curry paste straight away, or refrigerate it in an airtight container for up to a week.
What is Thai green curry paste?
Thai green curry paste is a blend of fresh chillies, herbs and aromatic ingredients used as the flavour base for green curry. It is part of Thai cooking, where pastes bring heat and fragrance to dishes.
This version balances the chillies with basil, lemongrass, ginger and lime. Blending the ingredients fresh keeps the result bright and aromatic.
Nutrition and macros by portion
The nutrition label shows one serving as written: 15 calories, 0g protein, 3g carbs, 1g fat.
| Portion | Adjustment | kcal | Protein | Carbs | Fat |
|---|---|---|---|---|---|
| Lighter | Use less oil | 11 kcal | 0g | 2g | 1g |
| This serving | As written | 15 kcal | 0g | 3g | 1g |
| Hungry | Use a larger portion | 23 kcal | 1g | 4g | 1g |
Most of the carbohydrates come from the shallot, garlic and small amounts of sugar; the oil supplies most of the fat, while the aromatics contribute only a little protein. Pair a curry made with the paste with vegetables and a protein, and serve it with a measured portion of rice for a balanced plate.
Choosing the ingredients
Chillies: removing the seeds and veins moderates their heat while retaining their fresh flavour. Serranos are the specified choice here.
Basil: Thai basil gives the paste a distinctive herbal note, but ordinary fresh basil works if that is what you have.
Lemongrass: slice the stalk before processing so it breaks down more readily with the other aromatics.
Getting a smooth paste
First pulse the larger ingredients until finely chopped, then add the lime and seasonings. This helps the mixture become more even before the oil goes in.
Add oil gradually rather than all at once. Stop when the paste is thick and cohesive; the recipe calls for more oil only if needed.
Balancing the flavour
Lime zest and juice bring fragrant acidity, while a small amount of brown sugar rounds out the sharper flavours. Salt seasons the blend.
The chillies provide the heat, so the final intensity depends on their size and strength. For a milder paste, remove the seeds and veins as directed.
How to use the paste
This recipe makes about 90 ml of paste, or six tablespoons. Stir it into a Thai-style curry as its aromatic base, using the amount required by your chosen curry recipe.
It also works well prepared ahead: the method allows you to use it immediately or keep it chilled for later.
Serving a curry
Serve a curry made with this paste alongside rice to soak up the sauce. Vegetables and a protein such as tofu, chicken or prawns can make it a more complete meal.
The paste itself is concentrated and punchy, so use it as a flavouring rather than serving it on its own.
Recipe notes & tips
- Remove the chilli seeds and veins before blending, as specified, to moderate the heat.
- Chop the lemongrass and ginger into slices small enough for your food processor to handle.
- Pulse in short bursts so the ingredients chop evenly.
- Add the oil in small increments and stop once the paste is thick.
- Use Thai basil if you can find it for a more distinctly herbal flavour.
Variations
- Milder paste: Use fewer chillies while keeping the other ingredients in proportion.
- Thai basil: Choose Thai basil when available for a more distinctive herbal note.
- No food processor: Finely chop the ingredients by hand, then work them together into a paste.
- Extra citrus: Add a little more lime juice for a sharper flavour.
- Oil-free option: Omit the oil, recognising that the paste may be less cohesive.
Common mistakes to avoid
- Adding oil all at once: The paste can become too loose; add it 5 ml at a time.
- Leaving the chilli seeds in: The paste may be hotter than intended; remove the seeds and veins first.
- Using large pieces: They may remain coarse; slice the aromatics before processing.
- Over-processing at the start: The ingredients can turn unevenly mushy; pulse until finely chopped, then add the seasonings.
- Storing it uncovered: The paste can dry out; refrigerate it in an airtight container.
How to store
Transfer the paste to an airtight container and refrigerate for up to a week. Use it cold from the fridge as a curry base; this paste is not a finished dish that needs reheating on its own.
Frequently asked questions
How much paste does this recipe make?
It yields about 6 tablespoons of curry paste.
Can I make this without a food processor?
Yes. Finely chop the ingredients by hand and work them together into a paste, adding the oil gradually as needed.
Can I use ordinary basil?
Yes. Thai basil is suggested if you can find it, but the recipe also works with fresh basil.
How can I make the paste less spicy?
Remove the seeds and veins from the chillies as directed. You can also use fewer chillies, though that changes the recipe's proportions.
How long does homemade green curry paste keep?
Keep it in an airtight container in the refrigerator for up to a week.
Why add oil gradually?
The amount needed depends on how the ingredients blend. Add it 5 ml at a time until the paste is thick and cohesive.
Cook it from the original
This recipe comes from curiouscuisiniere.com. Their page has the author’s own photos, notes and tips — the best place to cook it from.
Open the recipe on curiouscuisiniere.com