
Cinnamon and Cardamom Morning Buns
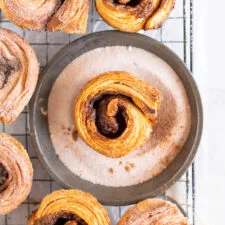
Morning buns are flaky and sweet, with layers from the lamination. The base laminated yeasted danish dough is a fun, easy project.
Ingredients
- 240 g whole milk, at room temperature
- 1 large egg, at room temperature
- 1 large yolk, at room temperature
- 2 1/4 tsp instant yeast
- 520 g bread flour
- 65 g granulated sugar
- 45 g unsalted butter, at room temperature
- 1 Tbsp salt
- 1 tsp vanilla bean paste
- 250 g unsalted butter, at room temperature
- 50 g bread flour
- 80 g Unsalted butter, at room temperature
- 125 g dark brown sugar
- 3 tsp cinnamon
- 3/4 tsp cardamom
- 1/4 tsp vanilla bean paste
- pinch of salt
- 200 g granulated sugar
- 2 tsp cinnamon
- 3/4 tsp cardamom
Instructions
- 1
--- DANISH DOUGH ---
- 2
In the bowl of a stand mixer fitted with the dough hook, whisk together milk, egg, egg yolk, and yeast. Add the flour, sugar, butter, salt, and vanilla bean paste, and mix at low speed until dough comes together, about 1 minute. Increase the speed to medium and mix until smooth and elastic, 8-10 minutes.
- 3
Shape the dough into a ball and place into a lightly greased bowl. Cover the bowl with plastic wrap and leave to rise in a warm place, about 2 hours, or until doubled in size.
- 4
Punch down the dough and shape into a 8”x10” (20x25cm) rectangle. Place on a sheet pan lined with parchment paper and dusted with a little flour (a quarter sheet pan is perfect for this), and wrap tightly in plastic wrap (I wrapped the whole pan in plastic and then placed it inside a large plastic bag just for some insurance). Refrigerate overnight.
- 5
--- BUTTER BLOCK ---
- 6
In a small bowl, combine the butter and bread flour. Place onto a large piece of parchment, and shape into a 6”x9” rectangle on the bottom half of the parchment. Fold down the parchment to wrap up the butter block, and use a bench scraper to square it off. Refrigerate overnight.
- 7
--- LAMINATIONS ---
- 8
Lock in the butter block
- 9
Roll to 12”x 18” (30x45cm), Letter fold 1
- 10
Roll to 12”x18” (30x45cm), Letter fold 2
- 11
Chill Dough 15 minutes
- 12
Roll to 12”x18” (30x45cm), Letter fold 3
- 13
Chill for 90 minutes.
- 14
--- MORNING BUN ASSEMBLY ---
- 15
Transfer the danish dough to the freezer for 15 minutes to firm up slightly. In a medium bowl, combine all of the filling ingredients and mix together until smooth.
- 16
Brush the cups of a 12 tray muffin pan with melted butter and dust with granulated sugar, tapping out the excess.
- 17
Turn the dough out onto a lightly floured surface, and roll into a rectangle about 8”x12”, 20x30cm. (the measurement you need to strictly stick to here is the width, otherwise the roll will be too fat to fit into the muffin tins).
- 18
Spread the surface of the dough evenly with the filling, leaving a 1/2” border on a long edge. Then, starting on the opposite long side, roll up the dough into a tight spiral. Trim the ends if needed. Measure your log of dough and cut into 1” rolls. Place rolls, cut side up, into prepared muffin cups, pressing gently to help the dough fill the cups.
- 19
Cover the pan lightly (I put it inside a big clear bag), and leave to rise in a warm, draft free place for 45 minutes to an hour, or until the rolls are puffy and when lightly poked with a finger, a small indentation is left.
- 20
When there is 15 minutes to go on your rise, preheat your oven to 375°f / 190°c.
- 21
Bake the buns until golden brown and a thermometer inserted in the centre registers 200°f /95°f, 20 to 25 minutes. Begin checking for doneness at 18 minutes and watch them carefully. Add foil half way through if needed to prevent excess browning (I did not need to). While the buns are baking, combine all the ingredients for the finishing sugar in a shallow bowl.
- 22
Let the buns cool in the pans for about 10 minutes, or until cool enough to handle. Remove from the pans and toss in the finishing sugar. Let cool completely.
- 23
Store leftovers lightly covered at room temperature. Refresh in the microwave if needed.
Cook it from the original
This recipe comes from cloudykitchen.com. Their page has the author’s own photos, notes and tips — the best place to cook it from.
Open the recipe on cloudykitchen.com