
No-Oven Bread Rolls - How to make Bread Rolls without an Oven
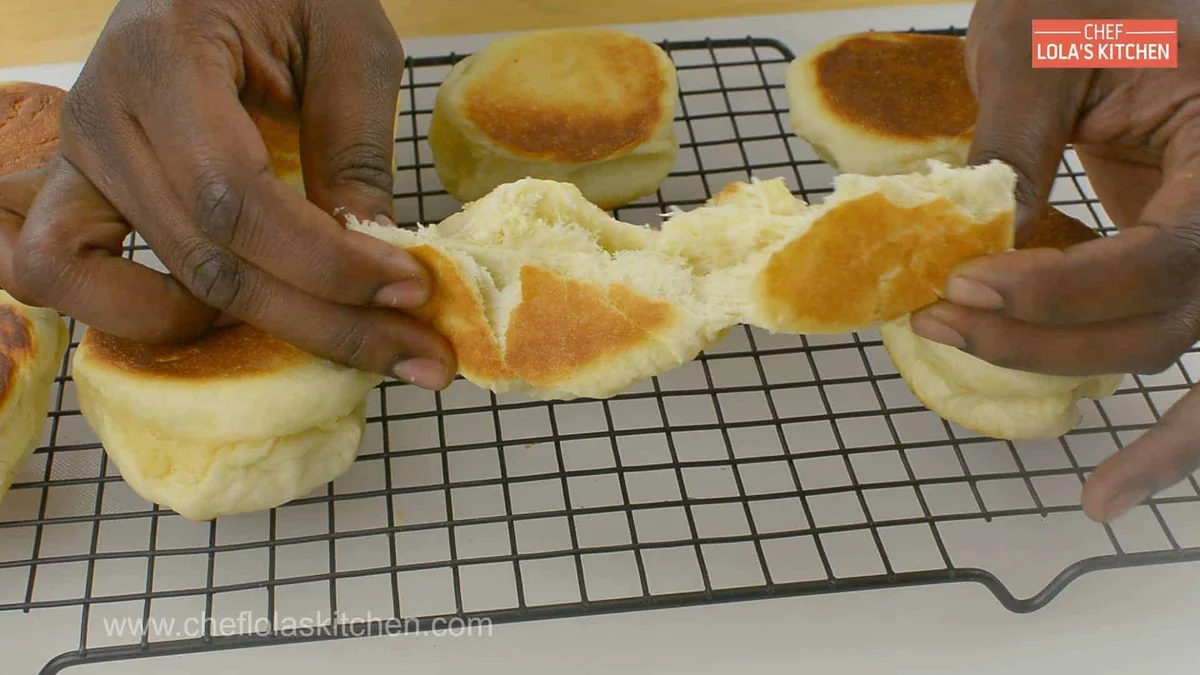
These soft, enriched bread rolls are cooked in a covered pan on the hob instead of baked in an oven. Make them when you want homemade rolls but do not have an oven available.
Ingredients
- 500 g (4 cups), plus about a handful for kneadingplain flour
- 57 g (4 tablespoons)melted butter
- 9 g (1 tablespoon)yeast
- 2eggs
- 5 g (1 teaspoon)salt
- 240 ml (1 cup)warm milk
- 50 g (¼ cup)sugar
- 1egg, for the egg wash
- 8 g (2 teaspoons)sugar, for proofing the yeast
Instructions
- 1
Proof the yeast
Dissolve the yeast and the sugar for proofing in the warm milk.
- 2
Mix butter and eggs
In a separate bowl, combine the melted butter and 2 eggs, then set the mixture aside.
- 3
Make the dough
In a large bowl, combine the flour, salt and 50 g sugar. Make a well in the centre, add the yeast mixture and the egg-and-butter mixture, then mix until a soft dough forms.
- 4
Knead until smooth
Turn the dough out onto a lightly floured surface and knead until smooth and elastic, about 10 minutes by hand or 7 minutes with a mixer.
- 5
Let the dough rise
Put the dough in a very large oiled bowl, coating its surface with a little oil as well. Leave it in a warm place for 1 hour, or until doubled in size.
- 6
Shape the rolls
Deflate the dough and turn it onto a lightly floured surface. Divide it into 16 equal pieces, shape each into a ball and place them in a cast-iron skillet or pan. Leave to rise for another 30 minutes.
- 7
Cook both sides
Set the pan over low heat and cook for 10 minutes. Flip the rolls and cook the other side for a further 5 minutes.
- 8
Cool and serve
Remove the pan from the heat, allow the rolls to cool, then enjoy.
What are no-oven bread rolls?
These are soft, slightly sweet rolls made from an enriched yeast dough and cooked in a pan rather than baked. The recipe uses a familiar American-style bread-roll dough, with butter, eggs and milk for a tender crumb.
The pan method makes them useful when an oven is unavailable. Gentle heat gives the dough time to cook through without scorching the outside.
Nutrition and macros by portion
The nutrition label shows one serving as written: 453 calories, 21g protein, 64g carbs, 13g fat.
| Portion | Adjustment | kcal | Protein | Carbs | Fat |
|---|---|---|---|---|---|
| Lighter | Smaller roll portion | 317 kcal | 15g | 45g | 9g |
| This serving | As written | 453 kcal | 21g | 64g | 13g |
| Hungry | Serve an extra roll | 680 kcal | 32g | 96g | 20g |
The flour and sugar provide most of the carbohydrates, while butter and eggs contribute much of the fat; the eggs, milk and flour also supply protein. For a balanced plate, serve a roll with a protein-rich main and vegetables.
The enriched dough
Flour and yeast: the flour gives the rolls their structure, while the yeast creates a light, risen texture. The dough should feel soft rather than stiff.
Milk, butter and eggs: these add richness and tenderness. The milk should be warm, not hot, when it is mixed with the yeast.
Getting the yeast started
Yeast mixture: dissolve the proofing sugar fully in the warm milk with the yeast. Give it a moment to begin activating before mixing it into the flour.
Temperature: very hot milk can stop the yeast working, while cold milk may slow it down. Aim for comfortably warm milk.
Kneading and rising
Kneading: work the dough until it becomes smooth and elastic, about 10 minutes by hand or 7 minutes in a mixer. Add only enough extra flour to keep it manageable, since too much can make the rolls firm.
First rise: oil the bowl and the dough surface to help prevent sticking and drying. Let it rise in a warm place for about 1 hour, until it has doubled in size.
Shaping the rolls
Portions: divide the dough into 16 equal pieces, then shape each piece into a neat ball. The recipe is listed as 12 servings, so the rolls can be portioned according to how many people you are serving.
Second rise: arrange the balls in the skillet and leave them for 30 minutes. Allow room for them to expand as they rise.
Cooking in a pan
Low heat: cook the rolls for 10 minutes on the first side and 5 minutes after turning. A heavy cast-iron skillet can help distribute the heat, but a suitable pan is also specified.
Doneness: the rolls should be cooked through rather than doughy in the middle. Keep the heat low so the outsides have time to colour without burning before the centres are done.
Serving and timing
Resting: let the rolls cool after removing the pan from the heat; this gives the crumb a chance to settle before serving.
Pairings: serve them warm with butter, alongside soup, or as a side for a main meal. Their mild sweetness also works well with savoury fillings.
Recipe notes & tips
- Use milk that feels warm rather than hot to help the yeast remain active.
- Oil the dough surface during its first rise so it is less likely to dry out.
- Divide the dough evenly so the rolls cook at a similar rate.
- Keep the pan over low heat throughout cooking to reduce the risk of burnt outsides.
- Leave space between the dough balls for their 30-minute rise.
Variations
- Herb rolls: mix finely chopped herbs into the flour for a savoury note.
- Garlic butter: brush the cooked rolls with garlic butter while they are warm.
- Seeded tops: sprinkle seeds over the rolls before cooking.
- Wholemeal swap: replace some of the plain flour with wholemeal flour for a heartier crumb.
- Savoury filling: use the cooled rolls for sandwiches with your preferred filling.
Common mistakes to avoid
- Milk too hot: it can hinder the yeast; use comfortably warm milk instead.
- Too much flour: it can make the dough stiff; add only what is needed for kneading.
- Uneven portions: different-sized rolls may cook at different rates; divide the dough as evenly as possible.
- High heat: the outsides can brown before the centres cook; keep the pan on low.
- Skipping the second rise: the shaped rolls need 30 minutes to rise before cooking.
How to store
Once completely cool, store the rolls in an airtight container at room temperature for up to 2 days. Warm them briefly in a covered pan over low heat, or reheat until just warmed through.
Frequently asked questions
Can I make these rolls without an oven?
Yes. The recipe cooks the shaped dough in a skillet or pan over low heat, so no oven is needed.
How long does the dough need to rise?
Allow about 1 hour for the first rise, or until doubled in size, then 30 minutes after shaping.
How many rolls does the recipe make?
The method divides the dough into 16 rolls, although the recipe lists 12 servings.
Can I use a pan other than cast iron?
The method specifies a cast-iron skillet or pan. Use a pan suitable for cooking bread over low heat.
How do I know when the rolls are cooked?
They should be cooked through and not doughy in the centre. Keep the heat low and follow the stated 10-minute cook on one side and 5 minutes after flipping.
Cook it from the original
This recipe comes from cheflolaskitchen.com. Their page has the author’s own photos, notes and tips — the best place to cook it from.
Open the recipe on cheflolaskitchen.com