
Chocolate Peanut Butter Caramel Tarts
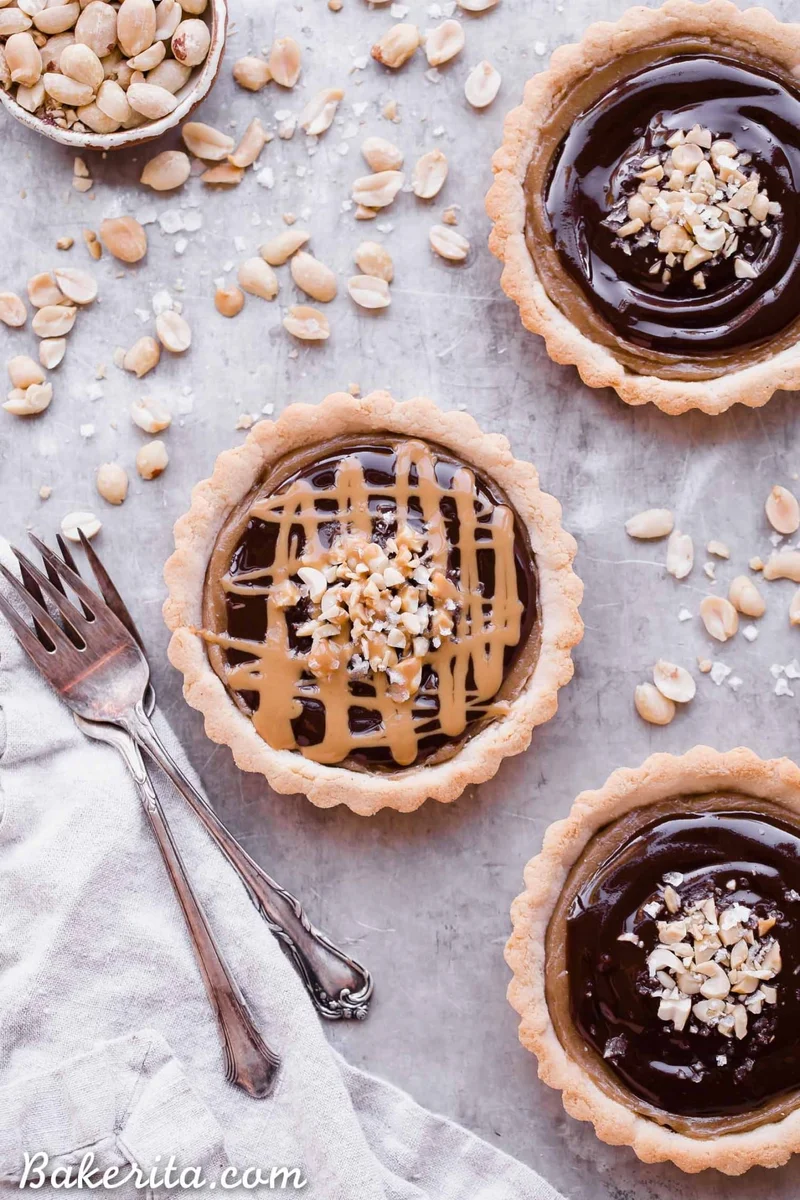
These vegan chocolate peanut butter caramel tarts layer a crisp coconut-flour crust with a smooth date and peanut butter filling and a glossy cacao topping. They’re a rich make-ahead dessert, finished with roasted peanuts and flaky salt for crunch.
Ingredients
- 128 g (1 cup)coconut flour
- ¼ teaspoonkosher salt
- 60 ml (¼ cup)pure maple syrup
- 95 ml (⅓ cup plus 1 tablespoon)coconut oil
- 6Medjool dates (soak in hot water if they’re not soft)
- 125 g (½ cup)creamy natural peanut butter
- 60–80 ml (¼–⅓ cup)hot water
- 30 ml (2 tablespoons)coconut oil
- ¼ teaspoonkosher salt
- 45 ml (3 tablespoons)maple syrup
- 45 ml (3 tablespoons)coconut oil, melted
- 25 g (¼ cup)unsweetened cacao powder
- 30 ml (2 tablespoons)peanut butter
- 35 g (¼ cup)roasted peanuts, chopped
- 30 ml (2 tablespoons)peanut butter, for drizzling
- 1 teaspoonflaky sea salt
Instructions
- 1
Prepare the pans
Heat the oven to 175°C. Grease three 10 cm round tart pans with removable bottoms, one 20 cm round tart pan with a removable bottom, or a 20 × 20 cm square pan with coconut oil. If your pan has no removable bottom, lining it with baking parchment is recommended.
- 2
Mix the crust
In a bowl, work the maple syrup and coconut oil together, pressing out any lumps of coconut oil. Stir in the coconut flour and kosher salt until evenly combined.
- 3
Bake the shells
Press the dough into the prepared pan or pans. Bake a larger shell for about 12 minutes or smaller shells for about 8 minutes, until the edges are golden brown. Leave to cool completely.
- 4
Blend the caramel
Put the dates, soaked first if needed, peanut butter, coconut oil and 60 ml hot water in a blender. Blend until completely smooth, adding more hot water if you prefer a thinner consistency. If you used unsalted peanut butter, add a pinch of salt.
- 5
Fill the shells
Spread the peanut butter caramel evenly over the cooled tart shell or shells.
- 6
Make the topping
Whisk the maple syrup, melted coconut oil, cacao powder and peanut butter until smooth. Pour the mixture over the caramel.
- 7
Garnish and chill
Add roasted peanuts, a drizzle of peanut butter and flaky sea salt as desired. Refrigerate for about an hour, until the chocolate topping has hardened.
- 8
Store the tarts
Keep the tarts tightly sealed in the refrigerator for up to 5 days; they’re best within the first 3 days. They can also be frozen for up to 6 months.
What are chocolate peanut butter caramel tarts?
These are American-style dessert tarts built in layers: a shortbread-like coconut-flour shell, a date-sweetened peanut butter filling and a chocolate topping. The combination draws on familiar American flavours of chocolate, peanut butter and caramel, with dates providing the filling’s smooth, sweet base.
This version is gluten-free, grain-free and vegan. Its appeal comes from the contrast between the crisp-edged crust, creamy filling and firm chocolate layer.
Nutrition and macros by portion
The nutrition label shows one serving as written: 405 calories, 8g protein, 45g carbs, 29g fat.
| Portion | Adjustment | kcal | Protein | Carbs | Fat |
|---|---|---|---|---|---|
| Lighter | Smaller tart portion | 284 kcal | 6g | 31g | 20g |
| This serving | As written | 405 kcal | 8g | 45g | 29g |
| Hungry | Larger tart portion | 608 kcal | 12g | 68g | 44g |
The coconut flour, dates and maple syrup provide most of the carbohydrates, while coconut oil and peanut butter contribute much of the fat. Peanut butter and peanuts also supply protein, though this is still a rich dessert rather than a protein-focused dish. Serve a tart portion with fresh fruit to add a lighter, fresh contrast.
The coconut-flour crust
Coconut flour: it absorbs moisture readily, so press the dough into the pan rather than expecting it to behave like a pliable wheat-flour pastry. Mixing the syrup and oil first helps distribute the fat before the flour goes in.
Even thickness: press the dough up the sides and across the base in a consistent layer. This helps the shell bake evenly and gives the filling a stable base.
Getting the date caramel smooth
Soft dates: use dates that blend easily, soaking them in hot water first if they feel firm. This reduces the chance of small chewy pieces remaining in the filling.
Water: start with 60 ml and blend before adding more. Add it gradually until the caramel is smooth and spreadable, rather than pouring in the full amount automatically.
Look for these doneness cues
Crust: the edges should be golden brown after about 12 minutes for the larger pan or 8 minutes for smaller pans. Cool the shell completely before adding the filling so the layers stay distinct.
Chocolate: chilling for about an hour should firm the topping. If it still looks soft in the centre, give it more time in the fridge before slicing.
Choose a pan and plan the timing
Pan size: the recipe works in three 10 cm tart pans, one 20 cm round tart pan or a 20 × 20 cm square pan. The smaller shells bake for less time, so check their edges at around 8 minutes.
Make-ahead: allow the shell to cool fully and leave about an hour for the topping to set. The chilled tarts are easier to portion neatly than freshly assembled ones.
Finishing and serving
Peanuts: scatter the chopped roasted peanuts over the chocolate for a crisp, savoury contrast to the creamy layers. Flaky salt adds a final savoury note, so use it to taste.
Serving: cut the large tart into portions or serve the small tarts individually. Fresh berries or sliced fruit make a bright accompaniment to the rich filling.
Recipe notes & tips
- Use soft Medjool dates, or soak firm ones in hot water before blending.
- Add the caramel’s hot water a little at a time to control its thickness.
- Press the crust evenly into the corners and up the sides of the pan.
- Let the baked shell cool completely before spreading on the caramel.
- Chill until the chocolate layer is firm for cleaner slices.
- Use unsalted peanut butter if you want to adjust the salt to your taste.
Variations
- Extra crunch: sprinkle additional chopped roasted peanuts over the chocolate before chilling.
- Saltier finish: add the flaky sea salt sparingly over the topping to taste.
- Small tarts: divide the crust and filling among three 10 cm tart pans and bake the shells for about 8 minutes.
- Square slices: use a 20 × 20 cm square pan and cut the chilled tart into portions.
- Softer caramel: blend in extra hot water a little at a time until it reaches your preferred consistency.
Common mistakes to avoid
- Using firm dates: soak them in hot water first so they blend smoothly.
- Adding too much water at once: begin with 60 ml and add more only if the caramel needs it.
- Filling a warm shell: cool it completely before adding the caramel to keep the layers in place.
- Baking by time alone: check that the crust edges are golden, as pan size affects how quickly they bake.
- Cutting before chilling: refrigerate for about an hour so the chocolate topping can harden.
How to store
Store the tarts tightly sealed in the refrigerator for up to 5 days; they’re best within the first 3 days. They can be frozen for up to 6 months, then thawed in the refrigerator before serving.
Frequently asked questions
Do I need to soak the dates?
Only if they are not soft. Soaking firm dates in hot water helps them blend into a smooth caramel.
How much water should I use for the filling?
Start with 60 ml and blend. Add more, up to 80 ml, if the filling is thicker than you’d like.
Can I make this in one large pan?
Yes. Use a 20 cm round tart pan with a removable bottom or a 20 × 20 cm square pan. The larger shell bakes for about 12 minutes.
Can I make the tarts ahead?
Yes. They need about an hour in the fridge for the chocolate topping to set, and they can be stored chilled for up to 5 days.
How do I know when the crust is ready?
Look for golden-brown edges. Bake smaller shells for about 8 minutes and a larger shell for about 12 minutes.
Can I freeze the tarts?
Yes. Keep them tightly sealed in the freezer for up to 6 months and thaw them in the refrigerator before serving.
Cook it from the original
This recipe comes from bakerita.com. Their page has the author’s own photos, notes and tips — the best place to cook it from.
Open the recipe on bakerita.com