
Easiest Sourdough Bread Recipe (No-Knead Sourdough)
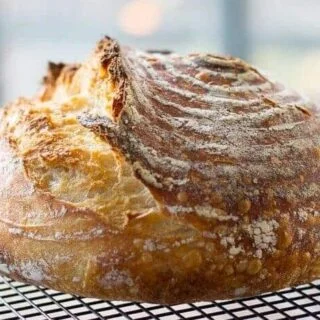
A simple, no-knead sourdough loaf with a chewy crumb and crisp crust, made with a long room-temperature fermentation. It is a forgiving way to practise shaping and baking a naturally leavened loaf.
Ingredients
- 25 gmature sourdough starter
- 25 gwholemeal flour
- 50 gunbleached plain flour
- 75 gfiltered water at 32°C (90°F)
- 100 gripe sourdough starter
- 300 gfiltered water at 32°C (90°F)
- 500 gunbleached plain flour or strong white bread flour
- 10 gfine sea salt or kosher salt
- for dustingrice flour
Instructions
- 1
Feed the starter
About 24 hours before baking, feed 25 g of starter with 25 g wholemeal flour, 50 g unbleached plain flour and 75 g filtered water at 32°C (90°F).
- 2
Check the starter
Eight to ten hours after feeding, gently drop a spoonful of starter into a glass of water. If it floats, it is ready to use; if it sinks, give it more time to become active.
- 3
Mix the dough
In a large bowl, mix 100 g ripe starter with 300 g water at 32°C (90°F) until the starter is distributed. Add 500 g unbleached plain flour or bread flour, then 10 g salt. Mix until all the flour is saturated, starting with a rubber spatula or bowl scraper and finishing by hand.
- 4
Bulk ferment
Cover the bowl with plastic wrap, a shower cap or a damp tea towel. Leave the dough at room temperature, 20–22°C (68–72°F), for 10–12 hours, until puffy and full of air. If the room is much warmer, shorten the fermentation by a few hours.
- 5
Shape the loaf
Turn the dough onto a very lightly floured work surface. Pull each of its four sides into the centre and press gently to seal, then repeat to gather the dough into a tight ball. Turn it seam-side down onto an unfloured part of the work surface. Cup your hands around it and pull it towards you to round it and tighten the surface.
- 6
Proof the loaf
Dust a 23 cm (9-inch) round banneton with rice flour. Alternatively, line a bowl with a lint-free tea towel and dust the towel with rice flour. Put the shaped loaf into the prepared banneton or bowl seam-side up, cover it and proof at 20–23°C (68–74°F) for 3–4 hours.
- 7
Heat the oven
At least 45 minutes before baking, preheat the oven to 230°C (450°F). The pot does not need to be preheated.
- 8
Test and score
Gently press a finger about 1.3 cm (½ inch) into the dough. If the dent fills immediately, allow more proofing time; if it fills slowly, the loaf is ready. Turn it onto a piece of baking parchment and score it with a bread lame or sharp knife, making one long slash down the middle if you like.
- 9
Bake the loaf
Use the parchment to transfer the dough to a Dutch oven or oven-safe pot of at least 3.8 litres (4 quarts). Cover it and place it on the centre rack. Reduce the oven to 220°C (425°F) and bake covered for 40 minutes. Remove the lid and bake for a further 5–15 minutes if you want a darker crust.
- 10
Cool the bread
Leave the loaf on a cooling rack for at least 1 hour before slicing. For the best flavour and texture, and to help it stay fresh, let it cool for 4–12 hours if possible.
- 11
Store the loaf
Keep the bread completely uncovered at room temperature for the first 24 hours. Once cut, rest it cut-side down on a board. On days two and three, keep it in a zip-lock bag and refresh slices by toasting; after that, slice and freeze the bread, then toast it from frozen.
What is no-knead sourdough?
Sourdough is bread leavened with a living starter rather than commercial yeast. Long fermentation and wild yeasts are part of a long bread-making tradition, while this version keeps the hands-on work short by relying on time instead of kneading.
A ripe starter, a simple flour-and-water dough and a covered pot help make this loaf approachable. The pot traps steam during baking, helping the loaf rise before its crust colours.
Nutrition and macros by portion
The nutrition label shows one serving as written: 2040 calories, 66g protein, 418g carbs, 9g fat.
| Portion | Adjustment | kcal | Protein | Carbs | Fat |
|---|---|---|---|---|---|
| Lighter | Serve a smaller slice | 1428 kcal | 46g | 293g | 6g |
| This serving | As written | 2040 kcal | 66g | 418g | 9g |
| Hungry | Add another slice | 3060 kcal | 99g | 627g | 14g |
The flour provides most of the loaf’s carbohydrates and some protein, while the salt accounts for most of its sodium; there is very little added fat. Pair a slice with eggs, beans or another protein-rich topping and vegetables for a more rounded plate.
Build an active starter
Feed ahead: The small starter feed is made about 24 hours before baking, and the recipe uses 100 g of ripe starter in the dough. Plan around the stated feeding and fermentation times rather than rushing the process.
Check readiness: The float test is the recipe’s cue for whether the fed starter is ready to mix. If it sinks, wait a little longer and test again.
Mix without kneading
Saturate the flour: Mix the starter into the warm water first, then add the flour and salt. Scrape the bowl and finish by hand until no dry flour remains.
Keep it simple: This dough is not kneaded; the long bulk fermentation gives it time to develop. Cover it so the surface does not dry out while it rests.
Watch the fermentation
Bulk rise: Leave the covered dough at 20–22°C for 10–12 hours, until it looks puffy and airy. A warmer room can speed fermentation, so the recipe advises reducing this stage by a few hours in warmer conditions.
Final proof: After shaping, proof the loaf for 3–4 hours at 20–23°C. Use the finger-dent check before baking: a dent that fills slowly indicates the loaf is ready.
Shape for surface tension
Gather the dough: Pull each side into the centre, repeating the movement to form a tight ball. The dough may feel soft, so use a very light dusting of flour rather than burying it in flour.
Tighten the outside: With the seam underneath, cup your hands around the dough and draw it towards you to round it. This creates a taut surface before the loaf goes into its rice-floured basket.
Bake in a covered pot
Prepare the pot: Preheat the oven to 230°C for at least 45 minutes, but leave the pot unheated. Transfer the loaf on baking parchment into a pot of at least 3.8 litres, then cover it.
Finish uncovered: Bake at 220°C for 40 minutes with the lid on, then remove the lid. The extra 5–15 minutes is optional and gives the crust more colour.
Cool before slicing
Let the loaf cool on a rack for at least an hour before cutting. If you can wait 4–12 hours, the recipe recommends that for better flavour and texture and to help prevent the bread from going stale too quickly.
Serve slices with soup, eggs, cheese or a simple savoury topping. Toasting is also a handy way to refresh slices once the crust has softened in storage.
Recipe notes & tips
- Use a kitchen scale to measure the flour, starter and water accurately.
- Keep the starter feed and dough water at the stated 32°C.
- Dust the banneton or lined bowl with rice flour to help prevent sticking.
- Use the finger-dent check alongside the stated proofing time before scoring.
- Make sure the pot is oven-safe and holds at least 3.8 litres.
- Wait at least an hour before slicing so the loaf can cool on a rack.
Variations
- Use bread flour: Choose strong white bread flour instead of plain flour for the main dough.
- Try wholemeal flour: The recipe refers to a note for using wholemeal flour, but no proportions for that change are provided here.
- Change the score: Make one long slash down the loaf or score it in another pattern before baking.
- Adjust the crust colour: Leave the lid off for up to 15 minutes after the covered bake for a deeper colour.
- Toast frozen slices: Slice and freeze the loaf after the first few days, then toast slices straight from frozen.
Common mistakes to avoid
- Using an inactive starter: If the spoonful sinks in the float test, wait longer before mixing the dough.
- Rushing bulk fermentation: Let the dough rest for 10–12 hours at the stated room temperature, shortening the time only if the room is much warmer.
- Adding too much bench flour: Keep the work surface very lightly floured so the dough can be gathered and shaped.
- Skipping the proof check: If the finger dent springs back immediately, give the loaf more time before scoring.
- Cutting too soon: Cool the loaf for at least an hour on a rack before slicing.
- Preheating the pot unnecessarily: The recipe calls for a hot oven but says the pot can go in cold.
How to store
Leave the whole loaf uncovered at room temperature for the first 24 hours. After cutting, store it cut-side down on a board; for days two and three, use a zip-lock bag and toast slices to refresh them. After that, slice and freeze the bread, then toast slices from frozen.
Frequently asked questions
Can I use plain flour instead of bread flour?
Yes. The recipe gives unbleached plain flour and bread flour as alternatives for the main dough.
Do I need to preheat the Dutch oven?
No. Preheat the oven for at least 45 minutes, but the recipe says the pot does not need to be preheated.
How do I know when the loaf is proofed?
Press a finger about 1.3 cm into the dough. If the dent fills slowly, the loaf is ready; if it fills immediately, allow more proofing time.
What can I use instead of a banneton?
Line a bowl with a lint-free tea towel and dust the towel with rice flour before placing the loaf seam-side up.
Why does the dough need such a long rest?
This no-knead method relies on a long bulk fermentation to develop the dough. The recipe specifies 10–12 hours at 20–22°C, with a shorter time if the room is much warmer.
How long should the bread cool?
Cool it for at least 1 hour before slicing. The recipe recommends 4–12 hours when possible for flavour and texture.
Cook it from the original
This recipe comes from bakerbettie.com. Their page has the author’s own photos, notes and tips — the best place to cook it from.
Open the recipe on bakerbettie.com