
Buttermilk Fried Chicken
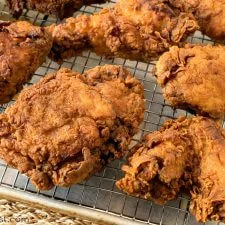
Buttermilk fried chicken pairs a seasoned, crisp flour crust with tender chicken brined overnight in buttermilk and herbs. It takes planning and careful frying, but the batch-cooking method makes a generous meal for four.
Ingredients
- 1.36–1.81 kg (3–4 pounds)whole chicken or chicken pieces
- 473 ml (2 cups)buttermilk
- 237 ml (1 cup)water
- 3 tablespoonskosher salt
- 1 tablespoongranulated sugar
- 2 teaspoonsgarlic powder
- 6whole black peppercorns
- 2 large sprigsfresh rosemary
- 8 small sprigsfresh thyme
- 473 ml (2 cups)buttermilk
- 375 g (3 cups)plain flour
- 1 1/2 teaspoonskosher salt
- 1 teaspoonwhite pepper
- 1/4 teaspoonground cayenne pepper
- 1 1/2 teaspoonsgarlic powder
- 1 1/2 teaspoonsonion powder
- 1 teaspoonpaprika
- 710 ml or more (3 or more cups)lard
Instructions
- 1
Cut the chicken
Cut the chicken into 10 pieces: two wings, two thighs, two drumsticks and two breast halves, each cut in half again. Put them in a large resealable food bag.
- 2
Mix the brine
In a bowl, combine 473 ml (2 cups) buttermilk, the water, 3 tablespoons salt, sugar, 2 teaspoons garlic powder, peppercorns, rosemary and thyme.
- 3
Marinate overnight
Pour the mixture over the chicken. Press the air out of the bag, seal it and refrigerate for at least 12 hours and up to 24 hours.
- 4
Rinse the chicken
The next day, discard the marinade and rinse the chicken pieces under cold water.
- 5
Rest at room temperature
Set the chicken on a rack over a baking tray and leave it at room temperature for 1 hour.
- 6
Pour the buttermilk
Put 473 ml (2 cups) buttermilk in a medium bowl.
- 7
Season the flour
In another medium bowl, whisk together the flour, 1 1/2 teaspoons salt, white pepper, cayenne, 1 1/2 teaspoons garlic powder, onion powder and paprika.
- 8
Heat the lard
Set a cast-iron frying pan over a burner and add enough lard to come halfway up its sides. Heat to 171°C (340°F), using a thermometer to keep the temperature at or below that point.
- 9
Prepare the oven
Set the oven to its warm setting. Put a rack over a baking tray and set it aside.
- 10
Coat the breasts
Dip four breast pieces in buttermilk, then the flour mixture, then buttermilk again and flour again. For the second coating, press the flour firmly onto the chicken so it forms clumps.
- 11
Lower into the fat
Using tongs, add the breasts to the hot lard one at a time, skin side down. Each piece will make the fat foam; wait a few seconds between additions for the foam to settle so it does not overflow.
- 12
Fry the breasts
Cook for about 4 minutes, then use tongs to check the underside. If it is golden, turn the chicken and continue frying for about 12–16 minutes total, turning a few more times if needed for even browning. Check that the internal temperature reaches 74°C (165°F) with a probe thermometer.
- 13
Keep warm
Transfer the cooked breasts to the prepared rack and place them in the warm oven while you fry the remaining pieces.
- 14
Fry remaining pieces
Once the lard is back to 171°C (340°F), coat the remaining chicken twice as before. Add the thighs skin side down first, followed by the drumsticks and then the wings.
- 15
Turn the chicken
As before, after about 4–5 minutes check the colour and turn the pieces to cook the other side.
- 16
Check each piece
The wings will finish first, followed by the drumsticks and thighs. Use tongs to move each piece to the rack in the oven when it reaches 74°C (165°F) inside; these pieces should take 2–4 minutes less overall than the breasts.
- 17
Skip extra salt
The chicken is considered sufficiently seasoned as it comes out of the lard, so no extra salt is added.
What is buttermilk fried chicken?
Fried chicken is a familiar American dish: chicken pieces are coated and cooked in hot fat until the outside is crisp and the meat is cooked through. This version builds flavour in stages, using an overnight buttermilk brine followed by a seasoned flour coating.
The double coating and the flour clumps it creates are central to the craggy crust. Frying the breasts separately from the smaller pieces also lets you manage their different cooking times.
Nutrition and macros by portion
The nutrition label shows one serving as written: 848 calories, 99g protein, 40g carbs, 30g fat.
| Portion | Adjustment | kcal | Protein | Carbs | Fat |
|---|---|---|---|---|---|
| Lighter | Smaller chicken piece | 594 kcal | 69g | 28g | 21g |
| This serving | As written | 848 kcal | 99g | 40g | 30g |
| Hungry | Add a chicken piece | 1272 kcal | 148g | 59g | 45g |
The chicken supplies most of the protein, while the flour coating contributes carbohydrates and the lard contributes much of the fat. For a more balanced plate, serve a piece with a generous side of vegetables or salad.
The overnight buttermilk brine
Brine ingredients: buttermilk, water, salt, sugar, garlic powder, peppercorns, rosemary and thyme give the chicken time to take on seasoning. Refrigerate it for at least 12 hours and no more than 24 hours, as directed.
After brining: discard the liquid and rinse the pieces under cold water, then let them sit on a rack for an hour at room temperature. This gives you time to prepare the coating and frying station.
Building the craggy coating
Seasoned flour: white pepper, cayenne, garlic powder, onion powder and paprika season the plain flour. Whisk them together before coating so the spices are distributed throughout.
Two passes: dip each piece in buttermilk, flour, buttermilk and flour once more. On the second flour dip, press the mixture onto the chicken to form small clumps that fry into a textured crust.
Keeping the frying temperature steady
Hot lard: the recipe calls for heating the fat to 171°C (340°F) and not going higher. Use a thermometer to monitor it, and let the temperature recover to 171°C before adding the next batch.
Foaming fat: lower the chicken in with tongs, one piece at a time, allowing the foam to settle between additions. Use a pan large enough to leave room for the foaming fat, and take care around the hot lard.
How to judge doneness
Colour: check the underside after about 4 minutes, then turn each piece when it is golden. Turning the chicken a few times can help it brown evenly.
Temperature: use a probe thermometer to confirm the centre reaches 74°C (165°F). The wings finish first, then the drumsticks and thighs; check pieces individually rather than relying on one cooking time for the whole batch.
Fry in batches and hold warm
Breasts first: the method starts with four breast pieces, which take about 12–16 minutes in total. Move them to the rack in a warm oven while the remaining pieces cook.
Smaller pieces: return the lard to 171°C (340°F), then fry thighs, drumsticks and wings in that order. The oven rack helps hold finished pieces while the rest of the batch cooks.
What to serve alongside
Fresh sides: serve the chicken with a green salad or simply cooked vegetables to bring freshness alongside the crisp coating. A sharp, vinegar-based slaw is another good contrast.
Filling sides: biscuits, bread or potatoes can make the meal more substantial. Since the chicken is already richly coated, choose the sides according to how hearty you want the plate to be.
Recipe notes & tips
- Use a thermometer to keep the lard at 171°C (340°F) and never above it.
- Let the foam settle between adding chicken pieces to help prevent the fat from overflowing.
- Press flour onto the second coating to create the clumps that give the crust texture.
- Keep finished pieces on the rack in a warm oven while you fry the next batch.
- Check each piece with a probe thermometer and remove it once it reaches 74°C (165°F) inside.
Variations
- Adjust the heat: use less cayenne for a milder coating, or more for extra warmth.
- Herb emphasis: vary the balance of rosemary and thyme in the brine while keeping the listed quantities.
- Piece selection: use chicken pieces instead of a whole chicken, keeping the method's separate frying batches in mind.
- Seasoning balance: adjust the white pepper, paprika or garlic powder in the flour to suit your preferred flavour.
- Serve with slaw: add a crisp, tangy slaw alongside the chicken for a fresh contrast.
Common mistakes to avoid
- Skipping the brine: allow at least 12 hours in the refrigerator for the chicken to take on the brine's seasoning.
- Adding chicken too quickly: lower pieces in one at a time and pause for the foam to settle.
- Letting the lard overheat: monitor it and keep it at 171°C (340°F) or below.
- Making a thin coating: press the flour onto the second dip so it forms clumps.
- Guessing doneness: check the internal temperature of each piece and cook to 74°C (165°F).
How to store
Refrigerate leftover chicken in a covered container once cooled, for up to 3 days. Reheat in an oven until hot throughout; the coating may soften during storage.
Frequently asked questions
How long should the chicken stay in the brine?
Refrigerate it for at least 12 hours and up to 24 hours. Discard the brine and rinse the chicken before cooking.
Can I use chicken pieces instead of a whole chicken?
Yes. The ingredient list allows for either a whole chicken or chicken pieces; the method cooks the breast pieces first, then the thighs, drumsticks and wings.
What temperature should the lard be?
Heat it to 171°C (340°F) and do not let it go higher. Use a thermometer to monitor the fat and let it return to temperature between batches.
How do I know when the chicken is cooked?
Use a probe thermometer to check that each piece reaches 74°C (165°F) internally. The wings and other smaller pieces will finish before the larger pieces.
Why coat the chicken twice?
The sequence of buttermilk, flour, buttermilk and flour builds a thicker coating. Pressing flour onto the second layer creates clumps for a more textured crust.
Can I make this recipe without lard?
The recipe specifies lard for frying. It does not provide an alternative fat or instructions for changing the frying method.
Cook it from the original
This recipe comes from afamilyfeast.com. Their page has the author’s own photos, notes and tips — the best place to cook it from.
Open the recipe on afamilyfeast.com