
How to Build a Sourdough Starter from Scratch
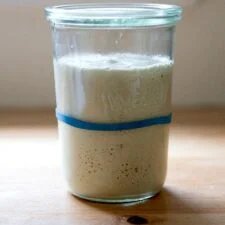
A simple flour-and-water sourdough starter is built over several days by allowing natural fermentation to develop, then feeding a small portion until it becomes active. It takes patience and a warm spot, but gives you a starter to use in sourdough recipes.
Ingredients
- 192 gstone-milled flour
- 192 gwater or pineapple juice
- 128 gstone-milled flour, for the Day 3 feeding
- 128 gwater, for the Day 3 feeding
- 128 gstone-milled flour, for the Day 4 feeding or an additional feeding if the starter doubles on Day 3
- 128 gwater, for the Day 4 feeding or an additional feeding if the starter doubles on Day 3
- 100 gactive starter, for the Day 5 offshoot
- 100 gstone-milled flour, for the Day 5 offshoot
- 100 gwater, for the Day 5 offshoot
Instructions
- 1
Mix on Day 1
In a straight-sided vessel or large bowl, stir together 192 g flour and 192 g water or pineapple juice until no dry flour remains. Cover, note the date, time and quantities, and leave in a warm place, ideally 24–27°C, for 24 hours. Stir once or twice if you remember.
- 2
Stir on Day 2
Uncover the vessel and stir the mixture. Cover it again, record what you have done and leave it somewhere warm for another 24 hours. Stir once or twice during that time if convenient.
- 3
Feed on Day 3
Stir in 128 g flour and 128 g water, then cover the vessel. Mark the mixture's height with tape and record the feeding. Keep it warm and, if possible, watch it for 8–10 hours. If it doubles or starts to double, feed it another 128 g each of flour and water. If it doubles again before bedtime, move on to making the offshoot on Day 5; otherwise, leave it warm overnight and make the offshoot the next morning. If there is little activity, leave it warm until the next morning, stirring once or twice, then continue with Day 4.
- 4
Feed on Day 4
If the starter showed little activity on Day 3, uncover it and look for bubbles and a pleasant, fruity-yoghurt-like smell. Stir in 128 g each of flour and water, cover, mark the height and record the feeding. Leave it warm and monitor it for 8–10 hours if possible. If it doubles or starts to double, test a spoonful in water; if it floats, proceed to the Day 5 offshoot. If it has not quite doubled, keep it warm until the next morning, stirring once or twice, then make the offshoot.
- 5
Build on Day 5
When the mixture has shown activity and risen and fallen, transfer 100 g of it to a clean vessel. Add 100 g flour and 100 g water and stir well. Cover, mark the height with a rubber band and leave somewhere warm. Put the remaining original mixture in the fridge as sourdough discard. When the new starter doubles, you can repeat the process by moving 100 g to a fresh vessel and feeding it with 100 g each of flour and water; refrigerate the remainder as discard. Repeat feedings to strengthen it, pause by refrigerating it if needed, or try it in a sourdough bread recipe.
- 6
Maintain the starter
Once the starter is strong and active, follow a regular feeding and storage routine to maintain it.
What is a sourdough starter?
A sourdough starter is a living mixture of flour and water that ferments and is used to leaven bread. This method is adapted from Peter Reinhart's approach and builds the culture through successive feedings rather than relying on commercial yeast.
The process works by keeping the mixture warm, watching for signs of activity and transferring a small portion into a fresh feeding. The discarded remainder can be saved for other recipes.
Nutrition and macros by portion
The nutrition label shows one serving as written: 667 calories, 19g protein, 140g carbs, 2g fat.
| Portion | Adjustment | kcal | Protein | Carbs | Fat |
|---|---|---|---|---|---|
| Lighter | Use less starter | 467 kcal | 13g | 98g | 2g |
| This serving | As written | 667 kcal | 19g | 140g | 2g |
| Hungry | Make a larger bread loaf | 1001 kcal | 29g | 210g | 3g |
The flour supplies most of the carbohydrates and some protein; water contributes no macros, while the small amount of fat comes naturally from the flour. The stated three servings are difficult to interpret for a starter that is fed, divided and partly stored as discard, so these figures are only a rough estimate; balance a bread-based meal with a source of protein and vegetables.
Choose and measure the ingredients
Stone-milled flour: The recipe specifies this flour for the initial mixture and feedings. Weigh it rather than relying on a volume measure for consistent proportions.
Water or juice: Water is used for later feedings; pineapple juice is an option in the initial mix. Use a scale for the quantities, including the water.
Keep the starter warm
Warmth: Aim for about 24–27°C and choose a spot where the temperature stays fairly steady. A cool room can slow visible activity, so give the starter more time rather than assuming it has failed.
Vessel: A straight-sided jar makes it easier to see how far the starter has risen. Marking its height after a feeding helps you judge whether it has doubled.
Read the signs of fermentation
Bubbles: Small or large bubbles, rising and falling, and a pleasant fruity, yoghurt-like smell are useful signs of activity. The starter may not follow an exact day-by-day schedule.
Float test: The method suggests dropping a spoonful into water once the starter is doubling or beginning to double. If it floats, the recipe treats that as a sign to move on to the offshoot; if it does not, allow more time.
Make the offshoot
Small transfer: On Day 5, take 100 g of the active mixture and combine it with 100 g each of flour and water in a clean vessel. This creates a fresh starter while the remaining original mixture becomes discard.
Further feeds: Once the new starter doubles, repeat the 100 g transfer and feeding if you want to continue strengthening it. Keep the vessel covered and mark the level so you can follow its rise.
Allow for an uneven timeline
Timing: The schedule gives checkpoints, not a guarantee that every starter will be ready on the same day. If activity is slow, keep it warm, stir as directed and continue the next morning.
Pausing: If you need to stop, the method says to refrigerate the starter and resume when you are ready. For longer-term feeding and storage, use a separate maintenance routine.
Use the discard and serve
Discard: The leftover original mixture can be stored in the fridge and used in other recipes, rather than being treated as part of the new starter.
Serving ideas: Once your starter is strong and active, use it in a sourdough bread recipe. This is a baking ingredient rather than a dish to serve on its own.
Recipe notes & tips
- Use a scale to weigh flour and liquid accurately.
- Choose a straight-sided vessel so the rise is easy to see.
- Record each feeding and mark the starter's height.
- Keep the jar in a warm place, ideally around 24–27°C.
- Give the mixture extra time if it has not shown the expected activity.
- Save the refrigerated discard for another recipe.
Variations
- Use pineapple juice: Replace the initial water with the same weight of pineapple juice.
- Choose a different flour: Keep the method's stated weights when using another suitable flour.
- Adjust the warmth: Use a steady, gently warm spot if your kitchen is cool.
- Pause the process: Refrigerate the starter if you need to stop and continue later.
- Repeat the feeding: Transfer 100 g to a clean vessel and add 100 g each of flour and water when it doubles.
Common mistakes to avoid
- Measuring by volume: Weigh the flour and liquid for more reliable proportions.
- Using a rounded bowl: A straight-sided vessel makes the rise easier to track.
- Expecting a fixed schedule: Continue the process if the starter is not yet active.
- Forgetting the height: Mark the level after feeding so you can judge its growth.
- Keeping it too cool: Find a warmer, steady place and allow more time for fermentation.
- Discarding the remainder: Refrigerate the leftover mixture as discard for later use.
How to store
Keep the original mixture left after making the Day 5 offshoot in the fridge as sourdough discard; the method does not give a storage duration. The new starter can also be refrigerated if you need to pause, then fed again when you resume. Follow a separate maintenance routine once it is strong and active.
Frequently asked questions
How warm should the starter be kept?
The method recommends a warm spot around 24–27°C. A steady temperature is more useful than a very warm place.
What if there are no bubbles on Day 3?
Leave it somewhere warm until the next morning, stirring once or twice, and continue with the Day 4 feeding.
Does the starter have to double before I continue?
The method allows for slower activity: if it is not doubling, keep it warm and continue the next morning. Use the rise, bubbles and smell as cues rather than relying only on the calendar.
What is the leftover mixture?
After transferring 100 g to build the new starter, the remaining original mixture is treated as sourdough discard. Store it in the fridge for use in other recipes.
Can I pause the process?
Yes. The method says to refrigerate the starter if you need a break, then pick up where you left off when ready.
When can I bake with it?
The method suggests using it once it has become strong and active. If it needs more strength, repeat the 100 g starter, 100 g flour and 100 g water feeding as described.
Cook it from the original
This recipe comes from alexandracooks.com. Their page has the author’s own photos, notes and tips — the best place to cook it from.
Open the recipe on alexandracooks.com