
Mille-Feuille Recipe
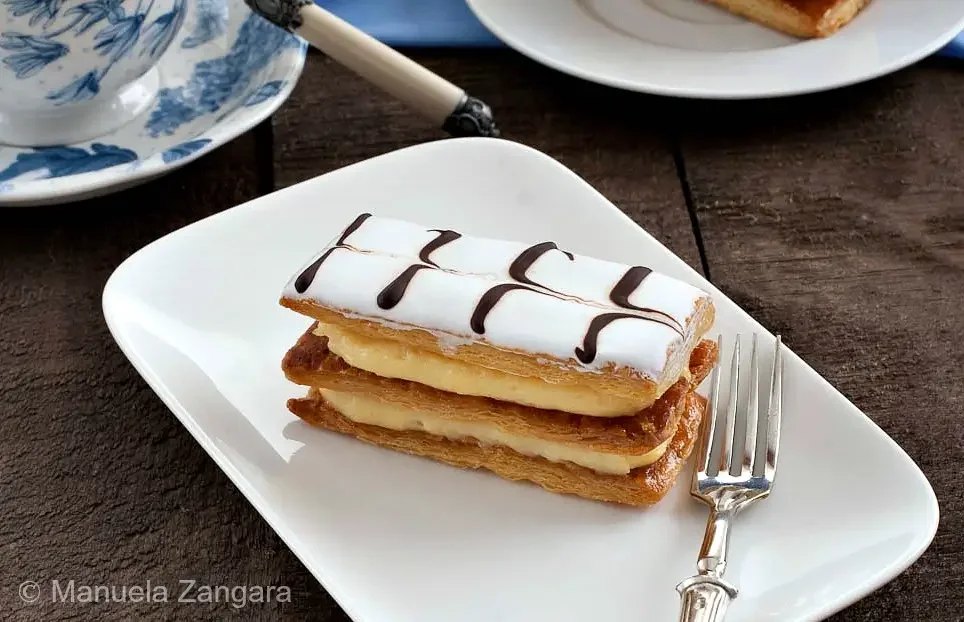
Mille-feuille layers crisp, caramelised puff pastry with smooth crème pâtissière, finished with white icing and a feathered chocolate pattern. It makes an elegant French-inspired dessert for sharing, especially alongside coffee or fresh fruit.
Ingredients
- 12 piecespuff pastry
- al gustoicing sugar, for sprinkling
- 1/2 dosecrème pâtissière, made and chilled
- 1egg white
- 1 tbsplemon juice
- 175 g (6 oz)icing sugar
- 2 tbspdark chocolate, melted
Instructions
- 1
Prick the pastry
Prick the puff pastry rectangles all over with a fork to limit how much they rise in the oven.
- 2
Cover the pastry
Arrange the rectangles on a baking tray lined with baking paper. Cover them with a silicone mat, or another sheet of baking paper and a heavy baking tray, to keep them from puffing up too much.
- 3
Bake until golden
Bake in a preheated oven at 200°C (400°F) for 15 minutes. Remove the top tray and baking paper, dust the pastry with icing sugar, then bake uncovered for another 5 to 10 minutes until browned and caramelised, watching closely so the sugar does not burn.
- 4
Cool the pastry
Take the pastry out of the oven and leave the rectangles to cool on a wire rack.
- 5
Fill a piping bag
When the pastry is cool, transfer the crème pâtissière to a piping bag fitted with a large round nozzle. Alternatively, use a reusable bag with the end snipped off.
- 6
Pipe the first layer
Pipe enough crème pâtissière to cover 4 puff pastry rectangles.
- 7
Add the middle layer
Place another 4 rectangles on top and press lightly so they adhere to the filling.
- 8
Finish the layers
Pipe more crème pâtissière over the 4 pastries, then add the remaining 4 rectangles. Press lightly again to help them stick.
- 9
Chill the pastries
Refrigerate the assembled pastries while you prepare the icing.
- 10
Prepare the chocolate
Melt the chocolate and transfer it to a piping bag fitted with a small round nozzle, or to a plastic bag with one corner snipped. Stand the bag upright in a glass or other tall container.
- 11
Mix the icing
Whisk the egg white, lemon juice and icing sugar with an electric mixer until smooth and thick enough to leave trails on the surface. If it is too thin, whisk in a little more icing sugar.
- 12
Ice the pastries
Take the pastries out of the fridge and pour the icing over the top, spreading it evenly. Alternatively, remove the top pastry layers and dip them into the icing.
- 13
Pipe the chocolate
Work quickly to pipe thin lines of chocolate across the width of each pastry.
- 14
Make the pattern
Use a toothpick or sharp knife to draw straight lines from top to bottom through the chocolate.
- 15
Set before serving
Chill for a couple of hours so the icing sets and the flavours develop. Serve cold or at room temperature.
What is mille-feuille?
Mille-feuille is a French layered pastry, traditionally made with crisp pastry and pastry cream, then finished with icing. Its name means “a thousand leaves”, referring to the many delicate layers in puff pastry.
This version builds four individual desserts from three pastry rectangles each. Caramelising the pastry adds a sweet, crisp top, while the chocolate lines make the icing finish distinctive.
Nutrition and macros by portion
The nutrition label shows one serving as written: 680 calories, 9g protein, 73g carbs, 39g fat.
| Portion | Adjustment | kcal | Protein | Carbs | Fat |
|---|---|---|---|---|---|
| Lighter | Smaller pastry portions | 476 kcal | 6g | 51g | 27g |
| This serving | As written | 680 kcal | 9g | 73g | 39g |
| Hungry | Add another pastry layer | 1020 kcal | 14g | 110g | 59g |
The pastry and icing sugar provide most of the carbohydrate, while puff pastry and crème pâtissière contribute much of the fat; the cream and egg white supply some protein. Serve a portion with fresh fruit, or keep the accompanying drink unsweetened, to balance the dessert.
Keep the pastry flat and crisp
Pricking the pastry and covering it with a mat or weighted tray helps keep the rectangles relatively even as they bake. The weight should restrain the rise rather than squash the pastry completely.
Uncover the pastry for the final bake so the icing sugar can brown and caramelise. Keep watch during these last 5 to 10 minutes, since sugar can darken quickly.
Use cool pastry and cream
Cool the baked rectangles fully before assembling; warm pastry can soften the crème pâtissière and make the layers harder to handle.
A large round nozzle makes it easier to spread the filling across each rectangle. Pipe enough cream to cover the surface, but avoid pressing hard when adding the next layer.
Get the icing consistency right
The icing should be smooth and thick enough for whisk trails to remain visible briefly. If it runs too freely, add a little more icing sugar and whisk again.
Spread or dip the top layers, then pipe the chocolate while the icing is still workable. Dragging a toothpick through the lines creates the feathered pattern without needing to move the pastry layers.
Plan the chilling time
The stated total time is 145 minutes, including the couple of hours needed for the icing to set. Allow extra time if your crème pâtissière still needs to be made and chilled.
The assembled pastries need to be cold for serving, but they can be brought to room temperature if you prefer a less chilled texture. The pastry is crispest soon after assembly.
Serve with something fresh
Serve a pastry with fresh fruit, as suggested, to give the plate a bright contrast to the rich cream and sweet icing. Coffee is another simple accompaniment.
The recipe makes four portions, each built from three pastry rectangles. Handle them gently when serving so the layers stay stacked.
Recipe notes & tips
- Make the crème pâtissière ahead and chill it before you start assembling.
- Use a heavy tray or silicone mat to keep the pastry rectangles from rising too much.
- Watch closely while the icing sugar caramelises, especially towards the end of baking.
- Let the pastry cool completely before piping on the cream.
- Keep the chocolate piping bag upright in a tall glass while you spread the icing.
- Work promptly when piping and feathering the chocolate so the icing does not set first.
Variations
- Add berries: Serve fresh berries alongside each pastry for a tart, fruity contrast.
- Use vanilla cream: Flavour the crème pâtissière with vanilla if that suits your chosen recipe.
- Change the chocolate: Use white chocolate instead of dark for a milder pattern.
- Make smaller portions: Cut the pastry into smaller rectangles and assemble more individual stacks.
- Skip the pattern: Leave the icing plain or finish it with a light dusting of icing sugar.
Common mistakes to avoid
- Skipping the fork pricks: The pastry may rise unevenly; prick the rectangles before baking.
- Removing the cover too soon: The pastry can puff up more than intended; keep it covered for the first 15 minutes.
- Burning the sugar: Caramelised icing sugar can turn quickly; watch the pastry during the final 5 to 10 minutes.
- Filling warm pastry: Heat can soften the cream; cool the rectangles fully before assembly.
- Using runny icing: It may slide off the top; whisk in a little more icing sugar until trails remain.
- Waiting to pipe the chocolate: The icing may begin to set; pipe the lines as soon as the top is iced.
How to store
Keep the assembled pastries covered in the fridge and eat within 1 day for the best texture; the pastry will soften as it sits. Serve cold or let a portion stand briefly at room temperature, and avoid reheating because it can melt the icing and cream.
Frequently asked questions
Can I make the crème pâtissière ahead?
Yes. Make half a dose of your crème pâtissière recipe and chill it before assembling the pastries.
Why is the pastry covered while it bakes?
The silicone mat or weighted tray helps limit how much the puff pastry rises. Remove it for the final bake so the icing sugar can caramelise.
How do I know when the pastry is done?
After the initial 15 minutes at 200°C, uncover and dust it with icing sugar, then bake for another 5 to 10 minutes until browned and caramelised. Keep a close eye on it to prevent burning.
What if my icing is too thin?
Whisk in a little more icing sugar until the mixture is thick enough to leave trails on its surface.
Can I serve mille-feuille straight from the fridge?
Yes. The recipe says to serve it cold or at room temperature, so either is suitable.
How far ahead should I assemble it?
Allow a couple of hours for the icing to set after decorating. For the crispest pastry, avoid assembling it much earlier than needed.
Cook it from the original
This recipe comes from manusmenu.com. Their page has the author’s own photos, notes and tips — the best place to cook it from.
Open the recipe on manusmenu.com