
Thalassery Chicken Dum Biryani
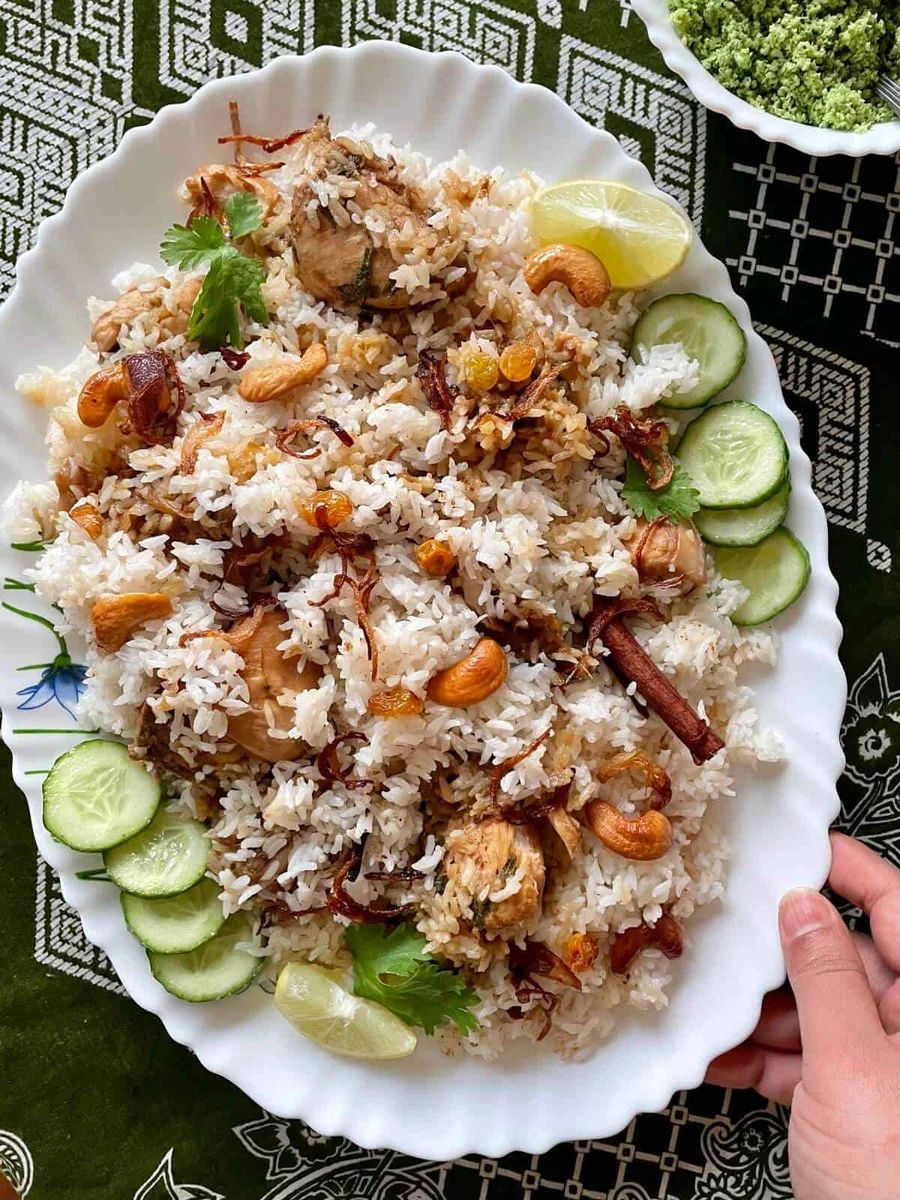
Thalassery biryani is one of the most sought-after Malabar rice and meat dish served for all occasions. Be it weddings or family gatherings, you will find a large platter of this dum biryani served with pickle, chammanthi, curd and sometimes papadums too.
Ingredients
- 1 pinch saffron strands (crushed)
- 2 tbsp water
- 1/2 cup cooking oil (any neutral frying oil)
- 2 tbsp ghee
- 2 to 3 large red onions
- 10 to 12 whole cashews
- 1 to 2 tbsp golden raisins
- 2 to 3 tbsp cooking oil ((onion fried oil))
- 2 to 3 medium-sized red onions (sliced thinly)
- 800 to1000 grams skinless whole chicken (cut into 8 to 12 pieces, washed and pat dried)
- 12 to 15 garlic cloves
- 2 inch ginger ((40g))
- 12 to 15 green chillies
- 1/4 cup yoghurt (whisked)
- 1 tomato (chopped)
- 1/2 teaspoon Malabar garam masala
- 1/2 cup Fresh coriander leaves (chopped)
- 1/4 cup fresh mint leaves
- 2 teaspoon lime juice
- salt to taste
- 1 to 2 tbsp ghee (plus remaining onion fried oil)
- 1 small red onion (diced)
- 2 inch cinnamon stick
- 3 to 5 green cardamom
- 5 to 6 cloves
- 1 garlic clove (crushed)
- 2 cups Jeerakasala or Kaima rice (washed and drained immediately)
- 4 cups hot water
- 2 to 3 green chillies (slit)
- salt to taste
- fried onions (cashews and raisins)
- rose water ((optional))
Instructions
- 1
--- Brew saffron ---
- 2
brew saffron: Pound the saffron strands with a pinch of sugar in a mortal and pestle. Add to a small bowl with hot water. Keep covered until required. If you have an ice cube, then just place the saffron strands on the ice cube in a small bowl and let sit until melted. You may skip saffron and use a pinch of turmeric powder in water.
- 3
--- Fry ---
- 4
Fry: Heat the oil and ghee in a deep round-bottomed kadai.
- 5
Fry: Add the sliced onions to a bowl and use your hands to lightly massage them to separate the strands.
- 6
Fry the sliced onions in small batches on medium flame stirring often until evenly golden. Each batch may take 4 to 6 minutes. Try not to step away as you may end up with burnt onions, which can also make the oil bad. You will be using the fried oil for the rest of the recipe.
- 7
Fry: Remove the fried onions using a slotted spoon and spread them on a tray lined with kitchen tissue. This is to drain any excess oil.
- 8
Fry: Split the cashews and add to the oil. Fry the cashews until golden and remove and keep them aside.
- 9
Fry: Next, add the golden raisins and fry for a few seconds and remove and keep them aside. You will be using the leftover fried oil for the rest of the recipe.
- 10
--- Prepare the chicken masala ---
- 11
Prepare the chicken masala: Heat 3 to 4 tbsp of the onion-fried oil in the pot you plan to dum the biryani. Or, you may choose to make it in a pressure cooker or a saucepot.
- 12
Prepare the chicken masala: Add the sliced onions and sauté until translucent.
- 13
Prepare the chicken masala: Next, add the chicken pieces and saute continuously until all the pieces are white or no longer look pink or raw.
- 14
Prepare the chicken masala: Meanwhile, add the ginger, garlic and green chillies to a mini chopper and pulse them to coarse.
- 15
Prepare the chicken masala: Once all the chicken pieces turn white, add some salt, crushed ginger, garlic and green chillies and mix until the raw smell of ginger and garlic is gone.
- 16
Prepare the chicken masala: Stir in the whisked curd, chopped tomato and most of the fried onions and some Malabar garam masala. Retain some of the fried onions for garnishing.
- 17
Prepare the chicken masala: Mix well and cook covered for 10 to 15 minutes or until the chicken is cooked through. There is no need to add any water, as the curd and chicken will release water, enough for the chicken to get cooked. Switch off and start the prep for biryani rice.
- 18
--- Prepare the Neychoru ---
- 19
Prepare the Neychoru: Heat the remaining onion fried oil in a flat-bottomed deep pot.
- 20
Prepare the Neychoru: Add the diced onions, whole spices and garlic clove and saute until the onions turn translucent. Meanwhile, boil enough water in the kettle. ( at least 2 cups for every 1 cup of rice or as per pack instruction)
- 21
Prepare the Neychoru: Now, add the washed and drained short-grain jeerakasala (Kaima) rice and fry for 3 to 5 minutes or until dried and coated in oil.
- 22
Prepare the Neychoru: Pour the required amount of boiling water and salt to taste. At this point, you may add a few green chillies (optional)
- 23
Prepare the Neychoru: Cook on med-high until most of the water is absorbed and the rice surfaces so that rice and water are at the same level.
- 24
Prepare the Neychoru: Reduce the flame to the lowest, and turn the rice gently to bring the bottom to the top. Check and adjust the salt and then cover and cook for around 8 to 10 minutes. Switch off and keep covered for 5 to 8 mins.
- 25
--- Dum-cook ---
- 26
Dum-cook: Meanwhile, bring the biryani masala pot back on the heat and cook off any excess watery gravy, if any. Stir in fresh coriander leaves, lime juice and a sprinkle of garam masala. Switch off and assemble the rice.
- 27
Dum-cook: Gently scoop and scatter the prepared biryani rice over the hot chicken masala, then sprinkle Malabar garam masala, fried onions, fried cashews and fried raisins. Sprinkle some chopped coriander, rose water and brewed saffron on the top.
- 28
Dum-cook: Cover the entire pot with foil and tightly close it with a heavy lid. If your lid is not heavy, then place a heavy object like a mortar or a jug of water. Traditionally, we place charcoal on the top lid which defines dum cooking. But for indoor cooking, we can skip that and instead place a heavy object.
- 29
Dum-cook: Keep a flat pan or heat diffuser on the hob and then keep the biryani pot over this. Dum cook on the lowest flame for 20 to 25 minutes.
- 30
--- Serve ---
- 31
Serve: Open and dish out the rice on a large serving platter with the masala. Before serving garnish with more fried onions, cashews, and raisins.
- 32
Serve with green salad, yoghurt, pickled onions, coconut mint chammanthi, lime pickle or date pickle, and pappadams!
Cook it from the original
This recipe comes from butfirstchai.com. Their page has the author’s own photos, notes and tips — the best place to cook it from.
Open the recipe on butfirstchai.com