
Harcha
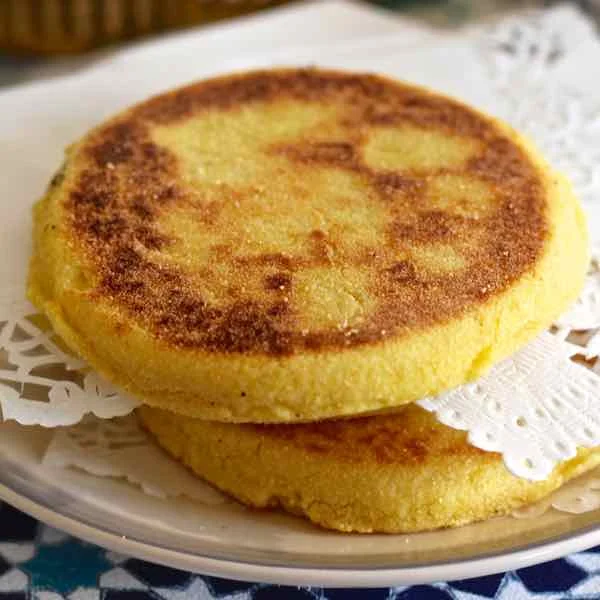
Harcha is a Moroccan semolina flatbread with a tender, crumbly texture and a lightly crisp surface. These small rounds are cooked in a frying pan and are lovely served warm for breakfast or a snack.
Ingredients
- 700 gfine semolina
- 3 tablespoonssugar
- 1 teaspoonsalt
- 2 sachetsbaking powder
- 200 gmelted butter
- 300 mlmilk
Instructions
- 1
Mix dry ingredients
Put the semolina, sugar, salt and baking powder in the food processor bowl and mix them together.
- 2
Add the butter
Pour in the melted butter and use the whisk attachment to mix until the semolina resembles crumbs.
- 3
Mix in milk
Add the milk and mix for 1 minute using the K beater.
- 4
Rest the dough
Leave the dough at room temperature for 15 minutes so the semolina can absorb the butter and milk.
- 5
Prepare the surface
Sprinkle semolina over the work surface.
- 6
Shape the rounds
Flatten the dough by hand, without using a rolling pin, then cut out circles with a cutter or a large glass.
- 7
Cook the harcha
Heat a non-stick frying pan over medium heat. Cook each harcha for 3 to 4 minutes on each side.
- 8
Serve warm
Serve the harcha hot or warm.
What is harcha?
Harcha is a Moroccan flatbread made with semolina, usually shaped into rounds and cooked on a pan rather than baked. This version uses butter, milk and baking powder for a rich dough that cooks up soft inside with a lightly browned exterior.
The dough is shaped by hand, so the rounds keep a pleasantly rustic feel. Serve them warm on their own or alongside breakfast.
Nutrition and macros by portion
The nutrition label shows one serving as written: 535 calories, 12g protein, 69g carbs, 22g fat.
| Portion | Adjustment | kcal | Protein | Carbs | Fat |
|---|---|---|---|---|---|
| Lighter | Use less butter | 375 kcal | 8g | 48g | 15g |
| This serving | As written | 535 kcal | 12g | 69g | 22g |
| Hungry | Serve an extra harcha | 803 kcal | 18g | 104g | 33g |
Semolina supplies most of the carbohydrates, while butter contributes much of the fat and saturated fat; the milk adds a little protein alongside the semolina. For a more balanced plate, serve a harcha with yoghurt and fruit, or add eggs and vegetables for a savoury meal.
The role of semolina
Fine semolina: its small grains give harcha its distinctive texture. A brief rest after adding the milk helps the grains absorb the liquid and butter before shaping.
Baking powder: it gives the rounds some lift as they cook. Mix it thoroughly with the dry ingredients so it is spread through the dough.
Building the dough
Melted butter: mixing it into the semolina first creates a crumb-like mixture, rather than adding it after the milk. This helps coat the grains evenly.
Milk: add it after the butter and mix for 1 minute with the K beater. The dough should be workable enough to flatten by hand after its rest.
Shaping without a rolling pin
By hand: flatten the rested dough gently on a surface dusted with semolina. Avoid pressing it so firmly that the rounds become dense.
Cutting: use a cutter or a large glass to make the circles. Gather and reshape any offcuts carefully so you can use the dough without overworking it.
Cooking and doneness
Steady heat: a non-stick pan over medium heat gives the rounds time to cook through while their surfaces turn golden. If they darken too quickly, lower the heat.
Timing: cook each harcha for 3 to 4 minutes per side. Look for a lightly browned surface and a set centre before taking it out of the pan.
How to serve harcha
Warm from the pan: harcha is served hot or warm in this recipe, when its butter-rich texture is at its best. Set the rounds out for breakfast or a snack.
On the side: pair them with tea, yoghurt, honey or a savoury spread, depending on how you like to eat them.
Recipe notes & tips
- Let the melted butter cool slightly before mixing it into the semolina.
- Give the dough the full 15-minute rest so the semolina can absorb the liquid.
- Dust the work surface with semolina to make shaping easier.
- Flatten the dough by hand rather than with a rolling pin, as directed.
- Keep the pan at medium heat and adjust it if the rounds brown too quickly.
- Serve the harcha warm for the best texture.
Variations
- Olive oil: replace some or all of the butter with olive oil for a different flavour.
- Honey topping: drizzle a little honey over the warm rounds when serving.
- Savoury side: serve with cheese or a savoury spread instead of a sweet topping.
- Yoghurt pairing: add plain yoghurt on the side for a cool contrast.
- Smaller rounds: cut the dough into smaller circles for snack-sized portions.
Common mistakes to avoid
- Skipping the rest: the semolina needs time to absorb the butter and milk; leave the dough for 15 minutes.
- Using a rolling pin: the method calls for hand-shaping; flatten the dough gently with your hands.
- Hot pan: the outside can brown before the centre cooks; use medium heat.
- Crowding the pan: the rounds are harder to turn when packed together; cook them in batches if needed.
- Overcooking: the harcha can become dry; check each side after 3 minutes.
How to store
Cool leftover harcha completely, then store it in an airtight container in the fridge for up to 3 days. Reheat in a dry frying pan over low heat until warm, turning once.
Frequently asked questions
Can I make the dough without a food processor?
Yes. Mix the dry ingredients in a bowl, rub in the melted butter until crumbly, then stir in the milk until combined.
Can I use a rolling pin to shape harcha?
This recipe specifies shaping by hand rather than using a rolling pin. Flatten the dough gently with your hands on a semolina-dusted surface.
How do I know when each harcha is cooked?
The surface should be lightly browned and the centre should feel set. The recipe allows 3 to 4 minutes per side over medium heat.
Can I prepare the dough ahead?
The method calls for a 15-minute rest at room temperature. For a longer make-ahead period, refrigerate the dough covered and allow it to soften enough to shape before cooking.
What should I serve with harcha?
Serve it warm with honey, yoghurt, tea or a savoury spread. Fruit or eggs can round out a meal.
Cook it from the original
This recipe comes from 196flavors.com. Their page has the author’s own photos, notes and tips — the best place to cook it from.
Open the recipe on 196flavors.com