
Christmas Tree Cake
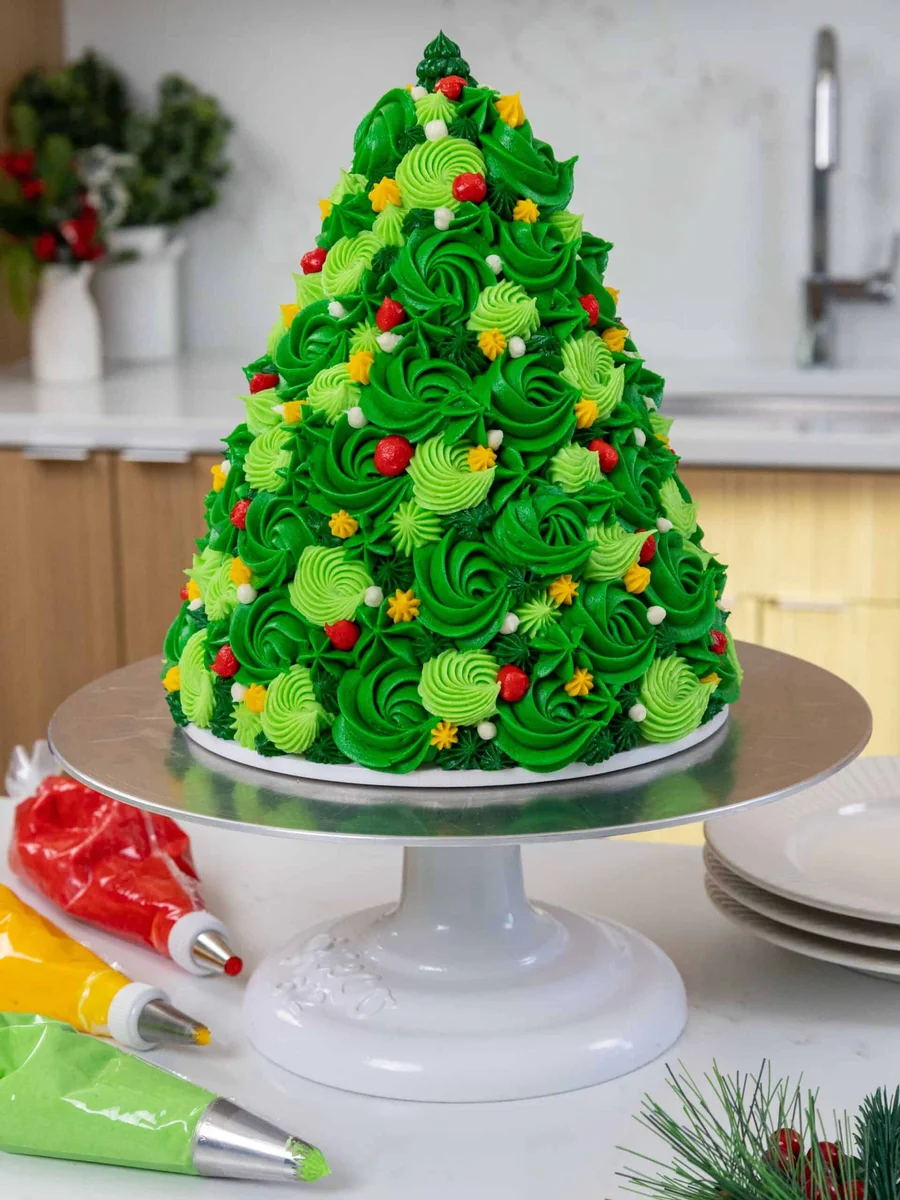
This American-style Christmas tree cake stacks spiced, marbled green cake layers into a festive tree shape and finishes them with piped buttercream decorations. It is a from-scratch centrepiece for a holiday gathering, with plenty of frosting for decorating.
Ingredients
- 3 cups (375 g)all-purpose flour
- 1 1/2 cups (300 g)granulated sugar
- 1 1/2 cups (300 g)packed light brown sugar
- 2 1/2 tsp (10 g)baking powder
- 1 tsp (6 g)fine salt
- 2 tsp (6 g)ground cinnamon
- 1 tsp (3 g)ground ginger
- 1/2 tsp (2 g)ground nutmeg
- 1/2 cup (113 g)unsalted butter, at room temperature
- 4 large (224 g)eggs, at room temperature
- 1 cup (255 g)full-fat sour cream, at room temperature
- 1/2 cup (90 g)unsweetened apple sauce
- 1/2 cup (105 g)vegetable or canola oil
- 1 tsp (4 g)vanilla extract or vanilla bean paste
- as neededgreen gel food colouring
- 3 cups (678 g)unsalted butter, at room temperature
- 1 tbsp (12 g)vanilla extract or vanilla bean paste
- 1 tsp (3 g)fine salt
- 10 cups (1,250 g)icing sugar
- 1/2 cup (120 g)double cream, at room temperature
- as neededgreen, yellow and red gel food colouring
Instructions
- 1
Prepare the tins
Heat the oven to 175°C. Line one 20 cm, one 18 cm, two 15 cm and two 10 cm cake tins with parchment rounds, then grease them with non-stick baking spray.
- 2
Combine dry ingredients
In a large bowl, mix the flour, granulated sugar, brown sugar, baking powder, 1 tsp salt, cinnamon, ginger and nutmeg until evenly combined.
- 3
Mix in the butter
On a low mixer speed, slowly mix in the 1/2 cup (113 g) butter. Continue until no large pieces remain.
- 4
Add the eggs
Mix in the eggs on low speed, adding them two at a time and stopping as soon as they are incorporated.
- 5
Finish the batter
Add the sour cream, apple sauce, oil and 1 tsp vanilla. Mix on low until just combined.
- 6
Beat until combined
Scrape down the sides of the bowl with a rubber spatula, then beat at medium speed for about 1 minute so the batter is evenly mixed.
- 7
Colour the batter
Use green gel food colouring to tint half the batter light green and the other half a darker green.
- 8
Fill and swirl
Spoon both shades into the prepared tins, filling each to the same height, about 2.5 cm. Swirl the colours together with a butter knife or small offset spatula for a marbled effect.
- 9
Bake the layers
Bake for 28–33 minutes, or until a toothpick comes out with a few moist crumbs. Leave the layers in their tins for 10 minutes, then run a small offset spatula around each edge to loosen them.
- 10
Cool and shape
Turn the layers out onto a wire rack to cool. Once completely cool, level their tops with a serrated knife, then stack and trim them into a tapered Christmas tree shape.
- 11
Thaw in advance
If the layers were made ahead and frozen, let them thaw for about 20 minutes before assembling. Keep them slightly cold to the touch, which makes assembly easier.
- 12
Start the buttercream
While the cake layers bake and cool, make the buttercream. Beat the 3 cups (678 g) butter with a paddle attachment on medium speed for 30 seconds, until smooth.
- 13
Add vanilla and salt
Mix in the 1 tbsp vanilla and 1 tsp salt.
- 14
Add sugar and cream
Gradually mix in the icing sugar and double cream on low speed.
- 15
Adjust the frosting
If the buttercream is too thick, add more cream 1 tbsp at a time. If it is too thin, add more icing sugar 1/4 cup at a time. Wait until the cake is stacked and crumb-coated before colouring the buttercream.
- 16
Stack the layers
On a greaseproof cake board or flat plate, use a dab of frosting to secure the first layer. Stack the layers from largest to smallest to form the tree shape.
- 17
Fill and support
Spread an even layer of buttercream over each layer as you stack it. Insert a wooden dowel or thick straw through the centre to help hold the cake in place.
- 18
Crumb coat the cake
Cover the cake with a thin coat of frosting and smooth it with an offset spatula or bench scraper. Chill in the fridge for 30 minutes or the freezer for 10 minutes, until the frosting feels firm.
- 19
Prepare white frosting
While the cake chills, colour the remaining buttercream. Put 1/2 cup of white frosting into a small piping bag fitted with a small round piping tip and set it aside.
- 20
Prepare red frosting
Tint 1/2 cup of frosting red with gel food colouring. Put it into a small piping bag fitted with a small French piping tip and set aside.
- 21
Prepare yellow frosting
Tint 1/2 cup of frosting yellow with gel food colouring. Put it into a small piping bag fitted with a small round piping tip and set aside.
- 22
Prepare green frosting
Tint half of the remaining frosting light green and the other half dark green. Put each colour into its own large piping bag fitted with an open star piping tip and set aside.
- 23
Pipe the decorations
Pipe rosettes around the cake with the green frosting, then fill the gaps with red, yellow and white frosting dollops.
What is a Christmas tree cake?
This is a tiered celebration cake shaped and decorated to resemble a Christmas tree. The recipe uses the familiar American-style layer-cake approach, with spiced cake, buttercream and a colourful finish.
The graduated tin sizes create the basic tree silhouette, while the green marbling gives the layers a festive look inside and out. Piped rosettes and contrasting frosting details complete the decoration.
Nutrition and macros by portion
The nutrition label shows one serving as written: 662 calories, 3g protein, 83g carbs, 36g fat.
| Portion | Adjustment | kcal | Protein | Carbs | Fat |
|---|---|---|---|---|---|
| Lighter | Smaller cake slice | 463 kcal | 2g | 58g | 25g |
| This serving | As written | 662 kcal | 3g | 83g | 36g |
| Hungry | Larger cake slice | 993 kcal | 5g | 125g | 54g |
The cake layers contribute most of the carbohydrates from flour and sugars, while butter, oil and cream supply much of the fat. Eggs and sour cream add some protein, though this is still a dessert-led serving; pair it with fresh fruit for a more balanced plate.
The spiced cake layers
Warm spices: cinnamon, ginger and nutmeg give the cake a seasonal flavour without overpowering its buttery, sweet base.
Moisture: sour cream, apple sauce and oil join the butter to make a soft batter. Bring the refrigerated eggs and sour cream to room temperature as directed so they mix in more readily.
Marbling and shaping
Two greens: tint half the batter light green and half a darker shade, then add spoonfuls of both colours to each tin. A few gentle swirls make a marbled pattern; too much mixing will blend the colours together.
Tapered stack: once the layers are cool and level, trim them to form the tree shape and stack from largest to smallest. Keep the layers slightly cold if they have been frozen, as the recipe directs.
Buttercream and assembly
Smooth frosting: beat the butter until smooth, then add the vanilla, salt, icing sugar and cream gradually on low speed. Adjust a frosting that is too thick with cream, or a thin one with more icing sugar, following the stated increments.
Secure the stack: a dab of frosting anchors the first layer to the board, and the dowel or thick straw helps steady the tiers. A thin crumb coat followed by chilling gives the frosting a firm base for piping.
Piping and serving
Green rosettes: pipe them around the chilled cake, then use the red, yellow and white frostings to fill in the gaps. Keeping the coloured frostings in separate piping bags makes it easier to place each detail.
Serve slices on their own or alongside fresh fruit to balance the rich cake and buttercream. Use a sharp serrated knife and wipe it between cuts for neater portions.
Recipe notes & tips
- Use room-temperature butter, eggs, sour cream and cream as specified to help the batter and frosting mix evenly.
- Measure the batter into the tins so each layer is about 2.5 cm high.
- Let the layers cool completely before levelling and trimming them.
- Apply the crumb coat thinly and chill it until firm before piping decorations.
- Add gel colouring a little at a time until each frosting reaches the shade you want.
- Keep the layers slightly cold if they have been frozen, as the recipe recommends for easier assembly.
Variations
- Change the spices: Adjust the balance of cinnamon, ginger and nutmeg while keeping their combined quantities aligned with the recipe.
- Try a different green: Use lighter or darker shades of green gel colouring to alter the marbling and decoration.
- Simplify the finish: Use fewer coloured frosting details while keeping the green rosettes as the main decoration.
- Add fruit to serve: Offer fresh berries or sliced fruit alongside the cake.
- Use a flat plate: Assemble the layers on a flat plate if you do not have a cake board.
Common mistakes to avoid
- Overmixing the colours: Too many swirls erase the marbling; stop once the two greens form visible streaks.
- Frosting warm layers: Warm cake can soften the buttercream; cool the layers fully before assembling.
- Trimming too soon: Warm cake is more delicate; wait until the layers have cooled before levelling and shaping.
- Skipping the support: The stacked tiers can shift; insert the dowel or thick straw through the centre as directed.
- Applying a thick crumb coat: A heavy first layer can make the finish harder to smooth; spread a thin coat and chill until firm.
- Overcorrecting the frosting: Adding too much cream or icing sugar at once can change its consistency quickly; use the recipe's small increments.
How to store
Cover the cake and store it in the fridge. The recipe does not specify a storage duration; let chilled slices sit briefly at room temperature before serving so the buttercream softens. Keep the cake layers frozen if making them ahead, then thaw for about 20 minutes before assembly, while they remain slightly cold.
Frequently asked questions
Can I make the cake layers ahead?
Yes. The method allows the layers to be frozen ahead; thaw them for about 20 minutes before assembling, keeping them slightly cold to the touch.
How do I know when the layers are baked?
Bake for 28–33 minutes, checking with a toothpick. They are ready when it comes out with a few moist crumbs.
Why does the buttercream seem too thick?
Add extra cream 1 tbsp at a time until it reaches a workable consistency.
What if the buttercream is too thin?
Mix in more icing sugar 1/4 cup at a time, as directed.
How do I keep the stacked cake steady?
Anchor the first layer to the board with a dab of frosting, stack from largest to smallest and insert a wooden dowel or thick straw through the centre.
Can I decorate the cake without all the piping tips?
The method uses open star, small round and small French tips for its different details. If you do not have every tip, use the ones available and keep the same coloured frosting portions separate.
Cook it from the original
This recipe comes from chelsweets.com. Their page has the author’s own photos, notes and tips — the best place to cook it from.
Open the recipe on chelsweets.com