
Rosemary Garlic Sourdough Bread
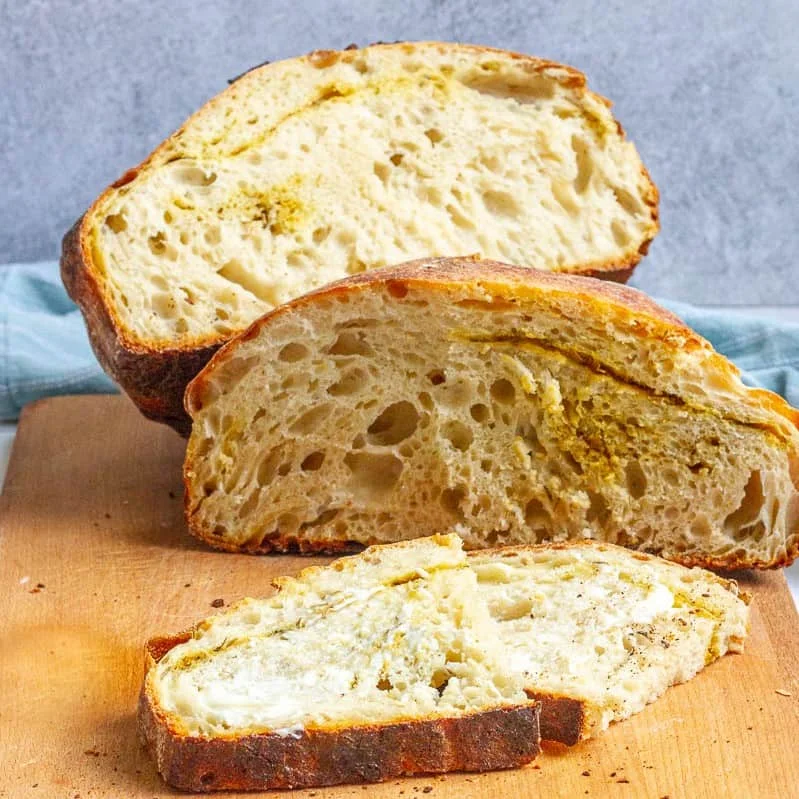
This no-knead sourdough loaf combines dried rosemary and garlic for a savoury, aromatic crumb, with optional nutritional yeast for extra savoury depth. An overnight proof and a covered Dutch oven bake make it a practical way to build flavour and a crisp crust with little hands-on mixing.
Ingredients
- 227 g (1 cup)active, ripe sourdough starter
- 602 g (5 cups)unbleached bread flour
- 397 g (1¾ cups)water
- 18 g (1 tablespoon)salt
- 10 ml (2 teaspoons), dividedgarlic powder
- 10 ml (2 teaspoons), divideddried rosemary
- 60 ml (¼ cup), divided; optionalnutritional yeast
Instructions
- 1
Mix the dough
Day 1: Combine the starter, flour and water in a large bowl or stand mixer bowl, leaving out the salt. Stir with a large spoon or dough whisk, or mix with the paddle attachment on medium speed for about 60 seconds, until the dough forms a ball and stops clinging to the bowl. Rest for about 20 minutes.
- 2
Add the salt
Mix in the salt with a spoon, whisk or stand mixer until just incorporated. Work it in with your fingers if needed, until you can no longer feel the salt crystals. Transfer the dough to a non-reactive bowl, cover with a damp towel and leave to rise for 1 hour.
- 3
Fold the dough
Spritz the work surface with water and dampen your hands and, if using, a flexible dough scraper. Gently turn out the dough, spread it slightly and fold it like a letter: bring the upper third towards the centre, then fold the bottom third over it. Fold both sides towards the centre, flip the dough and repeat the stretching and folding on the other side.
- 4
Build the flavour
Return the dough to the bowl, cover and leave to rise for 1 hour. Repeat the rest and fold process two more times, making 3 hours in total. During the third fold, spread the dough slightly and sprinkle over half the rosemary, garlic powder and nutritional yeast, if using. Fold it like a letter, flip and spread it again, add the remaining seasonings, then fold once more.
- 5
Proof overnight
Cover the bowl with a fitted lid, damp towel or plastic wrap. Choose one proofing method. For the preferred refrigerated method, chill the dough for at least 8 hours and up to 48 hours; if covered with a towel, re-dampen it occasionally. Alternatively, proof at room temperature only if the kitchen is about 21°C or cooler: keep the bowl out of direct sunlight for about 8 hours, adjusting for the temperature. Test with a lightly floured or oiled knuckle; if the dough springs straight back, continue proofing, and if it springs back slowly, it is ready.
- 6
Shape the loaf
Day 2: Dampen your hands and the work surface, then gently turn out the dough. Shape it into a ball with the seam facing upwards and cover with a damp towel for about 15 minutes. With damp hands, shape it into a round ball and set it on parchment paper.
- 7
Finish the rise
If the dough was refrigerated, let it rise at room temperature until it is no longer cold, about 2½ to 3 hours. If it proofed at room temperature, leave it on the parchment while the oven heats, then bake.
- 8
Heat and score
About 30 minutes before baking, preheat the oven to 249°C. If your pot is not enameled, put it in the oven as it heats. Just before baking, dust the dough lightly with flour and score it with a bread lame or floured knife, making one or two long cuts or a pattern if desired.
- 9
Bake the bread
If you preheated the Dutch oven, carefully remove it. Lift the parchment and dough into the pot, spritz the dough lightly with water and cover with the lid. Put the pot in the oven and reduce the temperature to 232°C. Bake covered for 45 minutes, then uncover and bake for another 10–15 minutes, until the centre reaches 99°C. Without a digital thermometer, gently tap the base and listen for a hollow sound.
- 10
Cool completely
Move the loaf to a cooling rack using a spatula, tongs or the edges of the parchment. Wait at least 2 hours before slicing so the loaf can finish baking internally.
What is rosemary garlic sourdough bread?
Sourdough bread is leavened with a living starter rather than relying on commercial yeast alone. This American-style loaf takes the familiar artisan boule and seasons it with dried rosemary and garlic.
The method uses a long proof and a Dutch oven to develop flavour and a crisp crust without kneading. Nutritional yeast is an optional addition for a more savoury note.
Nutrition and macros by portion
The nutrition label shows one serving as written: 306 calories, 11g protein, 61g carbs, 1g fat.
| Portion | Adjustment | kcal | Protein | Carbs | Fat |
|---|---|---|---|---|---|
| Lighter | Thinner bread slices | 214 kcal | 8g | 43g | 1g |
| This serving | As written | 306 kcal | 11g | 61g | 1g |
| Hungry | Larger bread serving | 459 kcal | 17g | 92g | 2g |
Most of the carbohydrates come from the bread flour, while the starter contributes additional flour-based energy and some protein. The recipe reports 1 g of fat per serving; a topping or spread will change the fat and overall energy, so pair a slice with vegetables and a protein-rich accompaniment for a more balanced plate.
The starter and flour
Active starter: Use ripe, fed starter that is ready to raise dough; it provides the fermentation that gives this loaf its rise.
Bread flour: Its higher protein content supports a dough that can hold its shape through the long proof and oven spring.
Folding and seasoning
Gentle folds: Folding develops the dough without kneading. Dampen your hands and work surface to make the sticky dough easier to handle.
Seasoning: Add the rosemary, garlic powder and optional nutritional yeast during the third fold. Dividing them between two additions helps distribute them through the dough.
How to tell when it is proofed
The recipe allows either a refrigerated proof of at least 8 hours and up to 48 hours, or an approximately 8-hour room-temperature proof in a kitchen around 21°C or cooler. The dough’s response to a lightly floured or oiled knuckle is the guide: a quick spring-back means it needs more time, while a slow return means it is ready.
A cold-proofed loaf needs another 2½ to 3 hours at room temperature before baking, until it is no longer cold. A room-temperature-proofed loaf can rest on the parchment while the oven heats.
Scoring and Dutch oven baking
Scoring: Make one or two long cuts, or a decorative pattern, just before baking. The cuts give steam an outlet and help prevent the base from cracking.
Covered bake: The preheated Dutch oven traps steam around the loaf. Keep it covered for 45 minutes at 232°C, then uncover for 10–15 minutes so the crust can brown.
Check the crumb and crust
Doneness: The centre should reach 99°C. If you do not have a digital thermometer, the recipe suggests tapping the bottom of the loaf and listening for a hollow sound.
Cooling: Leave the bread on a rack for at least 2 hours before slicing. Cutting sooner can leave the centre undercooked as it is still finishing internally.
What to serve with it
Serve slices alongside soup, a salad or a meal with roasted vegetables. The rosemary and garlic also make the bread a natural choice for sandwiches or toast.
For a more substantial plate, pair a slice with a protein-rich topping such as eggs, beans or cheese.
Recipe notes & tips
- Use a non-reactive bowl, such as glass, for the rising dough.
- Dampen your hands and work surface before handling the dough to reduce sticking.
- Choose either the refrigerated proof or the room-temperature proof, not both.
- If the dough is covered with a towel during refrigerated proofing, re-dampen the towel occasionally.
- Score the loaf just before baking, after lightly dusting it with flour.
- Wait at least 2 hours after baking before slicing the loaf.
Variations
- Skip the yeast: Leave out the optional nutritional yeast for a simpler rosemary and garlic loaf.
- Make a decorative top: Score a pattern into the floured dough just before baking.
- Change the herbs: Replace some or all of the rosemary with another dried herb you enjoy.
- Serve as toast: Toast slices and add a savoury topping for a simple snack.
- Make sandwiches: Use the cooled loaf for sandwiches with your choice of filling.
Common mistakes to avoid
- Adding salt too soon: Keep it out during the initial mix and add it after the 20-minute rest.
- Rushing the proof: Wait for the dough to respond slowly to the knuckle test rather than relying only on the clock.
- Using a warm room for an overnight counter proof: Use the unrefrigerated method only when the kitchen is about 21°C or cooler.
- Skipping the score: Make at least one cut so steam has an outlet during baking.
- Uncovering too early: Bake covered for the full 45 minutes before removing the Dutch oven lid.
- Cutting while hot: Cool the loaf on a rack for at least 2 hours before slicing.
How to store
Keep the bread lightly wrapped on the counter for up to 4 days. For longer storage, wrap it tightly and freeze for up to 3 months; slicing before freezing makes it easy to thaw individual portions. Thaw slices by toasting them or warming them over low heat in a pan or on a stovetop griddle.
Frequently asked questions
Can I proof the dough at room temperature?
Yes, but only if your kitchen is about 21°C or cooler. Leave the covered dough out of direct sunlight for about 8 hours and use the knuckle test to judge when it is ready.
How long can the dough stay in the fridge?
The refrigerated proof can last at least 8 hours and up to 48 hours. If you cover the bowl with a towel, re-dampen it occasionally.
Do I have to use nutritional yeast?
No. It is optional and can be left out; the loaf will still have rosemary and garlic flavour.
Can I bake the loaf without a Dutch oven?
The method provided uses a Dutch oven to bake the loaf, and does not give an alternative baking method. If your Dutch oven is not enameled, preheat it in the oven.
How do I know when the bread is done?
The centre should reach 99°C after the covered and uncovered baking stages. Without a digital thermometer, gently tap the bottom and listen for a hollow sound.
Why should I wait before cutting the bread?
The loaf continues to bake internally after it comes out of the oven. Let it cool on a rack for at least 2 hours to avoid an undercooked centre.
Cook it from the original
This recipe comes from champagne-tastes.com. Their page has the author’s own photos, notes and tips — the best place to cook it from.
Open the recipe on champagne-tastes.com