
Schnitzel Kiev
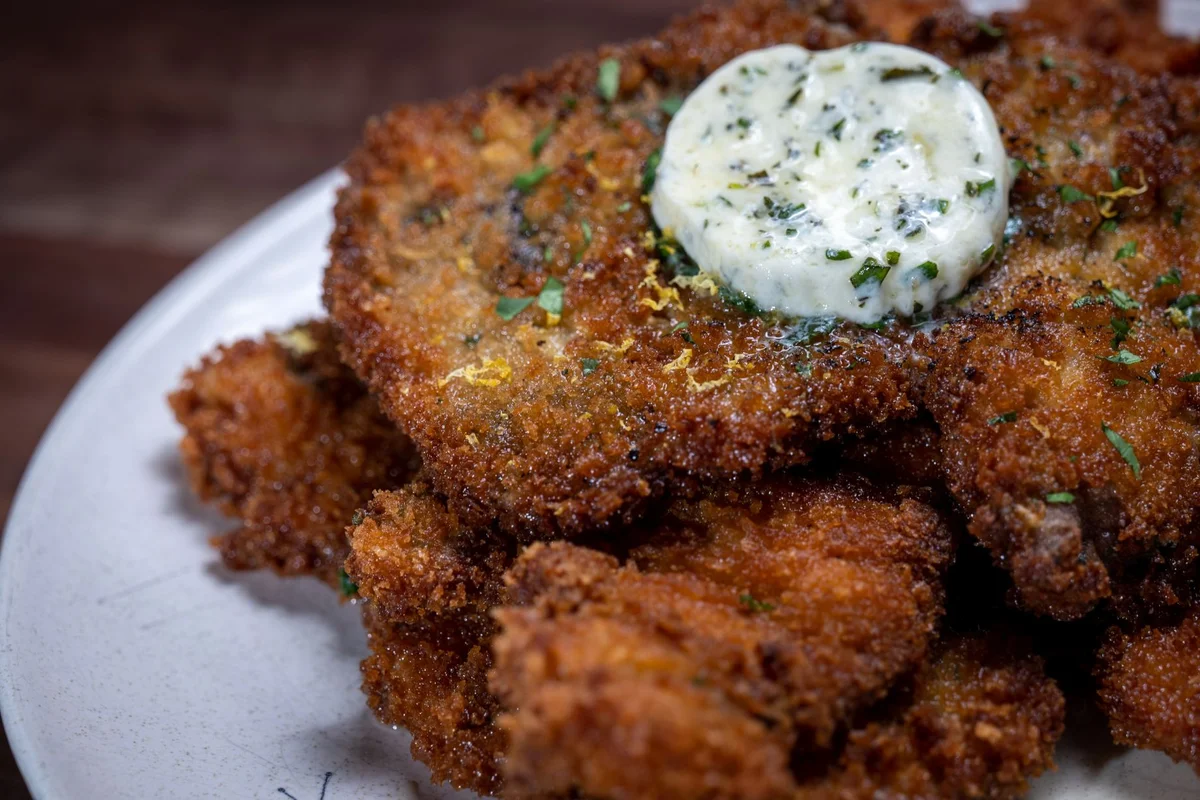
Schnitzel Kiev gives Chicken Kiev the crisp, quick-frying treatment of a schnitzel, with herb butter served on top rather than tucked inside a roll. Flattened chicken thighs cook quickly and are easier to coat and fry evenly.
Ingredients
- 3 tbsp (45 ml)chopped fresh tarragon
- 2 tbsp (30 ml)chopped fresh parsley
- 227 g (16 tbsp; 2 sticks)unsalted butter, cold and chopped into small pieces
- 2½ tsp (12.5 ml), dividedkosher salt
- ½ tsp (2.5 ml)freshly ground black pepper
- 4 (140–170 g each)boneless, skinless chicken thighs
- 60 g (½ cup)plain flour
- 2 largeeggs, beaten with 1 tbsp (15 ml) water
- 120 g (2 cups)panko breadcrumbs
- 500–950 ml (2–4 cups)100% olive oil, not extra-virgin, for frying
- 1lemon, for serving
Instructions
- 1
Mix the herbs
Combine the tarragon and parsley in a small bowl. Set aside 1 tablespoon of the mixture to garnish the finished chicken.
- 2
Beat the butter
Put the butter in a stand mixer fitted with the paddle attachment. Beat on medium-low, stopping occasionally to scrape down the bowl, until the butter is softer and paler, about 5–7 minutes.
- 3
Shape the butter
Add half the chopped herbs and ½ teaspoon of the salt, then beat on low for 2 minutes to combine. Scoop the butter onto baking parchment, fold the paper over it and use the straight edge of a baking tray to press it into a smooth cylinder about 15 cm (6 inches) long. Refrigerate until firm, about 2 hours. Once firm, the butter can be wrapped in cling film and kept for up to 1 week.
- 4
Set up a rack
Place a wire cooling rack inside a baking tray and have it ready. If possible, clear space in the lower part of the fridge for the tray and rack.
- 5
Flatten the chicken
Lay an approximately 45 cm (18-inch) piece of cling film on the worktop and season an area the size of a chicken thigh with some of the remaining salt and pepper. Put a thigh on top, season its other side, then fold the cling film over it. Spritz with water and gently pound with a smooth-sided meat mallet until about 6 mm (¼ inch) thick. Peel back the film, scatter on a pinch of herbs, turn the thigh over and repeat. Continue pounding until it is about 3 mm (⅛ inch) thick. Remove the top layer of film and transfer the thigh to the rack; remove the remaining film. Repeat with the other thighs.
- 6
Chill the thighs
Refrigerate the chicken on the rack for 30 minutes. If there is not enough room, leave it in a cool place out of direct sunlight.
- 7
Heat the oven
Heat the oven to 120°C (250°F) and place a second wire rack inside a baking tray on the middle shelf. If you do not have another cooling rack, put a tray beneath an oven rack to catch crumbs and rest the cooked chicken directly on the rack.
- 8
Coat the chicken
Arrange three shallow dishes or loaf tins: put the flour in the first, the beaten eggs and water in the second, and the panko in the third. After the chicken has rested for 30 minutes, coat each piece in flour, shaking off as much excess as possible, then dip it in the egg, counting to 3 to let excess drain. Turn it in the panko to coat thoroughly. Return each piece to the rack and leave at room temperature for 15 minutes.
- 9
Slice the butter
Cut four slices of herb butter, each about 6 mm (¼ inch) thick, and set them aside for serving.
- 10
Fry the chicken
Once the chicken has rested and the coating has set, pour 1.25 cm (½ inch) of olive oil into a large cast-iron frying pan or an 28 cm (11-inch) straight-sided sauté pan. Heat over medium-high until the oil reaches 190°C (375°F). Fry the thighs one at a time for 1–2 minutes per side, until deeply golden and the centre reaches 74°C (165°F). Transfer each cooked piece to the oven to keep warm. Check the oil temperature throughout and adjust the heat to maintain 190°C (375°F); lower it if the oil starts to get too hot.
- 11
Finish and serve
Top the chicken with the reserved herbs and one or two slices of herb butter. Zest the lemon over the chicken, cut it into wedges and serve them alongside.
What is schnitzel Kiev?
Schnitzel is a thin piece of meat coated in breadcrumbs and fried; Chicken Kiev is known for chicken filled with seasoned butter. This version combines the two ideas, serving the herb butter on top instead of enclosing it in a rolled chicken breast.
The recipe appeared in Season 2 of Good Eats: Reloaded. Flattened thighs make the chicken quicker to coat and fry, while the butter melts over the hot, crisp surface at the table.
Nutrition and macros by portion
The nutrition label shows one serving as written: 900 calories, 40g protein, 40g carbs, 65g fat.
| Portion | Adjustment | kcal | Protein | Carbs | Fat |
|---|---|---|---|---|---|
| Lighter | Less butter, more salad | 630 kcal | 28g | 28g | 46g |
| This serving | As written | 900 kcal | 40g | 40g | 65g |
| Hungry | Add another thigh | 1350 kcal | 60g | 60g | 98g |
The chicken supplies most of the protein, while the flour and panko contribute carbohydrates. Butter and frying oil account for much of the fat; the amount of oil absorbed can vary. Balance the plate with a generous serving of vegetables or salad alongside the schnitzel.
Why use chicken thighs?
Thighs: boneless, skinless thighs are easy to flatten into an even shape and have enough flexibility to handle the pounding. Work gently so you do not tear the meat as it becomes thin.
Butter: cold butter is beaten until pale and soft before the herbs and salt are mixed in. Chilling the shaped butter makes it easier to slice into neat portions for serving.
Pounding and chilling
Pounding: start between layers of cling film and let the weight of the mallet do the work. First bring the meat to about 6 mm thick, add herbs, then continue to about 3 mm.
Resting: the 30-minute chill gives the flattened thighs a chance to firm up before coating. If fridge space is tight, use the cool, shaded spot specified in the method.
Getting a crisp coating
Flour: shake off the excess so the egg has a light, even surface to cling to. Dip the chicken in the egg and let the extra drain before moving it to the panko.
Panko: turn each thigh until it is thoroughly covered, then let the coating rest for 15 minutes. That brief pause helps it settle before the chicken goes into the oil.
Frying and doneness
Oil: bring it to 190°C (375°F) and fry one thigh at a time, as directed. Check the temperature between pieces and adjust the heat so the oil does not overheat.
Doneness: look for a deeply golden crust and check that the centre of each thigh reaches 74°C (165°F). The pieces are thin, so the stated 1–2 minutes per side is a short cooking window.
Serving the schnitzel
Herb butter: place one or two slices on each hot piece so they soften and melt over the crust. Finish with lemon zest and pass the wedges at the table.
On the side: serve with a simple green salad, steamed vegetables or boiled potatoes. Choose a side that can be ready while the chicken rests and fries.
Recipe notes & tips
- Keep the butter cold until you are ready to shape it.
- Use a smooth-sided mallet and pound gently to avoid tearing the thin thighs.
- Shake excess flour from each piece before dipping it in the egg.
- Let the panko coating rest for the full 15 minutes before frying.
- Fry the thighs one at a time and check the oil temperature between batches.
- Use a thermometer to check the centre of each thigh for doneness.
Variations
- Change the herbs: use another mix of fresh herbs in the butter if you prefer.
- Add garlic: mix finely chopped garlic into the softened butter for a stronger savoury flavour.
- Serve extra lemon: offer additional wedges for a sharper finish at the table.
- Use chicken breasts: flatten boneless breasts evenly, then fry until their centres reach 74°C (165°F).
- Make smaller portions: cut the flattened thighs into smaller pieces and fry them in batches.
Common mistakes to avoid
- Pounding too hard: the thin meat can tear; use gentle taps and let the mallet’s weight do the work.
- Leaving excess flour on: it can make the coating uneven; shake the thigh well before dipping it in egg.
- Skipping the coating rest: the crumbs may not settle; leave the coated chicken on the rack for 15 minutes.
- Overheating the oil: the crust can brown too quickly; check the temperature and lower the heat as needed.
- Crowding the pan: the oil temperature can fall; fry one thigh at a time as directed.
- Guessing doneness: colour alone cannot confirm the centre is cooked; check for 74°C (165°F).
How to store
Refrigerate leftover cooked chicken in a covered container and use within 3 days. Reheat on a wire rack in a 180°C oven until hot throughout to help restore some crispness; keep leftover herb butter wrapped and refrigerated for up to 1 week.
Frequently asked questions
Can I make the herb butter ahead?
Yes. Once shaped and firm, wrap it in cling film and refrigerate for up to 1 week, as the method specifies.
Can I use chicken breasts instead of thighs?
The recipe calls for boneless, skinless thighs. If substituting breasts, flatten them evenly and check that the centre reaches 74°C (165°F).
How thin should I pound the chicken?
Pound it to about 6 mm (¼ inch), add herbs, then continue until it is around 3 mm (⅛ inch) thick.
Can I use extra-virgin olive oil?
The recipe specifies 100% olive oil that is not extra-virgin. Use that type for frying as written.
How do I know the chicken is cooked?
The crust should be deeply golden, and the centre should reach 74°C (165°F). The method allows 1–2 minutes per side, but use the temperature as the doneness check.
Cook it from the original
This recipe comes from altonbrown.com. Their page has the author’s own photos, notes and tips — the best place to cook it from.
Open the recipe on altonbrown.com