
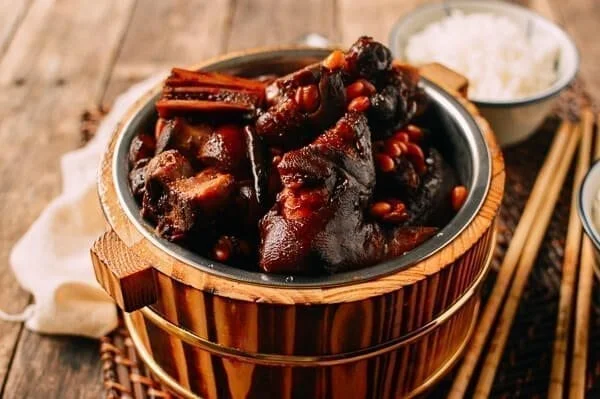
Braised Pork Trotters with Soybeans
Nutrition per Serving
313
Calories
23g
Protein
11g
Carbs
19g
Fat
Braised pork trotters with soybeans is a tasty, textural delight of a Chinese dish. Our recipe offers easy and clear instructions for how to make it!
📝 Ingredients
- 4 ounces dried soybeans ((115g, soaked overnight))
- 2½ pounds pork trotters ((about 1 kg))
- 2 tablespoons oil
- 4 slices ginger
- 4 scallions ((chopped, with the white and green parts separated))
- 3 star anise
- 1 Chinese cinnamon stick
- 2 bay leaves
- 2 dried hot chili peppers ((optional))
- 1 piece dried tangerine peel
- 20 grams rock sugar
- 2 tablespoons dark soy sauce
- 3 tablespoons light soy sauce
- 2 tablespoons Shaoxing wine
- 4 cups water
- Salt ((to taste))
👨🍳 Instructions
- 1After your soybeans have been soaked overnight, prepare your pork trotters. Have your butcher cut them into large chunks. Rinse them thoroughly, and place them in a pot filled with enough water to completely submerge them. Bring the water to a boil, letting it boil for a couple of minutes. Turn off the heat, drain and rinse the pork trotters clean. Pat them dry, and set aside.
- 2Heat the oil in a wok or large Dutch oven over medium low heat. Add the ginger, the white parts of the scallion, the star anise, cinnamon, bay leaves, dried hot chili peppers and dried tangerine peel. Let everything infuse for a few minutes, taking care not to let the aromatics burn. Now, carefully add the pork trotters, and brown them on both sides.
- 3Time to drain the soybeans. Add the soybeans, along with the rock sugar, dark soy sauce, light soy sauce, Shaoxing wine, and water. Stir thoroughly, and cover. Let the pork trotters braise for 70-80 minutes on low heat until tender. Be sure to stir periodically to prevent sticking. Towards the end of the cooking time, add salt to taste. Don’t prolong the cooking too much. In this case, “falling off the bone” is not what we want.
- 4If there is still too much liquid at the end of your cooking time, just turn up the heat and cook off the liquid to the right consistency. You’ll want some thickened sauce at the end. Garnish with the green parts of the scallion, and serve.
About the Chef & Original Recipe
This recipe was published by thewoksoflife.com. Visit the original source for step-by-step photos, chef notes and additional details.
Source: thewoksoflife.com