
Danish Pastry Dough Recipe (Easy Method)
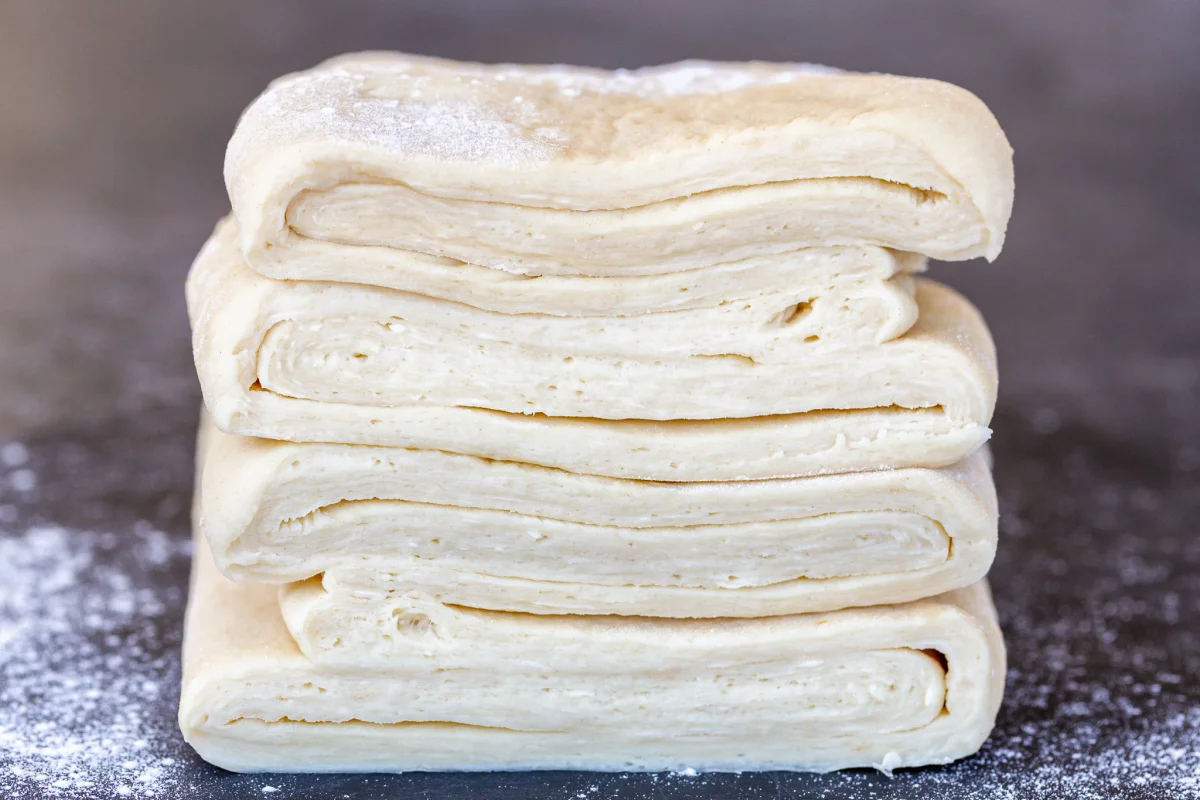
This Danish pastry dough uses grated frozen butter and a simple series of folds to create flaky, buttery layers without complicated pastry techniques. Make it ahead, then use it as the base for sweet Danish pastries.
Ingredients
- 240 mlmilk, lukewarm
- 2 tspdry yeast, instant or active
- 50 ggranulated sugar
- 1 largeegg
- 375 gplain flour
- ¼ tspsalt
- 227 gunsalted butter, frozen
Instructions
- 1
Bloom the yeast
Warm 120 ml of the milk to 43°C. Stir it together with the yeast and sugar, then leave for 10 minutes, until the yeast blooms.
- 2
Whisk the egg
In a separate dish, whisk the remaining 120 ml of milk with the egg until combined.
- 3
Grate the butter
Put the flour and salt in a large bowl. Coarsely grate the frozen butter into the bowl, tossing it with the flour as you go.
- 4
Mix the dough
Add all the liquid ingredients to the butter and flour mixture. Stir with a spatula until combined. The dough will look rough and sticky; this is normal.
- 5
Chill the dough
Cover the bowl with cling film and refrigerate for at least 6 hours.
- 6
Roll and fold
Lightly flour the work surface and roll the dough into a rectangle about ⅓ inch thick. Fold it over like a letter, then roll it again to ⅓ inch thick. Repeat 3 times, until the dough is smooth, working quickly so the butter does not melt.
- 7
Chill again
Cover the dough with cling film or parchment paper, folding the covering over it. Refrigerate for at least 2 more hours.
What is Danish pastry dough?
Danish pastry is a laminated yeast dough, meaning it combines a risen dough with layers of butter. The style is associated with Denmark, where these pastries are known as wienerbrød.
This version simplifies lamination by grating frozen butter into the flour, then building layers with a few folds. It gives home cooks a practical make-ahead dough for sweet pastries.
Nutrition and macros by portion
The nutrition label shows one serving as written: 193 calories, 4g protein, 20g carbs, 11g fat.
| Portion | Adjustment | kcal | Protein | Carbs | Fat |
|---|---|---|---|---|---|
| Lighter | Smaller pastry portion | 135 kcal | 3g | 14g | 8g |
| This serving | As written | 193 kcal | 4g | 20g | 11g |
| Hungry | Larger pastry portion | 290 kcal | 6g | 30g | 17g |
The flour and sugar provide most of the carbohydrate, while the butter contributes most of the fat; the egg, milk and flour contribute protein. Pair a pastry made with this dough with fruit, or serve it alongside a protein-rich food for a more balanced plate.
Why grate frozen butter?
Frozen butter: it is firm enough to grate into small pieces that distribute through the flour, helping create buttery layers as the dough is folded.
Cold handling: keep the butter and dough chilled between stages. If the butter softens, it can blend into the dough rather than remain in distinct pieces.
Getting the yeast ready
Milk temperature: warm the first half of the milk to 43°C, rather than making it hot. Let the yeast mixture stand for the full 10 minutes so it has time to bloom.
Two liquid mixtures: whisk the egg into the remaining milk separately, then add both mixtures to the flour and butter together.
Rolling and folding
Light flouring: dust the work surface lightly so the dough releases without adding much extra flour.
Even folds: roll to about ⅓ inch thick each time and fold the dough over like a letter. Repeat the rolling and folding 3 times, moving briskly to keep the butter cold.
What the dough should look like
Before chilling: the mixed dough may look uneven and feel sticky. That is expected; avoid adding extra flour just to make it look smooth at this stage.
After folding: the dough should look smoother. If it becomes soft or greasy while you work, pause and chill it before continuing.
Plan the chilling time
First rest: refrigerate the covered dough for at least 6 hours before rolling and folding.
Final rest: chill it for at least 2 more hours after folding. This is a useful recipe to prepare ahead when you want pastry dough ready for another day.
How to use the dough
Sweet fillings: use the chilled dough as a base for fruit, custard or other Danish pastry fillings, following the baking directions for your chosen pastry.
Serving ideas: pair finished pastries with fresh fruit or serve them alongside coffee or tea.
Recipe notes & tips
- Measure the milk for the yeast mixture separately from the remaining milk and egg.
- Use the large holes of a grater for the frozen butter.
- Toss the butter with flour as you grate to help keep the pieces separated.
- Use a lightly floured surface so the dough does not pick up too much extra flour.
- Work quickly during the folds to prevent the butter from softening.
- Allow for both chilling periods when planning when to make pastries.
Variations
- Add citrus zest: mix finely grated lemon or orange zest into the sugar for a fragrant dough.
- Use wholemeal flour: replace a small portion of the plain flour for a nuttier flavour and denser dough.
- Try cardamom: add a little ground cardamom to the flour for a warmly spiced pastry base.
- Make savoury pastries: fill the dough with cheese or vegetables, keeping any filling quantities separate from the dough recipe.
- Freeze for later: wrap the dough well after chilling and freeze it for a future baking session.
Common mistakes to avoid
- Hot milk: excessive heat can harm the yeast; warm it to 43°C.
- Soft butter: butter that melts into the dough will not form distinct layers; keep it frozen until grating.
- Adding flour too freely: too much can make the dough dry; dust the work surface only lightly.
- Skipping the first chill: the dough needs at least 6 hours in the fridge before rolling.
- Rushing the folds: rolling too thick or folding fewer times changes the layering; follow the stated thickness and repeat 3 times.
- Working slowly: warm hands and a warm kitchen can soften the butter; work promptly and chill the dough if needed.
How to store
Keep the dough covered in the refrigerator and use it within 2 days. For longer storage, wrap it well and freeze; thaw it in the refrigerator before using.
Frequently asked questions
Can I use active dry yeast?
Yes. The recipe allows either instant or active dry yeast, and the yeast is mixed with warm milk and sugar to bloom.
Why does the dough look rough and sticky?
That is normal just after mixing. The long chill and the later rolling and folding help bring the dough together.
Can I make the dough the day before?
Yes. It already requires a long chill, so you can prepare it ahead and keep it covered in the refrigerator. Allow enough time for the final chill after folding.
What if the butter starts melting while I roll?
Stop working and refrigerate the dough until it is firm again, then continue promptly.
How many folds should I make?
Roll the dough to about ⅓ inch thick, fold it over, and repeat the rolling and folding 3 times.
Cook it from the original
This recipe comes from momsdish.com. Their page has the author’s own photos, notes and tips — the best place to cook it from.
Open the recipe on momsdish.com