
Macarrão com pesto de agrião e ervilhas
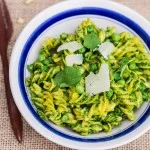
Este macarrão com pesto de agrião e ervilhas é cheio de sabores frescos da primavera, além de ser substancioso e delicioso!
Ingredientes
- 6 oz dried pasta, you can use any kind you like. I used gluten free corn pasta.
- 1/2 cup peas, fresh or frozen
- 2 – 3 tablespoons Parmesan cheese, grated
- Lemon wedges for finishing, if desired
- 3 cups watercress leaves, tightly packed
- 1/4 cup grated Parmesan cheese
- 1/4 cup pine nuts, toasted
- 1/2 cup olive oil, divided
- 1 clove garlic, roughly chopped
- salt, to taste
Modo de preparo
- 1
--- Make the Pesto ---
- 2
In a food processor, combine watercress, pine nuts, garlic, and 1 tablespoon of olive oil.
- 3
Pulse until all ingredients are broken down.
- 4
Add the parmasen cheese and turn the food processor on to medium speed.
- 5
Slowly drizzle in the remaining olive oil, until pesto is desired consistency.
- 6
Season with salt to taste.
- 7
--- Make the Pasta ---
- 8
Fill a medium sized pot with water and bring to a boil, add salt if desired.
- 9
Once water is boiling toss in dried pasta and cook according to package directions.
- 10
When pasta has about 1 minute left of cooking, throw in the peas to warm them through.
- 11
Drain peas and pasta with a strainer and pour into a large bowl.
- 12
Sprinkle with extra parmasean (2-3 tablespoons), if desired, and mix until cheese is coating the pasta.
- 13
Pour in the watercress pesto and mix until everything is combined.
- 14
Season with salt and pepper to taste.
- 15
Squeeze lemon wedge over finished pasta, if desired.
Cozinhe pela receita original
Esta receita é de shelikesfood.com. No site estão as fotos, as notas e as dicas do autor — o melhor lugar para prepará-la.
Ver a receita em shelikesfood.com