
Nhoque caseiro fácil de ricota
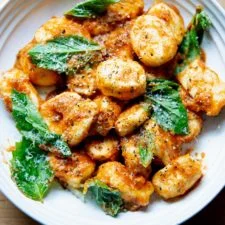
Adaptado de Colu Cooks Easy Fancy Food, de Colu Henry. Notas: A receita pede ricota de boa qualidade, como a da Calabro, que usei e adorei. Também usei a ricota “hand-dipped” da Maplebrook Farm, que também adorei. A maioria dos potes tem 16 onças — use o pote inteiro. Além disso, será preciso escorrer a ricota, o que leva de 20 a 30 minutos. As instruções estão na receita abaixo.
Ingredientes
- 15 oz (430 g) whole milk ricotta, see notes above
- 4 oz (115 g), about 1 cup, finely grated pecorino, such as the pre-grated Locatelli brand
- 1 large egg
- 1 large egg yolk
- 1/4 cup (30 g) all-purpose flour, plus more for dusting
- kosher salt and pepper to taste
- 1 to 2 cups homemade tomato sauce
- fresh basil, optional
- Parmigiano Reggiano or pecorino, optional
- 2 tablespoons olive oil
- 1 lb. mixed mushrooms
- 1 stick butter
- 1 small shallot, diced
- parsley
- lemon zest
- 4 tablespoons butter
- 1/4 cup pine nuts
- Parmigiano Reggiano
- Black pepper, to taste
Modo de preparo
- 1
Drain the ricotta: Line a sheet pan with two layers of paper towels. Spread the ricotta across the towels in a thin layer. Top with two more layers of paper towels and press down to encourage moisture absorption. Let stand 20-30 minutes; then remove the top layer.
- 2
Bring a large pot of salted water to a boil.
- 3
Scrape the ricotta into a large bowl. Add the pecorino, egg and egg yolk, and the flour. Season with salt and pepper to taste and gently stir to combine.
- 4
Transfer the dough to a lightly floured work surface and, using flour as needed, gently form into a ball.
- 5
With a bench scraper, cut the dough into quarters. Working with one quarter at a time, roll each piece into a log about 12 to 15 inches long. Cut each log into 12 to 15 gnocchi. Transfer to a lightly floured sheet pan and gently toss with a bit more flour to prevent the gnocchi from sticking.
- 6
Working with half the gnocchi at a time, transfer them to the boiling water and cook until they rise to the surface, roughly 30 seconds. Use a spider to remove the gnocchi and transfer to tea towel- or parchment-lined sheet pan. Repeat with the remaining gnocchi. Save the gnocchi cooking water — you made need it to thin whatever sauce you are using to dress the gnocchi.
- 7
--- For the Tomato Sauce Gnocchi: ---
- 8
Heat 1 to 2 cups (depending on how much of the gnocchi you are cooking) of the tomato sauce in a large skillet over medium heat. Once hot, add the gnocchi, and, using a large spoon, toss gently to coat. Once heated through, remove from the heat, add fresh basil, if using, and toss again to coat. Serve, shaving parmesan over the top and cracking pepper over the top to taste.
- 9
--- For the Mushroom Gnocchi: ---
- 10
Heat 2 tablespoons olive oil in a 12-inch skillet over medium heat. Add 1 pound of mixed mushrooms, which have been torn into bite-sized pieces, and season with salt and pepper. Cook until they begin browning and getting crisp at the edges, 12 to 14 minutes. Add in a stick (1/2 cup | 115 g) of butter and a finely chopped shallot. Cook until the butter melts and starts to become nutty. Ladle in some of the pasta cooking water and simmer until the sauce begins to thicken. Add the gnocchi and gently toss to coat in the sauce. Serve with finely chopped parsley and lemon zest.
- 11
--- For the Brown Butter & Pine Nut Gnocchi: ---
- 12
Melt the butter in a large skillet over medium heat until it begins to turn light brown and smell nutty. In a separate small skillet, toast the pine nuts over medium heat until golden.
- 13
When the butter has turned brown, add the gnocchi and toss gently to coat. Add the pine nuts and toss again.
- 14
Serve, shaving parmesan over the top and cracking pepper over the top to taste.
Cozinhe pela receita original
Esta receita é de alexandracooks.com. No site estão as fotos, as notas e as dicas do autor — o melhor lugar para prepará-la.
Ver a receita em alexandracooks.com