
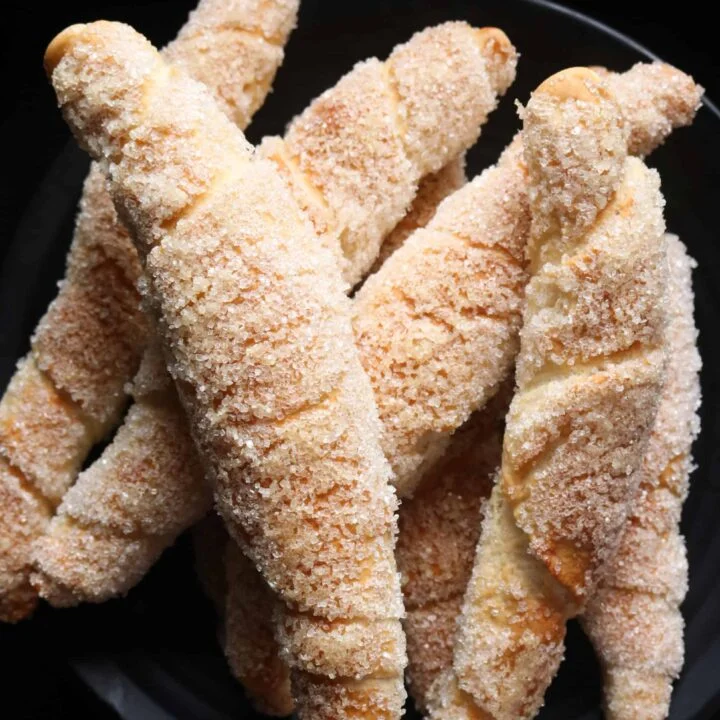
Sri Lankan kibula banis(sugar-coated buns).
Nutrition per Serving
108
Calories
3g
Protein
20g
Carbs
2g
Fat
kibula banis recipe with step-by-step instructions to help you make these buns right at home. These buns are very popular with kids and adults alike. You can serve these sugar-coated buns for breakfast or as a tea-time snack.
📝 Ingredients
- 1 cup of water (1/4 cup of water to be used to activate yeast and rest to mix the dough)
- 3 teaspoons of sugar
- 2 and 1/4 teaspoon yeast
- 2 and 1/2 cups of flour(or wheat flour as mentioned on the packaging).
- 1/2 cup extra flour(to be used as needed, to flour your hands, the kneading surface or to sprinkle over the dough, not).
- 2 teaspoons of salt
- 3 teaspoons of butter
- 1/4 cup of fresh milk(substitute with 3 tablespoons of milk powder)
👨🍳 Instructions
- 1Activate the yeast.
- 2Separate 1/4 cup of water from the cup...: Separate 1/4 cup of water from the cup of water needed to mix the dough.
- 3Microwave the 1/4 cup of water for 12...: Microwave the 1/4 cup of water for 12 seconds.
- 4Water should be tepid(slightly warm, refer to tips...: Water should be tepid(slightly warm, refer to tips above). You can heat the water over a stovetop as well.
- 5Add sugar and mix to dissolve it, add...: Add sugar and mix to dissolve it, add the recommended yeast amount, stir and cover. Set aside for 3-5 minutes.
- 6If your yeast is fresh when activated should...: If your yeast is fresh when activated should look like the below image.
- 7While the yeast activates, you can mix the...: While the yeast activates, you can mix the dough ingredients in a separate bowl.
- 8To a large bowl, add flour and salt....: To a large bowl, add flour and salt. combine them together for a few seconds.
- 9Add butter and milk.
- 10By now, your yeast should be ready. Add...: By now, your yeast should be ready. Add the yeast mixture to the flour mix.
- 11Mix the dough with your hand while gradually...: Mix the dough with your hand while gradually adding the rest of the remaining water.
- 12Make sure to incorporate all the ingredients together,...: Make sure to incorporate all the ingredients together, scraping off any flour that is left around the bowl.
- 13If you feel the dough is not hydrated...: If you feel the dough is not hydrated or rather dry, add water in tablespoons(about two).
- 14Once you have the dough mixed, cover with...: Once you have the dough mixed, cover with a kitchen towel or lid for 15 minutes and let the dough mixture rest.
- 15While the dough mixture rest, prepare your floured...: While the dough mixture rest, prepare your floured surface to knead the dough.
- 16Once you have a lightly floured surface prepared,...: Once you have a lightly floured surface prepared, transfer the dough mix onto it.
- 17Dust some flour onto your hand as well...: Dust some flour onto your hand as well as on top of your dough.
- 18Roughly shape as below. Don’t spend too much...: Roughly shape as below. Don’t spend too much time doing this, all you need is a roughly shaped dough which can be folded inward towards the middle of the dough.
- 19Fold the top half of the dough to...: Fold the top half of the dough to the centre and then gently roll it towards you.
- 20Position the dough vertically.
- 21Fold the top part to its centre again...: Fold the top part to its centre again and roll it towards you.
- 22Repeat the process of folding, and rolling the...: Repeat the process of folding, and rolling the dough.
- 23This is basically the kneading movements you will...: This is basically the kneading movements you will be using repeatedly.
- 24Dust your hands as well as the surface...: Dust your hands as well as the surface you are kneading with flour.
- 25Make sure you are kneading the dough gently...: Make sure you are kneading the dough gently and without much force.
- 26I like to remind myself that I’m gently...: I like to remind myself that I’m gently massaging the dough with the right amount of pressure at this point.
- 27As you knead, you’ll notice, that you are...: As you knead, you’ll notice, that you are using more of the heel of your palm and fingers like handles(for want of a better term)to knead and move the dough.
- 28As you repeat the gentle folding, and rolling...: As you repeat the gentle folding, and rolling motions you’ll feel the dough smoothing out.
- 29You will also notice a seam forming on...: You will also notice a seam forming on the underside of the dough where you fold and roll out the dough.
- 30Knead the dough for 10 minutes until smooth(refer...: Knead the dough for 10 minutes until smooth(refer to tips above about kneading times).
- 31Once you have a smooth dough ball, place...: Once you have a smooth dough ball, place it in a deep bowl, and cover it with a kitchen towel or cling film.
- 32Place the bowl in a warm place to...: Place the bowl in a warm place to rise.
- 33Cold weather or rainy days can have a...: Cold weather or rainy days can have a direct effect on the first proofing, if this is the case then place the bowl inside your oven.Let the dough rise for 1 hour and 30 minutes.
- 34Once the dough rises, slowly punch down and...: Once the dough rises, slowly punch down and then transfer the dough onto your floured board.
- 35Use a tucking motion to gently shape the...: Use a tucking motion to gently shape the dough into a single large ball.
- 36Once you have shaped the dough into a...: Once you have shaped the dough into a large ball.
- 37Use a sharp long knife to cut the...: Use a sharp long knife to cut the dough into 4 equal parts.
- 38Divide the pieces further by cutting the 4...: Divide the pieces further by cutting the 4 large pieces into two. This would result in 8 portions.
- 39Roll these pieces of dough into individual balls.
- 40Place the sliced dough on the floured board....: Place the sliced dough on the floured board. Place your hand over the piece of dough.
- 41Gently cage the dough within your hand and...: Gently cage the dough within your hand and fingers surrounding it.
- 42Use a gentle circular motion repeatedly so that...: Use a gentle circular motion repeatedly so that the piece of dough turns into a smooth ball.
- 43Make 8 individual balls. don’t worry about the...: Make 8 individual balls. don’t worry about the dough balls not being equal size.
- 44Once you go through the process of making...: Once you go through the process of making the kibula banis, you can later refine your workflow to suit you.
- 45Place them on a floured platter and cover...: Place them on a floured platter and cover with cling film or thick cloth.
- 46Flour the board lightly and place a single...: Flour the board lightly and place a single dough ball on the board.
- 47Place one palm over the top part of...: Place one palm over the top part of the dough ball while gently pulling the lower part down in the opposite direction.
- 48The pulling motion downwards should be done slowly...: The pulling motion downwards should be done slowly with a little shake as you pull down.
- 49This might take a little practice but there’s...: This might take a little practice but there’s enough dough for you to practice in forming the first shape of the sugar-coated buns.
- 50Next, use a rolling pin to refine the...: Next, use a rolling pin to refine the shape.
- 51To do this, use your roller pin from...: To do this, use your roller pin from the middle of the dough moving at an angle to flatten the left side of the dough.
- 52Repeat the motion from the middle on an...: Repeat the motion from the middle on an angle upwards to flatten the right side of the dough.
- 53Then place the rolling pin in the middle...: Then place the rolling pin in the middle and roll it down towards the pointy end.
- 54While you are using the rolling pin, make...: While you are using the rolling pin, make sure to gently pull the narrower part of the teardrop downwards.
- 55Flip the dough over and repeat the above...: Flip the dough over and repeat the above with your rolling pin.
- 56Then use the rolling pin to further stretch...: Then use the rolling pin to further stretch and widen the upper part of the triangle.
- 57Use the roller pin from the middle in...: Use the roller pin from the middle in a gentle downward motion to make the bottom a little longer.
- 58Repeat until you have a roughly shaped triangle.
- 59The rolling pin should not be pressed down...: The rolling pin should not be pressed down too hard on the dough.
- 60The surface should be lightly floured to avoid...: The surface should be lightly floured to avoid the shaped dough sticking.
- 61Once you have an elongated triangle as shown...: Once you have an elongated triangle as shown below.
- 62Fold the wider part of the dough inwards...: Fold the wider part of the dough inwards to make a 1/2 inch seam.
- 63And then gradually roll the dough downwards until...: And then gradually roll the dough downwards until you reach the end of the narrow part of the triangle.
- 64Pinch the end well to seal the dough....: Pinch the end well to seal the dough. press the two pointy ends of the buns.
- 65Set the shaped buns on a floured platter...: Set the shaped buns on a floured platter or tray and cover and let them prove(rise)for 35 minutes.
- 66While the buns rise…
- 67Add 1/2 a cup of water to a...: Add 1/2 a cup of water to a pan and add 4 tablespoons of sugar. heat until the water turns syrup-like. set aside.
- 68On a separate flat platter or plate spread...: On a separate flat platter or plate spread 1 cup of sugar.
- 69Fill a small oven-proof dish or a disposable...: Fill a small oven-proof dish or a disposable foil cup halfway with water.
- 70Preheat oven to 200C.
- 71Cover your baking sheet with baking paper(parchment paper).
- 72Thoroughly brush sugar syrup on the buns you’ll...: Thoroughly brush sugar syrup on the buns you’ll be baking and roll this side in sugar, make sure the tips get covered in sugar as well.
- 73Place the kibula banis on the baking sheet...: Place the kibula banis on the baking sheet with the sugar-coated side facing upwards.
- 74Repeat until you have your first batch of...: Repeat until you have your first batch of kibula banis ready to go into the oven.
- 75Place the buns on the upper shelf of...: Place the buns on the upper shelf of the oven. place the oven-proof dish with water on the bottom rack of the oven.
- 76If using an oven without shelves place a...: If using an oven without shelves place a foil cup of water on the tray with the buns. this is what I had to do with my convection oven.
- 77Bake at 200C for 18 to 22 minutes...: Bake at 200C for 18 to 22 minutes or until light golden in colour.
- 78Remove the buns from the oven, let them...: Remove the buns from the oven, let them cool for 10 minutes and enjoy.
About the Chef & Original Recipe
This recipe was published by jehan yusoof on islandsmile.org. Visit the original source for step-by-step photos, chef notes and additional details.
Source: islandsmile.org