
Foolproof Pizza Dough (Same day or Overnight Option!)
Nutrition per Serving
—
Calories
—
Protein
—
Carbs
—
Fat
My Easy Pizza Dough Recipe is perfect for if you're a pizza beginner, or if you're an experienced pizza maker and want to try a new recipe. This simple pizza recipe makes two dough balls to make two pizzas, but can easily be scaled. Make pizza dough the night before and have it ready to go, or there is an option to make it the same day. My Pizza Dough recipe is the perfect base - the topping options are endless! My Pizza dough recipe can be used for a pizza oven, or for making pizza in your home oven.
📝 Ingredients
- 252 g water, cool from the tap (about 20°c / 68°c)
- 5 g Extra Virgin Olive Oil
- 400 g 00 flour or high protein bread flour
- 10 g salt (I use kosher but any kind is fine)
- 1.2 g instant yeast (please see notes)
- Rice flour or regular flour for dusting (I use rice flour as it does not absorb into the dough)
- Semolina flour or regular flour for shaping (I prefer semolina flour)
- Pizza toppings of your choice - for ideas see my pizza recipes, or make up your own combination!
👨🍳 Instructions
- 1--- Please read this entire post before starting. This pizza dough recipe gives an overview of how to bake pizza using different methods but does not give specific topping recipes. For those, please see my other pizza recipes. ---
- 2--- PIZZA DOUGH ---
- 3To make with a stand mixer: Place the water and olive oil into the bowl of a stand mixer fitted with the dough hook. I put liquids in first to prevent dry pockets of ingredients in the mixing bowl.
- 4Add the flour, salt, and yeast. Mix on medium to low speed until combined. Turn off the mixer and cover the bowl, and leave to stand for 20 minutes.
- 5With the mixer on medium speed, mix the pizza dough for about 1o-15 minutes, until it is smooth, elastic, and clearing the sides of the bowl. It will seem as if it does not come together to begin with but it will get there. If you are having trouble, turn off the mixer, leave the dough for 5 minutes to rest, then continue mixing.
- 6To mix by hand:: Follow the same steps, but make the dough by hand in a mixing bowl rather than the dough mixer. Once it has rested for 20 minutes, turn out onto a work surface and knead by hand for about 10 minutes. The dough will seem sticky at first but will become smooth and elastic. Again, if it is too sticky or hard to work with, place it under an upside down mixing bowl and leave it to hang out for 5 minutes or so to relax before you keep kneading it. Follow the rest of the recipe as written.
- 7Once the dough is smooth and stretchy, transfer it to your work surface. I can usually do this without needing to add any extra bench flour, but add a little if needed.
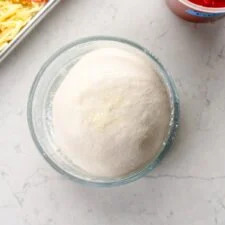
- 8Shape the dough into a ball, and place into a lidded container or a bowl you can cover with a clean towel or plate. Leave to proof at room temperature for 2 hours, until it has risen by about 50%.
- 9Dust a lidded sheet pan or a container with a lid that you are going to rise the pizza dough in with rice flour or regular flour, or with semolina flour. I like to use the Ooni stack which is a set of stacking glass bowls.
- 10Turn the dough out onto a work surface (again I don't usually need to add any flour here but if you do, then go ahead.
- 11Divide the dough into two pieces, each weighing about 330g. Shape the dough into a tight ball by using the surface tension of your work surface to shape it.
- 12Transfer the dough to the container you are going to use to rise it in, dust with rice flour, and transfer to the fridge for at least overnight and up to 3 days. The dough will 'flatten' out a little in the fridge but will not rise a ton.
- 13About an hour and a half before you want to use your pizza dough, remove it from the fridge. Allow to stand covered at room temperature until it has puffed up, and when pressed with a floured finger, the indentation that it leaves slowly springs back most of the way. It should no longer have any cold feeling to it.
- 14Shape, top, and bake by following the directions below.
- 15Once the dough is ready to use, place some semolina flour onto a dinner plate or sheet pan. Carefully remove one piece of dough from the container you have risen it in, and place it directly onto the semolina, flipping it so that both sides are covered.
- 16Transfer the dough to the work surface, adding more semolina if needed. Using your fingers, press in a circle around the edge of the pizza, leaving about a 1-2cm edge. Press down the middle of the ball of dough to gently flatten it off.
- 17There are lots of ways to stretch pizza but I like to use what I call the 'steering wheel' method - place one hand on the middle of the dough and using the other hand, gently grab the edge of the dough and stretch it out slightly, then turn the dough about 45°. Repeat, going around the edge of the dough 2-3 times until it has stretched out nicely.
- 18If you would like to, you can carefully pick the dough up and holding it by the edges, move your hands around the sides to use gravity to help stretch the dough further. You can also place it over the backs of your hands to gently stretch it out. This takes practice and you will get better at it with the more pizza that you make.
- 19You are aiming for a circle of dough that is 12-13" (30-33cm) in diameter, and has a slightly thicker edge.
- 20Transfer the pizza dough to your pizza peel, giving it a little wiggle to make sure that there are no stuck spots. As you top the pizza, give it a little wiggle every now and then too to ensure that it is not stuck to the peel.
- 21Top and bake using one of the below methods.
- 22Top the pizza as desired. Transfer using the pizza peel to the pizza oven and bake according to the manufacturer's instructions - my dough usually takes about 2-3 minutes in a gas fired oven, or 4 minutes in an electric pizza oven. Again, this will take some practice. Once baked, finish as desired.
- 23An hour before you want to bake the pizza, place a baking steel or pizza stone into the oven. I prefer to use a baking steel as they are much more durable. Preheat the oven to 500°f / 260°c or as high as your oven will go if it will not reach that temperature.
- 24Shape and top the pizza as instructed in the shaping section. Using the peel (or if you don't have a peel, the back of a sheet pan will work but you have to be very careful), wiggle the peel to transfer the pizza to the baking steel.
- 25Bake the pizza for about 5-6 minutes until bubbly and golden brown, and you are happy with the colouring of the crust on the bottom of the pizza. Use the peel to remove the pizza from the oven.
- 26If you are baking another pizza, make sure that you give the steel enough time to heat up again before cooking your next pizza.
- 27About an hour before you are going to bake your pizza, preheat the oven to 500°f / 260°c or however high your oven will go.
- 28Shape and top the pizza as instructed in the shaping section. You can top the pizza on the sheet pan you are going to bake it on, either directly on the baking sheet or on some parchment paper. While you are shaping the pizza, if you have one, preheat a second baking sheet that stacks with the one with the pizza on it in the oven for about 10 minutes - this helps with the initial burst of heat.
- 29Top the pizza as desired, then transfer to the oven. Bake for about 15 minutes, until the crust is brown and the cheese and toppings are bubbly.
About the Chef & Original Recipe
This recipe was published by Erin Clarkson on cloudykitchen.com. Visit the original source for step-by-step photos, chef notes and additional details.
Source: cloudykitchen.com