
How to: Easy Homemade Pasta Recipe with (and without) your KitchenAid
Nutrition per Serving
435
Calories
17g
Protein
76g
Carbs
6g
Fat
Want to make pasta from scratch? This KitchenAid pasta recipe will show you how easy it is to make fresh pasta at home with (and without) attachments.
📝 Ingredients
- 300 g “00” Flour
- 100 g semolina
- 4 eggs
- water
- sea salt to salt the pasta water
👨🍳 Instructions
- 1Assemble your stand mixer with the large bowl and a dough hook attached.
- 2In the bowl, combine the pasta flour and semolina. Make a well in the center of the flour and add the eggs. Turn your mixer onto speed 1 until the three ingredients are combined and starting to bind together. If you need a splash of water or two to aid this process, then go for it.
- 3Once the dough is starting to form, increase the speed to 2 and knead the dough into a ball.
- 4Knead the dough for 2-3 minutes. Remove the bowl from the mixer. Cover with plastic wrap and leave to rest for at least 1 hour.
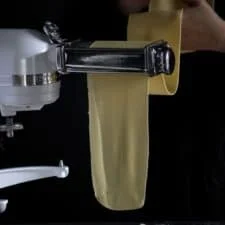
- 5Always start with the pasta roller attachment in the widest setting (mine is 0). Divide the dough into manageable chunks, and shape it into a ball. Then squish that ball of dough a bit to help the pasta machine catch the dough. Feed each dough ball through the pasta roller. After each feed, decrease the width of the pasta roller functions, working from 0 up to 9 (or as thin as you would like it). If you at any stage make an error feeding the dough through, just start again (the bonus of pasta dough!)
- 6Once you have fed all your pasta through the thinnest KitchenAid attachment setting, change over to a fettuccine attachment and feed each sheet of pasta through. Voila! Fettucine!
- 7You may want to dry your pasta at this point. To do so, hang individual pieces (make sure they are not touching!) over a pasta drying rack. Leave to dry for half an hour before cooking with.
- 8Drop your pasta pieces into a pot of salted water on a rolling boil. Cook for 3-4 minutes or till al dente. Have a taste to check it’s cooked and strain the pasta. Add to your favorite sauce, or serve simply with a little olive oil and freshly grated parmesan.
About the Chef & Original Recipe
This recipe was published by Emma Lee on theirishmanswife.com. Visit the original source for step-by-step photos, chef notes and additional details.
Source: theirishmanswife.com