
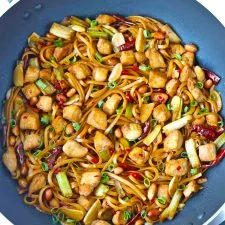
Kung Pao Chicken Linguini
Nutrition per Serving
667
Calories
39g
Protein
75g
Carbs
24g
Fat
This Kung Pao Chicken Linguini is a quick and easy stir-fry that’s made with tender pieces of chicken, aromatics, and linguini, and everything is tossed in a wickedly delicious spicy, sweet, and slightly tangy sauce! It’s perfect for easy dinners on busy weeknights and can easily be customized with your favorite protein like shrimp, pork, beef, or tofu and/or veggies!
📝 Ingredients
- 8 Garlic cloves – thinly sliced
- 1.5 inch knob of Ginger – chopped into thin strips
- 8-12 Red Chilies, to taste – roughly chopped (deseed if less heat is desired or omit entirely)
- 6-8 Spring Onion (white parts only) – chopped into 1 inch pieces
- 8 oz. uncooked Linguini (you can use spaghetti or any other noodle type of pasta if you like)
- 5 TBLS (about 48g) Chinese Brown-skinned Fried Peanuts (or substitute with Roasted Peanuts)
- 5-10 Dried Red Chilies, to taste – cut into halves and thirds depending on size
- 2 TBLS Peanut Oil (or any other cooking oil, preferably with a high burning point)
- 1.5 TSP Chili Oil (optional)
- 2 TSP Sesame Oil
- 1 TBLS + 1 TSP (4 TSP) White Sugar
- 6 TBLS (3/8 cup) Low Sodium Light Soy Sauce
- 5 TBLS Shao Xing Rice Wine
- 2 TBLS Chinkiang Vinegar
- 1 TBLS Dark Soy Sauce
- 1 TBLS + 1 TSP (4TSP) Sesame Oil
- 2 TSP Corn Starch
- 2 TBLS Low Sodium Light Soy Sauce
- 1 TBLS Shao Xing Rice Wine
- 2 Chicken Breasts (about 400g), boneless, skinless
- 1 Spring Onion (green part only) – chopped
👨🍳 Instructions
- 1--- Prep: ---
- 2Marinate the chicken: Dice the chicken breasts into bite-sized pieces. Then combine all the ingredients for the chicken marinade in large bowl and mix thoroughly with a spoon to combine.
- 3Make the sauce: Combine all the ingredients for the sauce in a measuring cup or small bowl and whisk until fully combined.
- 4Prepare the fresh and dry ingredients: Chop the garlic, fresh red chilies, ginger, and the spring onion, and cut the dried red chilies in halves and thirds (depending on their length). Set everything aside until ready to use.
- 5Cook the linguini al–dente according to package directions in a large pot of salted water. Then drain and set aside once cooked. (I like to run water over my pasta to prevent them from sticking and cooking further.)
- 6--- For the Kung Pao Chicken Linguini: ---
- 7Cook the chicken: Heat 1 TBLS peanut oil in a wok over medium-high heat. Once the oil is hot, add the chicken pieces and spread evenly in the wok. Cook for 1 minute without touching them. Then continuously stir-fry for another minute or until the chicken is brown on all sides. Use a slotted spoon to scoop the chicken into a strainer and allow excess oil to drip into the wok. Transfer the chicken to a clean bowl and set aside. Discard the any remaining juices and oil in the wok and wipe it out with paper towels. Set the wok back on the stove.
- 8Heat remaining peanut oil, sesame oil, and chili oil (if using) in the wok over medium-high heat. Once hot, add the spring onion whites, garlic, and ginger. Stir-fry for a 1-2 minutes or until fragrant.
- 9Add the dried red chilies, peanuts, and fresh red chilies to the wok. Stir-fry for another 1 minute.
- 10Add the chicken pieces and toss to combine with all the ingredients in the wok.
- 11Give the sauce in the measuring cup a quick stir with a spoon. Then add the linguini and pour the sauce over the noodles.
- 12Continuously stir-fry and toss to combine the sauce with the noodles and everything in the wok for 4-5 minutes, or until the sauce has thickened and the noodles are well coated with it. (Note: If the sauce thickens too much, feel free to add a tablespoon or water as needed to thin it out a little and continue tossing.) Then remove the wok from the heat.
- 13To Serve: Divide the Kung Pao Chicken Linguini in four plates or transfer to a serving dish. Garnish with the spring onion greens and serve.
About the Chef & Original Recipe
This recipe was published by Lavina on thatspicychick.com. Visit the original source for step-by-step photos, chef notes and additional details.
Source: thatspicychick.com