
Ombre Cake
Nutrition per Serving
547
Calories
4g
Protein
70g
Carbs
28g
Fat
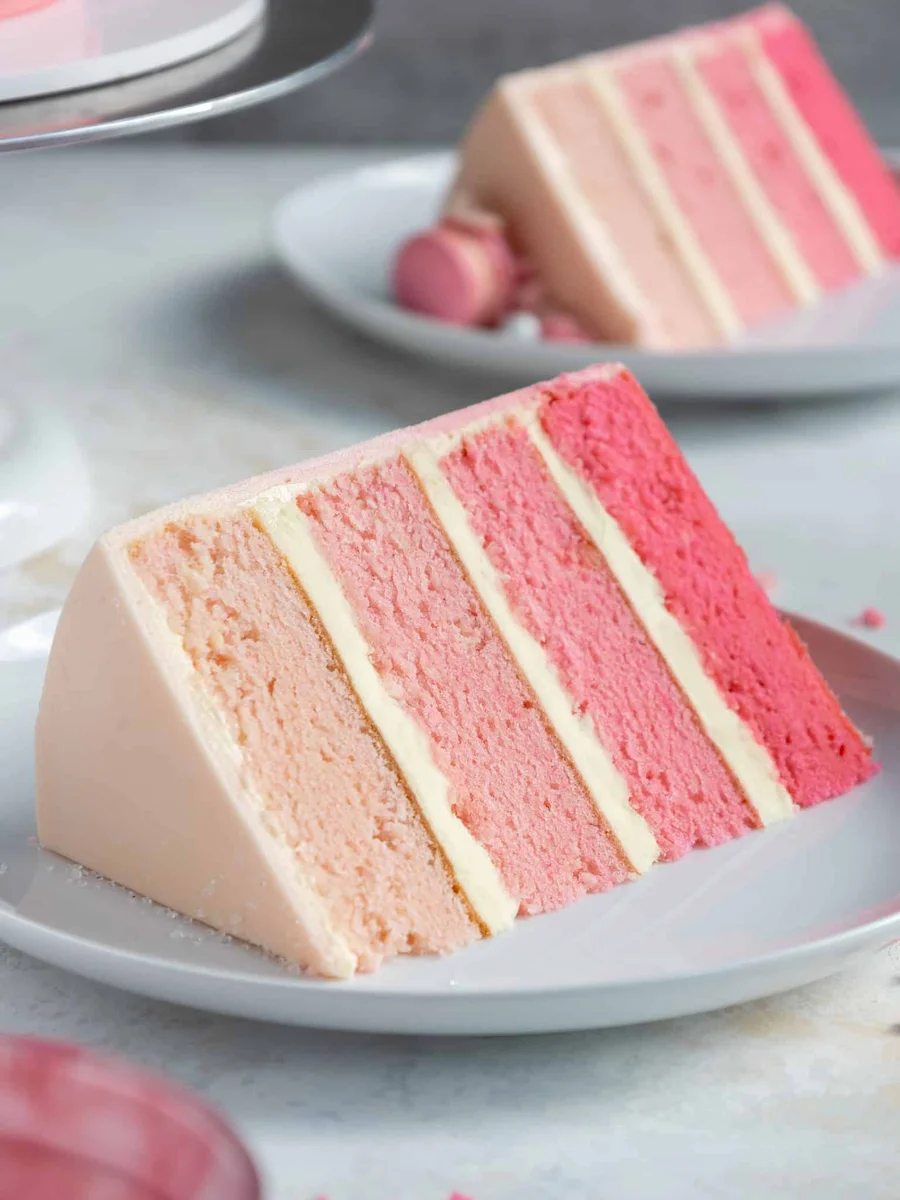
This beautiful pink ombre cake recipe bakes up so tender and delicious and is decorated with beautiful ombre buttercream and cake layers.
📝 Ingredients
- 3 cups all-purpose flour (375g)
- 3 cups granulated sugar (600g)
- 2 1/2 tsp baking powder (10g)
- 1 tsp fine salt (6g)
- 1 cup unsalted butter, room temperature (226g)
- 1 cup carton egg whites or 7 large egg whites, room temperature (235g)
- 1 1/2 cups full-fat sour cream, room temperature (360g)
- 2 Tbsp vegetable or canola oil (30g)
- 1 Tbsp vanilla extract or vanilla bean paste (12g)
- gel food coloring
- 2 cups unsalted butter, room temperature (452g)
- 1 Tbsp vanilla extract or vanilla bean paste (12g)
- 1/2 tsp fine salt (3g)
- 7 cups powdered sugar (904g or a 2 lb. bag)
- 1/3 cup heavy whipping cream, room temperature (80g)
- 1/2 batch pink ganache
- 5 Pink Gum balls
- 5 Pink Macarons
- Pink Sprinkle Blend
- 3, 8- inch cake pans or 4, 7-inch cake pans
- Spinning cake stand
- Electric hand mixer or stand mixer
- 10- inch greaseproof cake board
- Large offset spatula
- Bench Scraper
- Small Piping Bag
- Open Star Piping Tip like a Wilton 1M
👨🍳 Instructions
- 1--- Ombre Cake Layers: ---
- 2Preheat oven to 350°F / 175°C. Line four 7" or three 8" pans with parchment rounds and grease with non-stick baking spray or homemade cake pan release.
- 3Mix 3 cups all-purpose flour, 3 cups sugar, 2 1/2 tsp baking powder, and 1 tsp salt together in a stand mixer with a paddle attachment or hand mixer until fully combined.
- 4Mix in 1 cup of room temperature, unsalted butter slowly into the dry ingredients on a low speed. Continue to mix until no large chunks of butter remain, and the mixture looks like moist sand.
- 5Pour in 1 cup of egg whites and mix on low until just incorporated. Scrape the sides and bottom of the bowl as needed with a rubber spatula.
- 6Then mix in 1 1/2 cups sour cream, 2 Tbsp of vegetable oil, and 1 Tbsp of vanilla on a low speed until fully incorporated.
- 7Scrape down the sides of the bowl with a rubber spatula one more time, then beat on a medium speed for about 30 seconds to make sure everything is properly mixed together. This also helps lighten the texture of the cake layers.
- 8Add a small squirt of gel food coloring in the bowl and stir until evenly colored. If you're making 4 cake layers, scoop 450 grams (about 2.5 cups) of batter into one of the pans. Repeat 3 more times, creating increasingly deeper colored cake batter as you add in more gel food coloring. If you're making 3 cake layers, scoop 600 grams (about 3.25 cups) of batter into one of the pans. Repeat 2 more times, creating increasingly deeper colored cake batter as you add in more gel food coloring. I chose to make a pink ombre cake, but any color would look great.
- 9Bake for 33-36 minutes or until a toothpick comes out with a few moist crumbs. Rotate the pans halfway through to help them bake evenly.
- 10Let the pans cool for 10 minutes, then run a small offset spatula around the perimeter of the pan to separate the cake from the pan.
- 11Place the cake layers into the freezer for 30 minutes to accelerate the cooling process. Once the layers are fully cooled, carefully flip the pans, and remove the layers.
- 12Use a serrated knife to level the tops of the layers right before you plan to assemble your cake, or you can wrap and freeze them if you're making them in advance.
- 13If you make these cake layers in advance and freeze them, let them thaw for about 20 minutes before making the cake. The cake layers should still be slightly cold to the touch, which will make it easier to assemble the cake.
- 14--- Ombre Buttercream Frosting: ---
- 15While the cake layers bake and cool, make the vanilla buttercream frosting.
- 16In the bowl of a stand mixer or a large bowl, beat 2 cups of unsalted butter on a medium speed for 30 seconds with a stand mixer and paddle attachment or hand mixer until smooth.
- 17Mix in 1 Tbsp of vanilla extract and 1/2 tsp salt on a low speed.
- 18Gradually mix in 7 cups of powdered sugar and 1/3 cup of heavy cream on a low speed.
- 19Continue to mix on a low speed for a few minutes until the desired consistency is reached. If the frosting seems too thick, add in additional cream (1 Tbsp at a time). If the frosting seems too thin, add in more powdered sugar (quarter of a cup at a time).
- 20Wait to color the buttercream until the cake has been filled and crumb coated. Cover the buttercream flush with plastic wrap to prevent crusting, then set aside.
- 21--- Assembling This Pink Ombre Cake: ---
- 22Stack and frost the cake layers on a greaseproof cake board or flat plate using a dab of frosting to help stick the first cake layer to the board. Start with the deepest color on the bottom and work your way up to the lightest color.
- 23Spread an even layer of buttercream between each cake layer with a large offset spatula. Place the top cake layer upside down to make it easier to frost and create sharp corners.
- 24Add a thin coat of frosting around the cake to fully cover the cake layers. Smooth using a bench scraper, then chill the cake in the fridge (30 minutes) or freezer (10 minutes) until the frosting is firm to the touch.
- 25While the cake chills, make the ombre buttercream. Add a small squirt of the same gel food coloring that was used to make the cake layers into the bowl and stir just until evenly colored. Cover the top of the cake and 1/4 of the side of the cake with the lightly colored buttercream.
- 26Add another small squirt of gel food coloring, then spread a ring of buttercream underneath the lightest color of buttercream with a small offset spatula. Gently blend the different shades of frosting together where they meet. Repeat 2 more times, until there are 4 deepening shades of frosting covering the cake.
- 27Use a bench scraper to smooth the frosting, then decorate as desired! I used the leftover frosting to pipe some swirls on top of the cake and added on a partial drip and some mini macarons.
- 28If you're making this cake in advance, it can sit at room temperature for up to a day or be stored in the fridge for up to a week.
About the Chef & Original Recipe
This recipe was published by chelsweets.com. Visit the original source for step-by-step photos, chef notes and additional details.
Source: chelsweets.com