
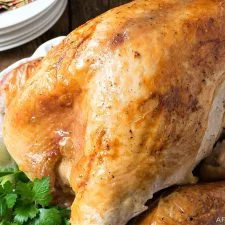
Juicy Roast Turkey
Nutrition per Serving
430
Calories
61g
Protein
5g
Carbs
17g
Fat
Juicy Roast Turkey is totally possible with this clever cooking tip from Chef Jacques Pepin.
📝 Ingredients
- One turkey, 12-15 pounds
- 4 medium carrots, sliced
- 2 celery stalks, cut up into pieces
- 1 large onion, quartered
- 1/2 cup butter, 1 stick divided
- 1 teaspoon kosher salt, plus more as needed
- 1/2 teaspoon freshly ground black pepper, plus more as needed
- 1 quart chicken broth, divided
👨🍳 Instructions
- 1Preheat oven to 325 degrees F. with rack in lowest position and upper racks removed.
- 2Remove neck and gizzards. Save for other recipes if desired.
- 3Rinse the turkey inside and out under cold running water, then pat dry with paper towels.
- 4Place the turkey on your cutting board breast up, and with a very sharp knife, cut around each leg, thigh and wing joint but not all the way through.
- 5The bone should stay attached but the flesh cut around each joint. Once complete, the thighs and drumstick should be splayed out on the board skin-down but still attached to the whole turkey. Same with the wing section, splayed out but still attached. Nip off the wing tip and save for stock.
- 6Place carrots, celery and onions in the bottom of a large roasting pan and cover with a flat rack (not the V-shape rack that came with your pan). I used two small racks side by side over the vegetables.
- 7Lift the turkey up by holding the legs, thighs and wings against the turkey as you lift and set it back down on the rack, letting the legs, thighs and wings fall to the side of the turkey onto the rack, again still attached.
- 8Melt half the butter and brush over all exposed skin.
- 9Sprinkle salt and pepper over the buttered turkey.
- 10Dot the inside of the thighs and legs with two tablespoons of cold butter, leaving the last two tablespoons for after the roast is cooked.
- 11Pour two cups of the chicken broth over the vegetables.
- 12Remove the probe that came with your turkey and replace it with your own probe and set your alarm to alert you at 150 degrees F. Not fully cooked yet and will cook further.
- 13Make a tent out of two large pieces of foil crimped together in the center and cover the turkey, or if your pan came with a cover, use that.
- 14Our 13½ pound turkey took exactly two hours to reach 150 degrees F.
- 15Remove the turkey from the oven and save the foil for later. Remove the probe. Note, if juice leaks from the probe hole, roll up a little piece of foil into a small cone shape and plug the hole. (This really works well)
- 16Raise the oven to 500 degrees F. If you have convection, turn that on.
- 17Pour the remaining two cups of broth into the pan bottom.
- 18Use butchers’ twine and tie the two drumstick ends together by tying one and then the other and pulling them together. This will expose the outside leg and thigh so it can brown in the next step.
- 19Do the same with the wing ends but wrap the string under the turkey drumsticks and back around to each wing end, pulling and tying tight so they brown.
- 20Brush the whole turkey again with the remaining butter melted, making sure the skin around the legs, thighs and wings get brushed.
- 21Add additional salt and pepper if desired.
- 22Place back into the oven uncovered and brown. I checked every ten minutes and mine browned in 30 minutes. After this 30-minute browning, the internal temperature of the turkey will have risen to a safe temperature of 160 degrees F.
- 23Remove from oven place on a platter and loosely cover with the foil saved from earlier and let rest 20 minutes while you work on any side dishes, gravy or pan drippings.
- 24When ready to serve, cut off all string. The legs, thighs and wings should have stayed upright during browning for an attractive finished turkey display for your table. You could also do as we did and completely carve the turkey in the kitchen and serve it all sliced, and on a platter, ready for serving.
About the Chef & Original Recipe
This recipe was published by A Family Feast on afamilyfeast.com. Visit the original source for step-by-step photos, chef notes and additional details.
Source: afamilyfeast.com