
Soft, Fluffy Buckwheat Bread (Gluten-Free, Dairy-Free)
Nutrition per Serving
262
Calories
5g
Protein
38g
Carbs
11g
Fat
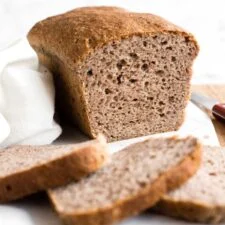
This super easy buckwheat bread is incredibly soft, fluffy and tender, and tastes delicious with a texture and look that's uncannily similar to whole wheat bread! Totally gluten-free and dairy-free too, but you wouldn't even know! We love making avocado toast with it, or spreading plenty of jam or honey all over. No matter how you eat it, it's sure to be a favorite!
📝 Ingredients
- 1 3/4 cup gluten-free all-purpose flour
- 1 teaspoon xanthan gum (leave this out if your flour blend already includes it)
- 1/2 cup buckwheat flour
- 1/4 cup psyllium husk powder
- 1 teaspoon baking powder
- 2 1/4 teaspoons instant yeast
- 2 tablespoons sugar
- 1 teaspoon salt
- 1/3 cup vegetable oil
- 1 teaspoon apple cider vinegar
- 1 1/2 cups warm water (approx. 105 to 110F)
- 2 large eggs, beaten (room temperature)
👨🍳 Instructions
- 1Grease and Preheat: Grease a 9″x4″ nonstick metal loaf pan with oil and preheat the oven to 350F. Arrange the oven rack to the middle position.
- 2Combine Dry Ingredients: In a large mixing bowl, whisk the gluten-free all-purpose flour, xanthan gum (if using), buckwheat flour, psyllium husk, baking powder, salt, instant yeast, and sugar together.
- 3Add Wet Ingredients: Add the vegetable oil, apple cider vinegar, warm water, and mix well until combined. Add the beaten eggs and mix for another minute until you get a dough that resembles thick cake batter (the dough will be sticky and wet, but that’s perfectly fine).
- 4Transfer Dough to Pan: Transfer the dough to the prepared loaf pan and smooth out the top with a wet spatula.
- 5Let Dough Rise: Cover the pan with a kitchen towel and let it rise for the next 30 minutes in a warm, draft-free place until it has roughly doubled in size.
- 6Bake for 40 to 50 minutes until the bread is dark brown on top and sounds hollow when tapped.
- 7Cool Completely: Let the loaf cool for at least 10 minutes in the pan, before removing and cooling fully on a wire rack.
- 8Slice and Enjoy: Use a serrated knife to slice once the bread is totally cool and enjoy!
About the Chef & Original Recipe
This recipe was published by Felicia Lim on dishbydish.net. Visit the original source for step-by-step photos, chef notes and additional details.
Source: dishbydish.net