
Nasi goreng (indonesischer gebratener Reis)
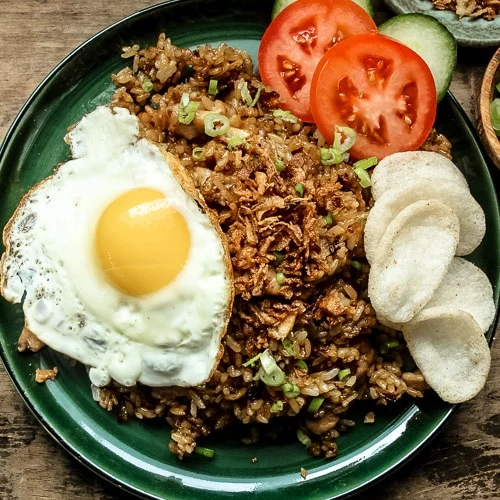
Nasi goreng ist ein beliebter indonesischer gebratener Reis, der bei jedem Bissen voller Geschmack steckt und wahrscheinlich zu den köstlichsten gebratenen Reisgerichten überhaupt gehört. Seine einzigartige dunkelbraune Farbe entsteht, wenn die süße Sojasauce (kecap manis) karamellisiert; eine salzige Garnelenpaste verleiht ihm viel Umami.
Zutaten
- 3 cups rice ((day old, cold))
- 1 tablespoon butter
- oil
- 3 cloves garlic
- 2-3 small shallots ((or 1 small onion, approx. 1/3 cup))
- 2 1/2 teaspoons shrimp paste ((or 3 tablespoons of fish sauce. See notes about shrimp paste))
- 2 1/2 tablespoons kecap manis
- 1-2 bird's eye chili ((or 1 tablespoon of sambal olek hot sauce))
- 1 stalk green onion ((use the whites for marinades, and the greens for a garnish))
- 2 boneless chicken thighs ((or 1 chicken breast, or 1 1/2 cups of ground meat))
- 1 tablespoon fish sauce
- 3 eggs ((1 per serving))
- fried shallots/onions
- green onions
- tomato
- cucumber
Zubereitung
- 1
--- Preparation ---
- 2
Start by breaking up the leftover rice (3 cups rice into small pieces by hand. The smaller, the better as it helps the rice to fry evenly.
- 3
Finely mince 2-3 small shallots and 3 cloves garlic and set them aside. If you are making it spicy, chop 1-2 bird's eye chili as well.
- 4
Slice the tomato and cucumber and set them aside. These will be used for garnishing your plate.
- 5
Finely mince 1 stalk green onion and set them aside. Separate the greens as a garnish for the end and the whites as a marinade for the chicken.
- 6
--- Marinate the Chicken ---
- 7
Cut 2 boneless chicken thighs up into small cubes and place them in a bowl. I like to keep the skin on for more flavor and texture.
- 8
Add the whites of the green onions and 1 tablespoon fish sauce and set it aside to marinate.
- 9
--- Make the Fried Egg ---
- 10
Fry a sunny side up egg and set it aside for later. Fry 1 egg per serving, so if you're making two servings, make 2 eggs.
- 11
--- Make the Fried Rice ---
- 12
In a large skillet or wok, set the heat to medium-high. Once the pan is hot, add in oil (don't be shy with the oil) and 1 tablespoon butter. Then add in the marinated diced chicken and cook it until it is fully cooked which will take approximately 2-3 minutes.
- 13
Add in the minced shallots. Cook until they are soft for 2 minutes, then add in the minced garlic and toast it for 1 minute.
- 14
Push the chicken aside and add in 2½ teaspoons shrimp paste and toast it for about 1 minute or until it turns a darker color. (If you are using fish sauce, do not add it yet)
- 15
Add the 3 cups rice and mix everything together. Cook the rice for about 2-3 minutes. Use this time to also break up any lumps of rice into individual grains.
- 16
Add in 2½ tablespoons kecap manis and turn up the heat to high to toast the rice and caramelize the sugars in the sauce for about 2 minutes. (If you are using fish sauce, add in 3 tablespoons now.)
- 17
Do a Taste Test. Everyone has a different preference when it comes to their sweet and salty balance. Do a taste test and adjust to how you like it. I personally like a 1:1 balance of salty and sweet, but if you like it sweeter, add more kecap manis. I also like my nasi goreng quite flavorful, if you find this too strong in flavor, add 1/4 cup to 1/2 cup more rice to bring it down a notch.
- 18
Add in the green part of the green onions, turn off the heat and mix well.
- 19
--- Plate and Garnish ---
- 20
Place the nasi goreng fried rice on a plate or bowl and place the cucumber and tomatoes on the side. If you are using shrimp/prawn crackers, add a few on the side as well.
- 21
Sprinkle some fried shallots/onions. (I like to use a lot, and find when mixed into the rice gives it a lot of extra flavor and texture).
- 22
Add the fried egg on top and enjoy!
Nach dem Original kochen
Dieses Rezept stammt von pupswithchopsticks.com. Dort findest du die Fotos, Notizen und Tipps der Autorin oder des Autors – der beste Ort, um es nachzukochen.
Rezept auf pupswithchopsticks.com öffnen