
Pain moelleux et léger à la farine de riz complet (sans gluten, sans produits laitiers)
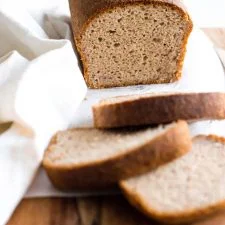
Ce pain à la farine de riz complet, moelleux et léger, est simple à préparer et idéal pour faire des sandwichs ou être grillé et tartiné de beurre et de confiture. Préparé avec de la farine de riz complet pour un apport supplémentaire en fibres, ce pain levé facile est entièrement sans gluten et sans produits laitiers.
Ingrédients
- 2 cups brown rice flour
- 1 3/4 cups warm water (approximately 105F – 115F)
- 1/4 cup sunflower oil
- 1/4 cup psyllium husk powder
- 1 tablespoon instant yeast
- 2 tablespoons sugar
- 3/4 teaspoons xanthan gum
- 2 eggs, room temperature
- 1 teaspoon baking powder
- 1/2 teaspoon salt
Préparation
- 1
Grease an 8″x4″ metal loaf pan.
- 2
Whisk Dry Ingredients: In a large mixing bowl, whisk the brown rice flour, psyllium husk powder, instant yeast, sugar, baking powder, xanthan gum, and salt together.
- 3
Add Liquid Ingredients: Add the warm water, sunflower oil, and eggs to the dry ingredients and mix well to get a wet and shaggy dough (the dough is supposed to be shaggy, so don’t worry).
- 4
Transfer to Pan: Transfer the dough to the greased loaf pan and smooth out the top with a spatula.
- 5
Let Dough Rise: Cover the dough pan with a kitchen towel and let the dough rise approximately 30 to 40 minutes in a warm, draft-free place until it has almost doubled in size. (Tip: I like to place the loaf pan in my microwave with the power off – it creates the perfect draft-free and warm environment for rising dough).
- 6
Preheat Oven: During the last 10 minutes of the dough rising, preheat oven to 350F and adjust the oven rack to the middle position.
- 7
Bake the dough for 40 to 50 minutes until bread has turned dark brown on top and the loaf sounds hollow when tapped. Remove loaf from the oven.
- 8
Cool Completely: Let the loaf cool for 10 minutes in the loaf pan, before removing and letting it cool completely on the wire rack. Use a serrated bread knife to slice once the loaf has completely cooled.
Cuisinez-la avec la recette originale
Cette recette vient de dishbydish.net. Leur page propose les photos, les notes et les astuces de l’auteur : le meilleur endroit pour la cuisiner.
Voir la recette sur dishbydish.net