
Pain moelleux et léger au sarrasin (sans gluten, sans produits laitiers)
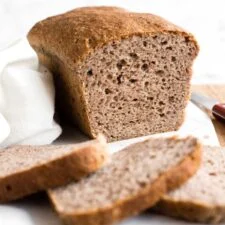
Ce pain au sarrasin très facile à préparer est incroyablement moelleux, léger et tendre, et son goût, sa texture et son apparence ressemblent étonnamment à ceux du pain complet ! Il est entièrement sans gluten et sans produits laitiers, mais on ne le devinerait même pas ! Nous aimons en faire des tartines à l’avocat ou le tartiner généreusement de confiture ou de miel. Quelle que soit la façon dont vous le dégustez, il deviendra sûrement l’un de vos préférés !
Ingrédients
- 1 3/4 cup gluten-free all-purpose flour
- 1 teaspoon xanthan gum (leave this out if your flour blend already includes it)
- 1/2 cup buckwheat flour
- 1/4 cup psyllium husk powder
- 1 teaspoon baking powder
- 2 1/4 teaspoons instant yeast
- 2 tablespoons sugar
- 1 teaspoon salt
- 1/3 cup vegetable oil
- 1 teaspoon apple cider vinegar
- 1 1/2 cups warm water (approx. 105 to 110F)
- 2 large eggs, beaten (room temperature)
Préparation
- 1
Grease and Preheat: Grease a 9″x4″ nonstick metal loaf pan with oil and preheat the oven to 350F. Arrange the oven rack to the middle position.
- 2
Combine Dry Ingredients: In a large mixing bowl, whisk the gluten-free all-purpose flour, xanthan gum (if using), buckwheat flour, psyllium husk, baking powder, salt, instant yeast, and sugar together.
- 3
Add Wet Ingredients: Add the vegetable oil, apple cider vinegar, warm water, and mix well until combined. Add the beaten eggs and mix for another minute until you get a dough that resembles thick cake batter (the dough will be sticky and wet, but that’s perfectly fine).
- 4
Transfer Dough to Pan: Transfer the dough to the prepared loaf pan and smooth out the top with a wet spatula.
- 5
Let Dough Rise: Cover the pan with a kitchen towel and let it rise for the next 30 minutes in a warm, draft-free place until it has roughly doubled in size.
- 6
Bake for 40 to 50 minutes until the bread is dark brown on top and sounds hollow when tapped.
- 7
Cool Completely: Let the loaf cool for at least 10 minutes in the pan, before removing and cooling fully on a wire rack.
- 8
Slice and Enjoy: Use a serrated knife to slice once the bread is totally cool and enjoy!
Cuisinez-la avec la recette originale
Cette recette vient de dishbydish.net. Leur page propose les photos, les notes et les astuces de l’auteur : le meilleur endroit pour la cuisiner.
Voir la recette sur dishbydish.net