
Tarta de queso Biscoff (¡5 ingredientes!)
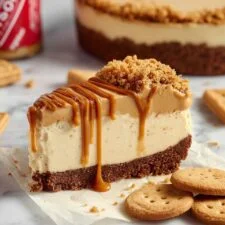
Esta tarta de queso Biscoff es un postre delicioso y cremoso, sin horno, con los intensos sabores de las galletas Biscoff y su crema para untar. Con solo cinco ingredientes principales, es un capricho fácil de preparar y muy goloso, perfecto para cualquier ocasión. La base crujiente de galletas Biscoff, junto con el relleno suave y aterciopelado de tarta de queso con Biscoff y la cobertura de Biscoff fundido, crea un postre decadente en capas que impresionará a familiares y amigos.
Ingredientes
- 200 g (7 oz) Biscoff biscuits, crushed
- 80 g (3 oz) unsalted butter, melted
- 300 ml (1.25 cups) double cream
- 400 g (14 oz) full fat cream cheese
- 200 g (7 oz) Biscoff spread
- 150 g (5 oz) Biscoff spread, melted
- 50 g (2 oz) Biscoff biscuits, crushed
Preparación
- 1
Prepare the base: Combine the crushed Biscoff biscuits with the melted unsalted butter until well mixed. Press this mixture firmly into the base of a springform or removable base tin. Chill the base in the fridge while you prepare the filling.
- 2
Make the cheesecake filling: In a bowl, pour in the double cream, add the full fat cream cheese and the Biscoff spread. Whisk vigorously—an electric whisk works best—until the mixture is very thick and creamy, resembling the texture of ice cream.
- 3
Assemble the cheesecake: Remove the chilled biscuit base from the fridge and spread the cheesecake mixture evenly over the base, smoothing the top with a spatula or the back of a spoon.
- 4
Chill the cheesecake: Place the assembled cheesecake back into the fridge and chill for at least 3 hours. For best results, allow it to chill overnight to set firmly.
- 5
Prepare the topping: When ready to serve, gently melt the remaining 150 g of Biscoff spread in a pan over low heat. Take care not to overheat; it should be warm and pourable but not hot.
- 6
Add the topping: Remove the cheesecake from the fridge and, while still in the tin, pour the melted Biscoff spread evenly over the top layer. Smooth out gently with the back of a spoon without disturbing the cheesecake layer below. Sprinkle the crushed Biscoff biscuits around the edge for decoration.
- 7
Final chill: Return the cheesecake to the fridge for at least one more hour to allow the topping to set fully. While it can be cut sooner, waiting will give cleaner slices.
- 8
Serve: To serve, run a warmed dinner knife carefully around the edges inside the tin to loosen the cheesecake before removing the sides. Cut into 12 slices and enjoy your creamy Biscoff cheesecake.
Cocínala con la receta original
Esta receta es de busyrecipe.com. En su web tienes las fotos, las notas y los consejos del autor: es el mejor sitio para cocinarla.
Ver la receta en busyrecipe.com