
Bolitas de coco sin horno
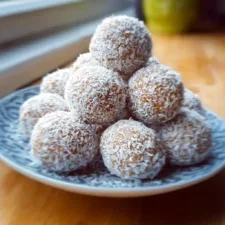
Ingredientes
- 1 (14-ounce) can Sweetened Condensed Milk: This is the magic ingredient that acts as both the sweetener and the binder, holding the balls together and providing a rich, creamy texture. Do not substitute with evaporated milk, as it will not work.
- 5 cups Sweetened, Shredded Coconut: You’ll need this divided. Four cups will form the body of the coconut balls, and the remaining one cup will be used for coating the outside, giving them their classic snowball appearance and an extra layer of texture. Sweetened coconut provides the best moisture and chewiness for this recipe.
- 1 teaspoon Pure Vanilla Extract: This enhances and deepens the other flavors, adding a warm, aromatic note that beautifully complements the sweet coconut.
- 1/8 teaspoon Salt (Optional): A tiny pinch of salt doesn’t make the balls salty; instead, it works to balance the sweetness from the condensed milk and coconut, making the overall flavor profile more complex and satisfying.
Preparación
- 1
Prepare Your Workstation: Before you begin, line a large baking sheet or tray with parchment paper or wax paper. This is a crucial step that will prevent the sticky coconut balls from adhering to the surface, making for easy removal and an even easier cleanup. Set it aside.
- 2
Combine the Main Ingredients: In a large mixing bowl, combine 4 cups of the sweetened, shredded coconut with the optional salt, if you’re using it. Give it a quick stir with a spatula to distribute the salt evenly.
- 3
Add the Wet Ingredients: Pour the entire can of sweetened condensed milk over the coconut. Add the teaspoon of pure vanilla extract.
- 4
Mix Thoroughly: Using a sturdy spatula or a wooden spoon, begin to mix everything together. Scrape the bottom and sides of the bowl frequently to ensure all the dry coconut is incorporated. The mixture will be very thick and sticky. Continue mixing until you have a uniform, dense paste where all the coconut is evenly moistened by the condensed milk.
- 5
The Crucial Chilling Step: Cover the mixing bowl with plastic wrap and place it in the refrigerator for at least 30 minutes, or up to an hour. Do not skip this step! Chilling the mixture solidifies the fats in the coconut and condensed milk, making the sticky “dough” much firmer and far easier to roll into neat balls. If you’re short on time, you can place the bowl in the freezer for 15 minutes.
- 6
Prepare the Coating: While the mixture is chilling, pour the remaining 1 cup of shredded coconut into a shallow bowl or onto a small plate. Spread it out so you have an even surface for rolling.
- 7
Shape the Balls: Once the mixture is chilled and firm, remove it from the refrigerator. To ensure uniform size, use a small cookie scoop or a tablespoon to portion out the mixture. Scoop out a portion and roll it firmly between the palms of your hands to form a smooth, compact ball, approximately 1 to 1.5 inches in diameter. If the mixture starts sticking to your hands, you can lightly dampen your palms with a little water.
- 8
Coat the Balls: Immediately after rolling each ball, drop it into the shallow bowl of shredded coconut. Gently roll it around until it is completely coated on all sides. The outer layer of coconut not only looks beautiful but also makes the balls less sticky to the touch.
- 9
Arrange and Set: Place the finished coconut ball on your prepared parchment-lined baking sheet. Repeat the scooping, rolling, and coating process with the remaining mixture, arranging the balls in a single layer on the sheet without them touching.
- 10
Final Chill for Setting: Once all the balls are formed and coated, place the entire baking sheet back into the refrigerator for at least one more hour. This final chill allows the coconut balls to fully set and firm up, ensuring they hold their shape perfectly and develop the ideal chewy texture. After this step, they are ready to be served or stored.
Cocínala con la receta original
Esta receta es de betterhomerecipes.com. En su web tienes las fotos, las notas y los consejos del autor: es el mejor sitio para cocinarla.
Ver la receta en betterhomerecipes.com