
Tarta de chocolate sin horno
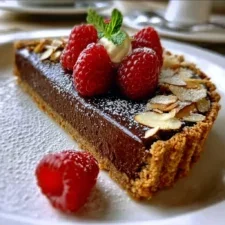
Ingredientes
- For the Chocolate Cookie Crust: 32 Chocolate Sandwich Cookies (e.g., Oreos), about 350g or 12.3 oz: These form the foundation of our tart. The combination of the dark, crunchy cookie and the sweet cream filling provides a complex flavor and eliminates the need for extra sugar in the crust. You will use the entire cookie, filling and all.
- 6 Tablespoons (85g or 3 oz) Unsalted Butter, melted: This is the binder that holds our cookie crumbs together, transforming them from a loose powder into a firm, sliceable crust. Using unsalted butter allows you to control the final saltiness of the dessert.
- For the Silky Chocolate Ganache Filling: 1 1/2 cups (360ml) Heavy Whipping Cream: The high fat content of heavy cream (typically 36% or more) is absolutely essential for creating a stable, rich, and creamy ganache that will set up firmly without being greasy. Do not substitute with milk or half-and-half.
- 12 ounces (340g) High-Quality Semi-Sweet Chocolate, finely chopped: This is the star of the show. Using a good quality chocolate bar (between 60-70% cacao) instead of chocolate chips will result in a smoother, more luxurious melt and a deeper chocolate flavor. Chocolate chips often contain stabilizers that can prevent them from melting as silkily.
- 1 teaspoon Pure Vanilla Extract: A small amount of vanilla doesn’t make the tart taste like vanilla; instead, it enhances and rounds out the deep flavors of the chocolate, adding a layer of aromatic complexity.
- 1/4 teaspoon Fine Sea Salt: Salt is a flavor enhancer. A tiny pinch cuts through the richness of the ganache and balances the sweetness, making the chocolate taste even more chocolaty.
Preparación
- 1
Crush the Cookies: Place the 32 chocolate sandwich cookies into the bowl of a food processor. Pulse several times to break them up, then process on high until they are reduced to very fine, consistent crumbs. You shouldn’t see any large cookie chunks remaining. Alternative Method: If you don’t have a food processor, place the cookies in a large, sturdy zip-top bag. Seal it, pressing out as much air as possible. Use a rolling pin or a heavy-bottomed pan to crush the cookies until they are a fine, sandy powder. This method requires a bit more effort but works just as well.
- 2
Combine with Butter: Transfer the fine cookie crumbs to a medium-sized mixing bowl. Pour the 6 tablespoons of melted unsalted butter over the crumbs. Using a fork or a spatula, mix thoroughly until all the crumbs are evenly moistened. The final mixture should have the consistency of wet sand and should clump together when you press it between your fingers.
- 3
Form the Crust: Tip the buttery crumb mixture into a 9-inch tart pan with a removable bottom. This type of pan is highly recommended as it makes removing the finished tart incredibly easy and clean. Using your fingers and the flat bottom of a measuring cup or glass, firmly press the crumbs into the base and up the sides of the pan. Strive for an even thickness all around to ensure a sturdy structure. Pay special attention to the corner where the base meets the sides.
- 4
Chill the Crust: Place the prepared tart crust into the freezer for at least 15-20 minutes while you prepare the ganache filling. This step is crucial as it helps the butter solidify, creating a firm base that won’t crumble when you pour in the warm filling.
- 5
Prepare the Chocolate: While the crust is chilling, finely chop your 12 ounces of semi-sweet chocolate. The smaller and more uniform the pieces, the more quickly and evenly they will melt when the hot cream is added. This is the single most important step for preventing lumps. Place all the chopped chocolate in a medium-sized, heatproof bowl. Add the ¼ teaspoon of fine sea salt directly to the chocolate.
- 6
Heat the Cream: Pour the 1 ½ cups of heavy whipping cream into a small saucepan. Heat over medium heat, stirring occasionally. Watch it closely. You want to bring the cream to a gentle simmer, where you see small bubbles forming around the edges of the pan. Do not let it come to a full, rolling boil, as this can cause the final ganache to break or become oily.
- 7
Combine and Emulsify: As soon as the cream reaches a simmer, immediately pour it all over the chopped chocolate in the bowl. Ensure all the chocolate is submerged. Do not stir it yet. Let the mixture sit, undisturbed, for a full 5 minutes. This allows the heat from the cream to gently and thoroughly melt the chocolate from the inside out.
- 8
Create the Emulsion: After 5 minutes, add the 1 teaspoon of vanilla extract. Now, begin to stir. Start from the very center of the bowl, using a small whisk or a spatula, and make small, slow circles. As you stir, you will see a glossy, smooth emulsion begin to form in the center. Gradually widen your circles, incorporating the melted chocolate from the sides of the bowl. Continue stirring slowly and gently until the mixture is completely smooth, uniform in color, and has a beautiful, glossy sheen. Avoid whisking vigorously, as this can incorporate too much air.
- 9
Fill the Tart Shell: Remove your chilled crust from the freezer. Pour the warm, silky ganache directly into the prepared crust. Use your spatula to gently spread the ganache into an even layer, ensuring it reaches all the edges.
- 10
Chill to Set: Carefully transfer the assembled tart to the refrigerator. It needs to chill for a minimum of 4 to 6 hours to set completely. For the best, firmest texture that allows for clean slicing, chilling it overnight is highly recommended. The ganache will transform from a liquid to a firm, yet melt-in-your-mouth, consistency.
- 11
Serve and Enjoy: Once fully set, you can garnish the tart as desired before serving. To release it from the pan, place the tart on a can or jar and gently push down on the outer ring of the tart pan. It should slide off easily. Slice and serve chilled.
Cocínala con la receta original
Esta receta es de betterhomerecipes.com. En su web tienes las fotos, las notas y los consejos del autor: es el mejor sitio para cocinarla.
Ver la receta en betterhomerecipes.com