
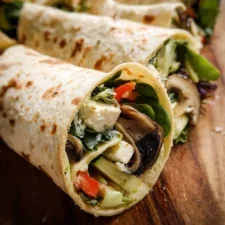
Wraps de verduras con ajo asado
Ingredientes
- 1 Red Bell Pepper: Sliced into thin strips. Its sweetness intensifies beautifully when roasted.
- 1 Yellow or Orange Bell Pepper: Sliced into thin strips. Adds a different color and a slightly milder sweet flavor.
- 1 Large Zucchini: Sliced into half-moons, about 1/4-inch thick. Provides a tender, satisfying bite.
- 1 Red Onion: Sliced into thin wedges. It caramelizes wonderfully, losing its sharp bite and becoming sweet and savory.
- 1 cup Cremini Mushrooms: Sliced. These add a fantastic umami depth and a meaty texture.
- 1 (15-ounce) can Chickpeas (Garbanzo Beans): Rinsed, drained, and patted thoroughly dry. They become slightly crispy and add essential protein and fiber.
- 2 tablespoons Olive Oil: The foundation for roasting, helping the vegetables to caramelize without burning.
- 1 teaspoon Dried Oregano: Lends a classic, earthy Mediterranean flavor.
- 1/2 teaspoon Smoked Paprika: Adds a subtle smokiness that complements the roasted vegetables perfectly.
- Salt and Freshly Ground Black Pepper: To taste, to enhance all the other flavors.
- 1 whole head of Garlic: This is the star of the aioli, providing a sweet, mellow, and deeply aromatic garlic flavor without the harshness of raw garlic.
- 1 teaspoon Olive Oil: For roasting the garlic.
- 3/4 cup High-Quality Mayonnaise: Use a good quality brand for the best creamy texture and flavor. You can substitute with Greek yogurt for a lighter, tangier version.
- 1 tablespoon Fresh Lemon Juice: Brightens up the aioli and cuts through the richness of the mayonnaise.
- 1/2 teaspoon Dijon Mustard: Adds a slight tang and complexity to the sauce.
- Salt and Freshly Ground Black Pepper: To taste.
- 6-8 Large Flour Tortillas or Wraps: Choose your favorite type – whole wheat, spinach, or gluten-free all work wonderfully.
- 2 cups Fresh Spinach or Arugula: Adds a fresh, peppery bite that contrasts with the rich roasted vegetables.
- Optional: 1/2 cup Crumbled Feta Cheese: For a salty, briny kick that complements the vegetables.
Preparación
- 1
Preheat and Prep: Begin by preheating your oven to 400°F (200°C). Line a large, rimmed baking sheet with parchment paper for easy cleanup. This also prevents the vegetables from sticking.
- 2
Prepare the Garlic: Take the whole head of garlic and slice off the top ¼ inch, just enough to expose the tops of the individual cloves. Place the garlic head on a small piece of aluminum foil. Drizzle the exposed cloves with 1 teaspoon of olive oil and a pinch of salt. Wrap the foil loosely around the garlic to create a small packet.
- 3
Combine the Vegetables: In a large mixing bowl, combine the sliced bell peppers, zucchini, red onion, mushrooms, and the thoroughly dried chickpeas. Drizzle with 2 tablespoons of olive oil. Sprinkle the dried oregano, smoked paprika, salt, and pepper over the top.
- 4
Toss to Coat: Use your hands or a large spoon to toss everything together until the vegetables and chickpeas are evenly coated in the oil and spices. Don’t be shy; ensure every piece is glistening.
- 5
Arrange for Roasting: Spread the seasoned vegetables in a single, even layer on the prepared baking sheet. It is crucial not to overcrowd the pan. If necessary, use two baking sheets. Overcrowding will cause the vegetables to steam instead of roast, and you won’t get those delicious caramelized edges. Place the foil-wrapped garlic packet directly on the baking sheet alongside the vegetables.
- 6
Roast to Perfection: Place the baking sheet in the preheated oven. Roast for 25-30 minutes, tossing the vegetables halfway through the cooking time. The vegetables are done when they are tender, slightly shrunken, and have developed deep brown, caramelized spots. The chickpeas should be slightly firm and toasted.
- 7
Cool the Garlic: Once done, remove the baking sheet from the oven. Carefully open the foil packet (it will be hot and steamy) and set the roasted garlic aside to cool down for at least 10 minutes, or until it’s cool enough to handle.
- 8
Extract the Garlic: Once the roasted garlic head is cool enough to touch, simply squeeze the base of the head. The softened, caramelized cloves should pop right out of their skins into a small bowl. They will be soft, fragrant, and paste-like.
- 9
Create the Garlic Paste: Using the back of a fork, mash the roasted garlic cloves into a smooth, uniform paste.
- 10
Combine Aioli Ingredients: In a medium bowl, combine the ¾ cup of mayonnaise (or Greek yogurt), the fresh lemon juice, Dijon mustard, and the mashed roasted garlic paste.
- 11
Whisk Until Smooth: Whisk all the ingredients together until the mixture is completely smooth, creamy, and uniform in color.
- 12
Season and Rest: Season the aioli with salt and pepper to your taste. For the best flavor, allow the aioli to sit for at least 10-15 minutes to let the flavors meld together. You can also make this a day ahead and store it in the refrigerator.
- 13
Warm the Tortillas: For the best texture and pliability, warm the tortillas. You can do this by heating them one at a time in a dry skillet over medium heat for about 30 seconds per side, or by wrapping the stack in a damp paper towel and microwaving for 30-45 seconds.
- 14
Layer the Aioli: Lay a warm tortilla flat on a clean surface. Spread a generous layer (about 1-2 tablespoons) of the Roasted Garlic Aioli evenly across the center of the tortilla, leaving a border around the edges.
- 15
Add the Greens: Place a handful of fresh spinach or arugula on top of the aioli. The greens create a moisture barrier that helps prevent the wrap from becoming soggy.
- 16
--- n-step-16" style="margin: 0px;padding: 0px;border: 0px"> ---
- 17
Pile on the Veggies: Spoon a hearty portion of the roasted vegetable and chickpea mixture down the center of the tortilla, on top of the greens.
- 18
--- -step-17" style="margin: 0px;padding: 0px;border: 0px"> ---
- 19
Add Optional Toppings: If using, sprinkle the crumbled feta cheese over the vegetables.
- 20
Fold and Wrap: To fold the wrap, first fold in the two sides. Then, holding the sides in, take the bottom edge of the tortilla (the one closest to you) and pull it up and over the filling, tucking it in tightly. Continue to roll the wrap away from you until it’s a secure, compact cylinder.
- 21
Serve Immediately: Slice the wrap in half on a diagonal for a professional-looking presentation and serve immediately while it’s still warm.
Cocínala con la receta original
Esta receta es de betterhomerecipes.com. En su web tienes las fotos, las notas y los consejos del autor: es el mejor sitio para cocinarla.
Ver la receta en betterhomerecipes.com