
Confit de muslo de pato: 3 horas, 3 ingredientes
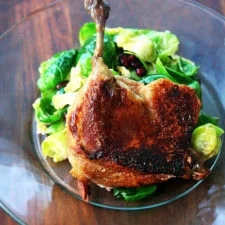
Esta no es una receta para hacer confit de pato tradicional, que suele ser un proceso largo de tres fases: salar, enjuagar y luego cocinar a fuego lento en grasa. Más bien es una receta inspirada en el confit de pato que elaboraba el chef Thien Ngo en Fork, cuando descubrió que su suministro de muchos años había sido tirado por error. Tradicionalmente, el confit también se guarda en grasa, lo que lo conserva durante meses. Ciertamente podrías hacer eso, pero si planeas dorar los muslos en pocos días, es más fácil almacenar los muslos y la grasa por separado. Sirve el confit con una ensalada verde sencilla aliñada con vinagreta de chalota. No te dejes intimidar por la cantidad de grasa aquí (ni en ninguna receta de confit). Muy poca grasa termina en la carne y el confit de pato en sí no sabe graso.
Ingredientes
- 4 duck legs
- 1 tablespoon kosher salt
- 1 lb. butter
Preparación
- 1
Preheat the oven to 325ºF.
- 2
Place duck legs in a 9×13-inch or other similarly sized baking pan — you want them to fit somewhat snuggly (more snug than what you see in the pictures is just fine). Sprinkle with the tablespoon of kosher salt. Cover legs with sticks of butter, breaking the sticks in half if necessary. Cover pan tightly with aluminum foil — use a couple of sheets of foil if necessary. Be sure to wrap tightly.
- 3
Bake for 2.5 hours. Remove pan from oven. Let cool briefly, then remove foil to cool completely. Once cool enough to handle, transfer legs to a plate (if serving immediately or within the next few hours) or a storage container (if serving on subsequent days). Transfer fat to a storage container. Label it duck fat. Store in fridge indefinitely. When you make confit again, use this fat in place of butter. (Note: You may need to pop your vat of duck fat in the microwave so that you can pour it out of its container. Alternatively, plop the container into hot water, or let it sit at room temperature for a few hours.)
- 4
If possible, bring the cooked duck legs to room temperature an hour before cooking. If you feel like being fancy, use the heel of your knife to whack off the top half of the bone nub at the end of each duck leg (see photo for guidance). Also, trim off any fat extending up the bone. Note: this is purely for presentation purposes and truly is not necessary.
- 5
Preheat the oven to 350ºF. (Note: preheating the oven is only necessary if you’ve stored your legs in the fridge.) Heat a cast iron skillet over medium heat. You should not need to add any fat to the pan — the duck legs should have enough fat clinging to their skin sides. Once hot, add duck legs skin side down. Let them crisp undisturbed for a minute or two. Shake the pan to make sure the skin isn’t sticking. If it is, use a spatula to gently separate the legs from the pan, being careful not to tear the skin. Continue crisping, repositioning the legs if necessary to ensure the skin is browning evenly, about 5 to 8 minutes total. If the legs have been refrigerated, once the skin is nicely crisped, transfer pan to the oven (no need to flip the legs over) for 5 to 10 minutes or until the meat is nicely heated through. If the legs have not been refrigerated, you probably can get away with just flipping the legs over and cooking for one minute skin side up. You don’t want to cook the legs too much on the flesh side or the meat will get too tough.
Cocínala con la receta original
Esta receta es de alexandracooks.com. En su web tienes las fotos, las notas y los consejos del autor: es el mejor sitio para cocinarla.
Ver la receta en alexandracooks.com